 | | | | | | |
| |

|
Hi all,
I’ve been lurking on these boards for years, but I thought it was high time I
created an account. I would like to share with you my model of a Deutsche Bahn
InterCityExpress (ICE 3 class 406) train set.
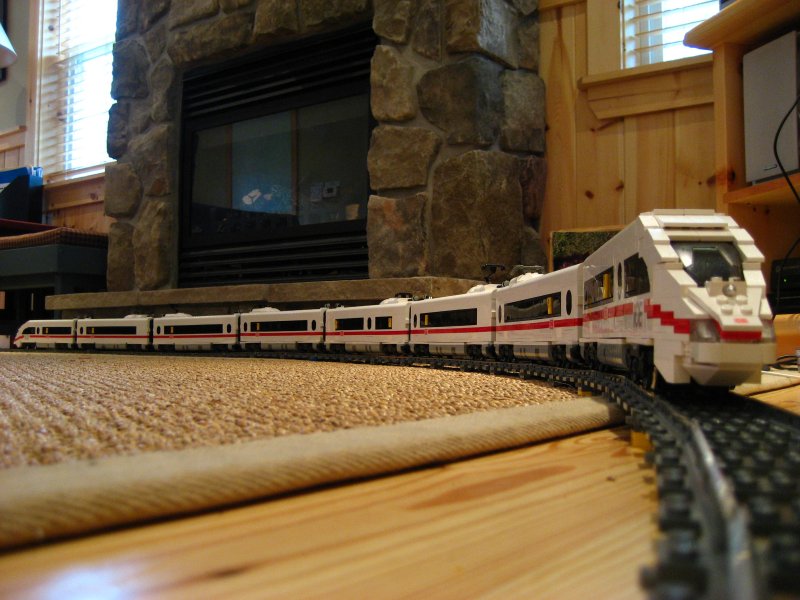
Full credit goes to James Mathis for the original design, which can be found in
his excellent Brickshelf
folder. Thanks James!
Beginning with James’ design, I made several modifications such that the model
could be built from parts that actually exist in brick form (ah the luxuries of
LDraw...). I then added a few touches of my own, most notably working lights on
the front and the rear and printed stickers.
Photos
Brickshelf Gallery
Videos
ICE 3 on long curve layout around
the main floor
ICE 3 on long curve layout around
the main floor 2
ICE 3 on long curve layout around
the main floor 3
ICE 3 on long curve layout around
the Christmas tree
In the videos, it is running on long curves made from straight track as
described in Railbricks 1 by Holger Matthes. I love this method of creating a
layout that is suitable for long trains to operate at high speed -- see
particularly the last video where I used a modified power supply with the
current increased to 3 A (helps with the electrical resistance from the long
curves).
For those who are interested, I have posted an
extended description and background in the NovaLUG forum.
Anyway, I’d welcome any feedback or ideas you may have -- thanks for reading!
Cheers,
Eric
| | | | | | | | | | | | | | | |
In lugnet.trains, Eric Bond wrote:
| |
Hi all,
I’ve been lurking on these boards for years, but I thought it was high time I
created an account. I would like to share with you my model of a Deutsche
Bahn InterCityExpress (ICE 3 class 406) train set.
Full credit goes to James Mathis for the original design, which can be found
in his excellent Brickshelf folder. Thanks James!
Beginning with James’ design, I made several modifications such that the
model could be built from parts that actually exist in brick form (ah the
luxuries of LDraw...). I then added a few touches of my own, most notably
working lights on the front and the rear and printed stickers.
Photos
Brickshelf Gallery
Videos
ICE 3 on long curve layout around
the main floor
ICE 3 on long curve layout around
the main floor 2
ICE 3 on long curve layout around
the main floor 3
ICE 3 on long curve layout around
the Christmas tree
In the videos, it is running on long curves made from straight track as
described in Railbricks 1 by Holger Matthes. I love this method of creating
a layout that is suitable for long trains to operate at high speed -- see
particularly the last video where I used a modified power supply with the
current increased to 3 A (helps with the electrical resistance from the long
curves).
For those who are interested, I have posted an
extended description and background in the NovaLUG forum.
Anyway, I’d welcome any feedback or ideas you may have -- thanks for reading!
Cheers,
Eric
|
WOW!
As a static model this train looks great. But seeing it in motion elevates it to
a whole new level of awesomeness. It looks beautiful running at high speeds
around those sweeping curves and is truly in its element. I would love to see
the interior when it’s finished.
Cale

| | | | | | | | | | | | | | | | | |
Those videos are amazing! The long curves really put realism to the train.
It looked like the train leaned into the curve a litte. Did you add a high
pivot point, so that it would lean into the curve?
Very nice setup and awesome train!
Scott
| | | | | | | | | | | | | | | | | |
That is an absolutely beautiful trainset! Seeing it on the long curves is
magnificent. I do have one suggestion/comment though. Have you thought about
using this piece http://peeron.com/inv/parts/x400 to hide the 1x2 light bulb
brick in body and route the light up to where you need it in the nose?
-Stefan-
| | | | | | | | | | | | | | | | | | |
| |
|
Thanks for the great feedback so far. I’m glad you enjoyed the videos! I had
fun making them with all the different camera angles -- there were quite a few
incidents involving the train colliding with the camera as well, so perhaps I
should post a video of “out-takes” too. ;-)
The interior is partially finished with seats and luggage storage on the inside
of the roof, but there is still more to be done (the interior of the dining car
for example). My trains are in storage right now, but when I’m back and can get
them out again, I will certainly take some pictures!
Regarding the videos, there is no tilt function built into the train, but the
tilting appearance could come from the layout itself, as some of the track on
the curves is slightly banked -- sometimes I found this helpful, particularly
when the layout went over carpet. Given the size of these long curve layouts,
they are unfortunately only ever temporary, and even so one must have
understanding companions who don’t mind watching their step. :-)
Concerning the center front lamp, that is a great idea to use the fiber optic
cable! I don’t have any of those pieces, so this had not occurred to me --
perhaps I will try to find some.
Another idea might the new Power Functions LED lamps, as they are also smaller
than the light brick. Can one hook up the PF LED lamps to the electrical pickup
on a 9V train motor?
Cheers,
Eric
| | | | | | | | | | | | | | | | | | | | |
| |
Another idea might the new Power Functions LED lamps, as they are also
smaller than the light brick. Can one hook up the PF LED lamps to the
electrical pickup on a 9V train motor?
|
The new lamps are really cool, especially in being LED. They can be a bit bulky
compared to the old light bricks though. Plus they’re permanently paired.
http://shop.lego.com/ByTheme/Product.aspx?p=8870&cn=57
I believe the bottom of these are compatible with the old 9V connectors. The
description seems to indicate so.
http://shop.lego.com/ByTheme/Product.aspx?p=8886&cn=57&d=70
-Stefan-
| | | | | | | | | | | | | | | | | | |
Very nice looking!
Thanks so much for sharing!
God Bless,
Nathan

| | | | | | | | | | | | | | | | | |
In lugnet.trains, Eric Bond wrote:
| |
Hi all,
I’ve been lurking on these boards for years, but I thought it was high time I
created an account. I would like to share with you my model of a Deutsche
Bahn InterCityExpress (ICE 3 class 406) train set.
|
| |
In the videos, it is running on long curves made from straight track as
described in Railbricks 1 by Holger Matthes. I love this method of creating
a layout that is suitable for long trains to operate at high speed -- see
particularly the last video where I used a modified power supply with the
current increased to 3 A (helps with the electrical resistance from the long
curves).
|
Cool! And also neat to see mother necessity in action with the curves. Your
implementation is the first time I’ve seen them realized. They look great in the
videos. And as battery trains are becoming the norm, they’ll be a lot easier to
implement too.
Benn
| | | | | | | | | | | | | | | | | |
In lugnet.trains, Eric Bond wrote:
| |
Hi all,
I’ve been lurking on these boards for years, but I thought it was high time I
created an account. I would like to share with you my model of a Deutsche
Bahn InterCityExpress (ICE 3 class 406) train set.
Full credit goes to James Mathis for the original design, which can be found
in his excellent Brickshelf folder. Thanks James!
|
Eric,
I’ve been lurking, as well, for some year or more. Your design of the ICE is
fantastic. I love the modifications you’ve made. Stellar set. The set runs so
smoothly along those sweeping curves-- mezmerizing, indeed!
I might make one comment on the design. The 1x3 inverted slope just in front of
the leading wheelset on the driving cabs: can that be raised by one plate? The
notch-effect there is a bit striking compared to the smooth taper of the rest of
the sleekly appointed nose.
I like the use of the curved windscreen. That said, I’ve since thought that the
MARS Mission oval cockpit window and frame might be ideal for the ICE 3:
1) The white frame for oval windscreen in set Mars Mission set 7647 MX-41 Switch
Fighter, http://www.peeron.com/inv/sets/7647-1: Part ID 47843: Windscreen 10 x
4 x 2 Curved with Bubble Cutout and Single Hinge Finger
2) The trans blue oval windscreen in Alpha Team Arctic set 4774 Scorpion Orb
Launcher, http://www.peeron.com/inv/sets/4774-1: Part ID 47844: Windscreen 9 x
3 x 1 2/3 Bubble Canopy
Is there a trans black/gray oval windscreen? That would be better than trans
blue.
The cameo of TGV and Eurostar in one of the movies made me smile.
Great job- and thanks for the acknowledgement-- I appreciate it.
mahalo,
James Mathis
| | | | | | | | | | | | | | | | | |
Eric, wow!!! Thanks so much for sharing your video’s with us. That is a serious
Lego train, very very impressive. You must live with some very understanding
people. My family wouldn’t allow it.
You have done well just to organise all the straight rail. How many pieces are
there? Your train design was also very nice, but as the others mentioned the
9volt light brick looks a bit od sticking up at the front.
Eric the lurker, well played!
| | | | | | | | | | | | | | | | |
Thank you all for your great comments! I am excited to try the suggested
improvements when I get the chance:
In lugnet.trains, James Mathis wrote:
| |
I might make one comment on the design. The 1x3 inverted slope just in front
of the leading wheelset on the driving cabs: can that be raised by one plate?
The notch-effect there is a bit striking compared to the smooth taper of the
rest of the sleekly appointed nose.
|
I agree this would improve the sleekness of the design, so I will certainly give
it a try. Originally the notch-effect may not have been as pronounced due to
the wedge plate that was
pointing forward and met at the same angle as the 1x3 inverted slopes, but I had
to remove this as I found it kept catching on the track. The clearance was only
around 1 plate, leading to many crashes. ;-)
| |
I like the use of the curved windscreen. That said, I’ve since thought that
the MARS Mission oval cockpit window and frame might be ideal for the ICE 3:
1) The white frame for oval windscreen in set Mars Mission set 7647 MX-41
Switch Fighter, http://www.peeron.com/inv/sets/7647-1: Part ID 47843:
Windscreen 10 x 4 x 2 Curved with Bubble Cutout and Single Hinge Finger
2) The trans blue oval windscreen in Alpha Team Arctic set 4774 Scorpion Orb
Launcher, http://www.peeron.com/inv/sets/4774-1: Part ID 47844: Windscreen 9
x 3 x 1 2/3 Bubble Canopy
Is there a trans black/gray oval windscreen? That would be better than trans
blue.
|
Wow! I have never seen this pair of parts before -- it really does capture the
shape of the ICE 3 windscreen very well. I saw it was also available in clear,
which might work well enough, but if they ever make it in trans black, this
would be very interesting to try!
| |
The cameo of TGV and Eurostar in one of the movies made me smile.
|
Yes, I have enjoyed building and modifying some of your other designs as well.
:-) I have not posted them since they are not “finished” per se... I keep
changing my mind about how to best do the windows on the Eurostar, and
unfortunately I don’t have much in the way of video footage of it either.
The TGV is more polished, but it is still missing two passenger wagons. In
response to a request on YouTube, I posted a
video of the TGV a short while ago.
As the model is lighter, shorter, and has shared bogies (fewer wheelsets = less
friction), the TGV runs around the layout quite a bit faster than the ICE 3
model -- enjoy! Once I have the chance to finish it, I will certainly post more
of this model if there is interest.
In lugnet.trains, David Boddy wrote:
| |
You have done well just to organise all the straight rail. How many pieces
are there?
|
The layout in the “main floor” videos contains about 350 pieces of straight
track, while the layout around the Christmas tree contains fewer, perhaps half
as many (I didn’t count, sorry). I got lucky and many of the rails came from
the S@H clearance sale on 9V track.
Thanks again for the great feedback, and I look forward to posting again soon!
Eric
| | | | | | |