 | | | | | |
In lugnet.trains, Tim David wrote:
| |
How are you
going to do your uncoupling? Its going to be a important issue if you are
doing a lot of switching.
Tim
|
Uncoupling is probably my biggest issue. Right now, I’m doing it by hand, which
means holding a set of cars apart with one hand and working the speed control
with the other. This isn’t too much of a problem down in the yard, but it’s a
stretch (literally) to reach the A/D track sometimes. I’ve been wondering if it
would be possible to build a knuckle or rapido-style coupler out of Lego.
I’ve also been thinking about installing some sort of electromagnet system
between the rails, and making it a hump yard, maybe raising the head of the yard
up a plate or two, but I’m not sure exactly how it would work. The idea also
makes the purist in me cringe.
The other problem I have is the switches on the far end of the layout. My
controllers are near the center of the layout, so throwing the switches to reach
the mainline or caboose track involve getting up and stepping over to reach
them. Hopefully it won’t be as bad once I have things up on tables, but right
now, it’s killing my knees to get up and down.
-Elroy
| | | | | | | | | | | | | | | |
In lugnet.trains, Elroy Davis wrote:
| |
Uncoupling is probably my biggest issue. Right now, I’m doing it by hand,
which means holding a set of cars apart with one hand and working the speed
control with the other. This isn’t too much of a problem down in the yard,
but it’s a stretch (literally) to reach the A/D track sometimes. I’ve been
wondering if it would be possible to build a knuckle or rapido-style coupler
out of Lego.
I’ve also been thinking about installing some sort of electromagnet system
between the rails, and making it a hump yard, maybe raising the head of the
yard up a plate or two, but I’m not sure exactly how it would work. The idea
also makes the purist in me cringe.
|
If you really want knuckle couplers for your LEGO trains, you could try these;

They’re made by Kadee (famous to all model railroad fans for their couplers).
On their site, they retail at 4,95$
for a pair. By modifying the shank (cut it shorter, sand it thinner and drill a
hole) it could be attached with this part;

That would make them a direct replacement for the regular train coupling with
the magnet. The only down side is that some kind of centering spring might be
needed to keep the coupler straight for coupling (to be determined).
A simple magnet or electro-magnet placed on the sleepers (ties) controls the
uncoupling. You could even use the regular train magnet with this part;

Daniel Aubin
| | | | | | | | | | | | | | | | | | | | |
In lugnet.trains, Daniel Aubin wrote:
| |
In lugnet.trains, Elroy Davis wrote:
If you really want knuckle couplers for your LEGO trains, you could try
these;
They’re made by Kadee (famous to all model railroad fans for their couplers).
On their site,
|
Using a standard #1 knuckle coupler is an interesting idea. But instead of
using the raw shank version, why not go with one that is mounted in a draft gear
box? A little epoxy or MEK could probably mount the draft gear box on a hacked
brick.
For that matter, up at the TechShop they have a 3D
printer that will print in ABS. It probably wouldn’t be too hard to make a
standard #1 draft gear box with technic-style mounting holes. The machine is a
bit too “pixelated” to do good Lego studs, I guessing. But 5mm holes on 8mm
centers is no problem.
Still, I’d like to do something better than magnetic uncoupling. I keep
noodling about designs involving shape-memory wire that would allow remote
controlled uncoupling. Haven’t worked that out quite yet...
| | | | | | | | | | | | | | | | | | | | | | |
In lugnet.trains, Dave Curtis wrote:
| |
In lugnet.trains, Daniel Aubin wrote:
| |
In lugnet.trains, Elroy Davis wrote:
If you really want knuckle couplers for your LEGO trains, you could try
these;
They’re made by Kadee (famous to all model railroad fans for their
couplers). On their site,
|
Using a standard #1 knuckle coupler is an interesting idea. But instead of
using the raw shank version, why not go with one that is mounted in a draft
gear box? A little epoxy or MEK could probably mount the draft gear box on a
hacked brick.
For that matter, up at the TechShop they have a 3D
printer that will print in ABS. It probably wouldn’t be too hard to make a
standard #1 draft gear box with technic-style mounting holes. The machine is
a bit too “pixelated” to do good Lego studs, I guessing. But 5mm holes on
8mm centers is no problem.
Still, I’d like to do something better than magnetic uncoupling. I keep
noodling about designs involving shape-memory wire that would allow remote
controlled uncoupling. Haven’t worked that out quite yet...
|
Jeff Christner used Kadees on his layout many years ago. His site is gone but
the Wayback machine has the
text but unfortunatly only one pic. He also talks about it
here Ondrew Hartigan has also done
some experimenting.
Tim
| | | | | | | | | | | | | | | | | | | | | | |
In lugnet.trains, Tim David wrote:
| |
In lugnet.trains, Dave Curtis wrote:
| |
In lugnet.trains, Daniel Aubin wrote:
| |
In lugnet.trains, Elroy Davis wrote:
If you really want knuckle couplers for your LEGO trains, you could try
these;
They’re made by Kadee (famous to all model railroad fans for their
couplers). On their site,
|
Using a standard #1 knuckle coupler is an interesting idea. But instead of
using the raw shank version, why not go with one that is mounted in a draft
gear box? A little epoxy or MEK could probably mount the draft gear box on
a hacked brick.
For that matter, up at the TechShop they have a 3D
printer that will print in ABS. It probably wouldn’t be too hard to make a
standard #1 draft gear box with technic-style mounting holes. The machine is
a bit too “pixelated” to do good Lego studs, I guessing. But 5mm holes on
8mm centers is no problem.
Still, I’d like to do something better than magnetic uncoupling. I keep
noodling about designs involving shape-memory wire that would allow remote
controlled uncoupling. Haven’t worked that out quite yet...
|
Jeff Christner used Kadees on his layout many years ago. His site is gone but
the Wayback machine has the
text but unfortunatly only one pic. He also talks about it
here Ondrew Hartigan has also done
some experimenting.
Tim
|
Jeff emailed me directly as he is having problems posting
While my Kadee site has been down for awhile, I did give permission to another
site to use my images and text which you can find
here
I have never given anyone else permission to use my images and text, but this
was something I thought should be preserved. They have some really good pictures
there along with a bunch of text that was originally on my site.
Just FYI,
Jeff Christner
Visit http://www.sixbyfire.com for LEGO Fire Trucks!
| | | | | | | | | | | | | | | | | |
The layout looks great (you will be so much happier with it when it’s up on a
table)! It’s really hard to resist the temptation to make a loop, but
point-to-point layouts have many more interesting possibilities. I think you’ll
be having fun with this one.
Below are some thoughts I had to some of your dilemmas:
In lugnet.trains, Elroy Davis wrote:
| |
In lugnet.trains, Tim David wrote:
| |
How are you
going to do your uncoupling? Its going to be a important issue if you are
doing a lot of switching.
|
Uncoupling is probably my biggest issue. Right now, I’m doing it by hand,
which means holding a set of cars apart with one hand and working the speed
control with the other.
|
I talked about this very thing six years (!) ago, and I haven’t changed my
opinion on it yet. Manual uncoupling is way underrated; you just have to have
the right tool. See my post here:
http://news.lugnet.com/trains/?n=16315
| |
I’ve also been thinking about installing some sort of electromagnet system
between the rails, and making it a hump yard, maybe raising the head of the
yard up a plate or two, but I’m not sure exactly how it would work. The idea
also makes the purist in me cringe.
|
If you really need an electric uncoupler, here’s a design I came up with that is
LEGO pure, if a bit bulky:
http://www.brickshelf.com/cgi-bin/gallery.cgi?f=18638
It works by lining up the train with the red horizontal plunger. The plunger
then disengages the magnets enough to drive the train away.
| |
The other problem I have is the switches on the far end of the layout. My
controllers are near the center of the layout, so throwing the switches to
reach the mainline or caboose track involve getting up and stepping over to
reach them.
|
There are a number of electrically operated switch designs, but I think mine is
the smallest, since it uses a micro-motor. It has pros and cons which are
detailed here:
http://news.lugnet.com/trains/?n=16648
Hope these links are helpful to you!
Rick C.
| | | | | | | | | | | | | | | | | |
In lugnet.trains, Rick Clark wrote:
| |
I talked about this very thing six years (!) ago, and I haven’t changed my
opinion on it yet. Manual uncoupling is way underrated; you just have to have
the right tool. See my post here:
http://news.lugnet.com/trains/?n=16315
If you really need an electric uncoupler, here’s a design I came up with that
is LEGO pure, if a bit bulky:
http://www.brickshelf.com/cgi-bin/gallery.cgi?f=18638
It works by lining up the train with the red horizontal plunger. The plunger
then disengages the magnets enough to drive the train away.
There are a number of electrically operated switch designs, but I think mine
is the smallest, since it uses a micro-motor. It has pros and cons which are
detailed here:
http://news.lugnet.com/trains/?n=16648
Hope these links are helpful to you!
Rick C.
|
Those are all excellent. The manual pick works really well, even on my light
skeleton log car. I tried a side uncoupler, but it pushes some of my light cars
off the tracks.
I love that remote switch. I may have to try that out.
Thanks for the links.
-Elroy
| | | | | | | | | | | | | | | | | | | | | |
In lugnet.trains, Elroy Davis wrote:
| |
I tried a side uncoupler, but it pushes some of my light
cars off the tracks.
|
Have you considered weighting your cars? I know the NMRA has a standard
recommended weight for HO cars.
Tim
| | | | | | | | | | | | | | | | | | | | | | | | | | |
In lugnet.trains, Tim David wrote:
| |
In lugnet.trains, Elroy Davis wrote:
| |
I tried a side uncoupler, but it pushes some of my light
cars off the tracks.
|
Have you considered weighting your cars? I know the NMRA has a standard
recommended weight for HO cars.
Tim
|
Most of my cars are okay. The one I have the most trouble with is my
skeleton car, which sometimes even hops the tracks during coupling if I don’t
have a log load on it.
-Elroy
| | | | | | | | | | | | | | | | | | | | | | | | | | | | |
In lugnet.trains, Elroy Davis wrote:
| |
In lugnet.trains, Tim David wrote:
| |
In lugnet.trains, Elroy Davis wrote:
| |
I tried a side uncoupler, but it pushes some of my light
cars off the tracks.
|
Have you considered weighting your cars? I know the NMRA has a standard
recommended weight for HO cars.
Tim
|
Most of my cars are okay. The one I have the most trouble with is my
skeleton car, which sometimes even hops the tracks during coupling if I
don’t have a log load on it.
-Elroy
|
Hmm, not much room for weight there, unless you have a load
| | | | | | | | | | | | | | | | | | | | | | | |
In lugnet.trains, Elroy Davis wrote:
| |
In lugnet.trains, Rick Clark wrote:
| |
I talked about this very thing six years (!) ago, and I haven’t changed my
opinion on it yet. Manual uncoupling is way underrated; you just have to
have the right tool. See my post here:
http://news.lugnet.com/trains/?n=16315
If you really need an electric uncoupler, here’s a design I came up with
that is LEGO pure, if a bit bulky:
http://www.brickshelf.com/cgi-bin/gallery.cgi?f=18638
It works by lining up the train with the red horizontal plunger. The plunger
then disengages the magnets enough to drive the train away.
There are a number of electrically operated switch designs, but I think mine
is the smallest, since it uses a micro-motor. It has pros and cons which are
detailed here:
http://news.lugnet.com/trains/?n=16648
Hope these links are helpful to you!
Rick C.
|
Those are all excellent. The manual pick works really well, even on my light
skeleton log car. I tried a side uncoupler, but it pushes some of my light
cars off the tracks.
I love that remote switch. I may have to try that out.
Thanks for the links.
-Elroy
|
If the uncoupling is for the switching yard, have you considered an on-loco
uncoupling device? It does have it’s limitations but at least it can be moved
around the layout realistically.
See my effort..
http://news.lugnet.com/announce/moc/?n=2683
I’d like to build a trackside one too.
Jon
| | | | | | | | | | | | | | | | | | |
In lugnet.trains, Rick Clark wrote:
| |
There are a number of electrically operated switch designs, but I think mine
is the smallest, since it uses a micro-motor. It has pros and cons which are
detailed here:
http://news.lugnet.com/trains/?n=16648
|
I love Rick’s awesome spear switch idea. I kept running it through my head to
see if I could make it any smaller. I came up with something this morning:
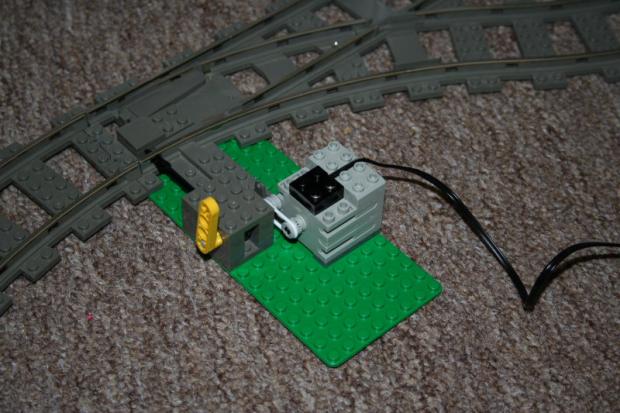
Full Gallery
of my prototype
I only have technic motors, so I wanted a solution that I could swap out if I
get something smaller. The belt/pulley system also allows the motor to keep
running past the point needed to move the switch, which keeps it from either
stalling the motor or tearing the switch apart.
The spear is held in place by a headlight brick, which is pushed along a tile by
two 1/2 1x2 liftarms on an axle. The yellow liftarm indicates which direction
the track is switched, and also allows for manual switching if necessary.
The housing is 3 x 4 x 2 1/3. The bushings and switch indicator each add a stud
on either side. This could be made smaller by leaving off the indicator and
only using a single bushing. It could probably be made even smaller by using a
single 1/2 liftarm inside, with the bushing next to it, and the belt running out
the back, but I haven’t tried that. Other sizing depends on what type of motor
you use. With a little work, and some cleverly drilled holes, the motor could
even be hidden beneath the table.
See Rick’s post above for cautions, and a description of how the switches work.
-Elroy
| | | | | | | | | | | | | | | | |
I am new at this.
I have some 4531 switches (points) that are from LEGO. The main line is always
powered. The side line is only powered when the switch is thrown to that side.
looking at the MOC in this thread it seem that another tpye of switch is being
used. Is this Correct?
Are my switches newer? They do not seem to have any springs in them. Can these
switches be remotely controlled in the same way or do they have to be modified?
Thank you both for the ideas.
Larry Crumb
| | | | | | |