| |
Hi,
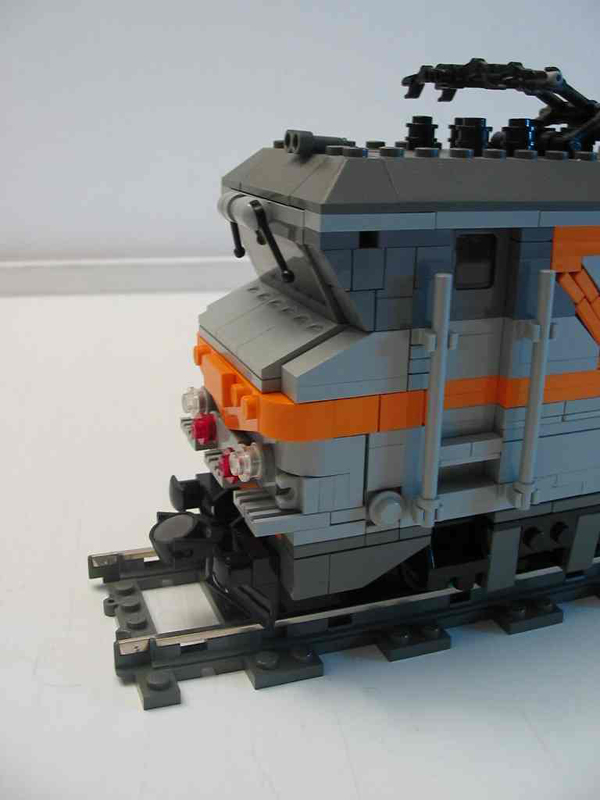
I’m pleased to announce my new loco MOC. It’s a BB72000, a very common french
locomotive.
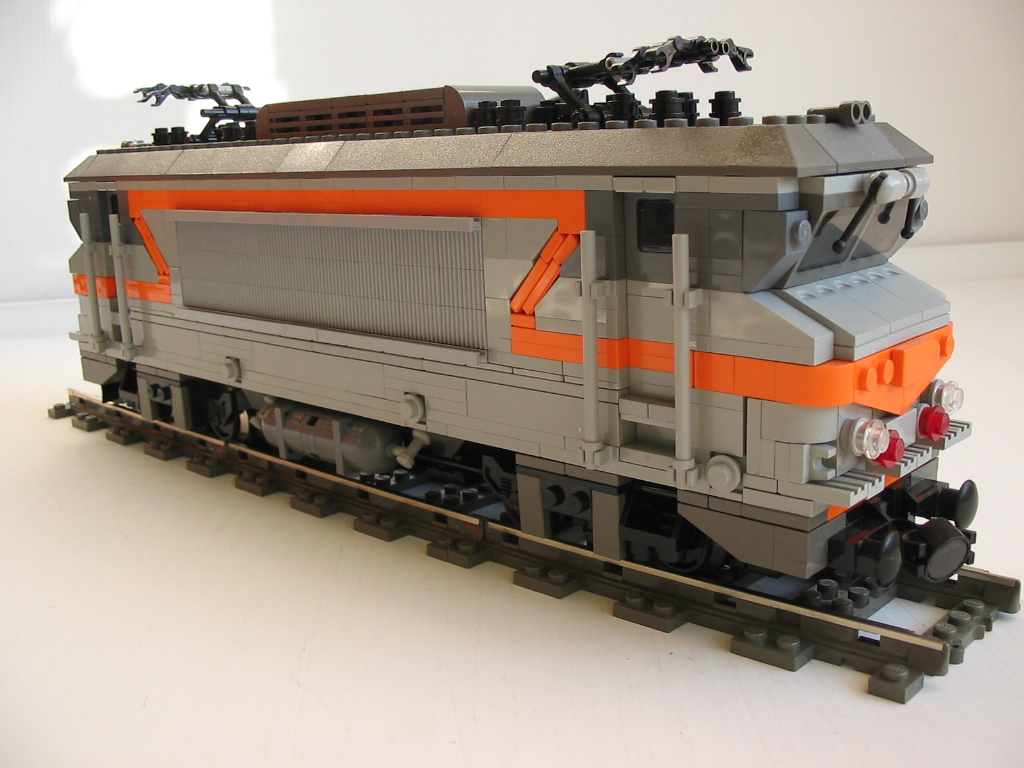
Of course it’s a 8-wide loco :-)
I used the 4 differents gray (light-gray, light-bluish-gray, dark-gray and
dark-bluish-gray). As a curiosity, the height of the Loco without the boggies
and the top, is 23.5 plates i.e. 7.83 Bricks, because I used bracket parts all
the long of the loco (the thickness of a bracket is a half plate height). The
use of these brackets was necessarly because the front of the loco is designed
with 3 bricks SNOT, and you know that 2 SNOT brick = 5 plates height, so the
third SNOT brick generated a half plate shift.
You can see the bracket technic I used on the brickwiki here (below the title
“SNOT mounted 1x2-2x2 bracket (Alban Nanty)”):
http://brickwiki.zapto.org/index.php/Micro_striping_techniques
This loco is a symetrical locomotive, i.e. the front and the back of the loco
are identical. That way the loco can move in both direction, avoiding the use of
U-turns, which simplify the maneuvers. The symmetry of this loco obliged me to
design a non-motorised boggie that looks like a 9V train motor. You can read (in
french, but there’s a building instruction) the article I wrote on this boggie
on the Freelug website here:
http://www.freelug.org/article.php3?id_article=435
I hope you like it, and of course feel free to make any comment.
The BS gallery is here:
http://www.brickshelf.com/cgi-bin/gallery.cgi?f=152867
Bye.
|
|
| |
In lugnet.trains, Dean Earley wrote:
> That is a very impressive loco and very detailed.
> The front end is cleverly done, and I expect it would be difficult to do
> in 6 wide :)
>
> Congrats.
Thanks a lot.
Yes, that was quite difficult to design. Of course there was several versions
and in fact one day I had to rebuild the loco entirely to remove 2 plates in
height because I found it to high.
The middle of the loco is ashamedly easy, just stacked bricks... :-)
I never tried to do a 6 wide train, so I don't know if it would be more
difficult... probably yes. :-)
Yours.
|
|
| |
In lugnet.trains, Alban NANTY wrote:
> In lugnet.trains, Dean Earley wrote:
> > That is a very impressive loco and very detailed.
> > The front end is cleverly done, and I expect it would be difficult to do
> > in 6 wide :)
> >
> > Congrats.
>
> Thanks a lot.
>
> Yes, that was quite difficult to design. Of course there was several versions
> and in fact one day I had to rebuild the loco entirely to remove 2 plates in
> height because I found it to high.
Indeed, the front is very well done! I love the orange triangular bib.
> The middle of the loco is ashamedly easy, just stacked bricks... :-)
Yet, stacked very well with good texture and relief.
> I never tried to do a 6 wide train, so I don't know if it would be more
> difficult... probably yes. :-)
Regardless, a really nice 8-wide with lots of nice little details.
Great model!
later,
James Mathis
|
|
| |
In lugnet.trains, Alban NANTY wrote:
| |
Hi,
I’m pleased to announce my new loco MOC. It’s a BB72000, a very common french
locomotive.
|
Alban,
I was inspired by your SNOT work on the windscreen to try to use the new 1x1x2/3
slope in replacement of the 1x2 45-deg slope that is either-side of the front
windscreen. In CAD, it looks like this:
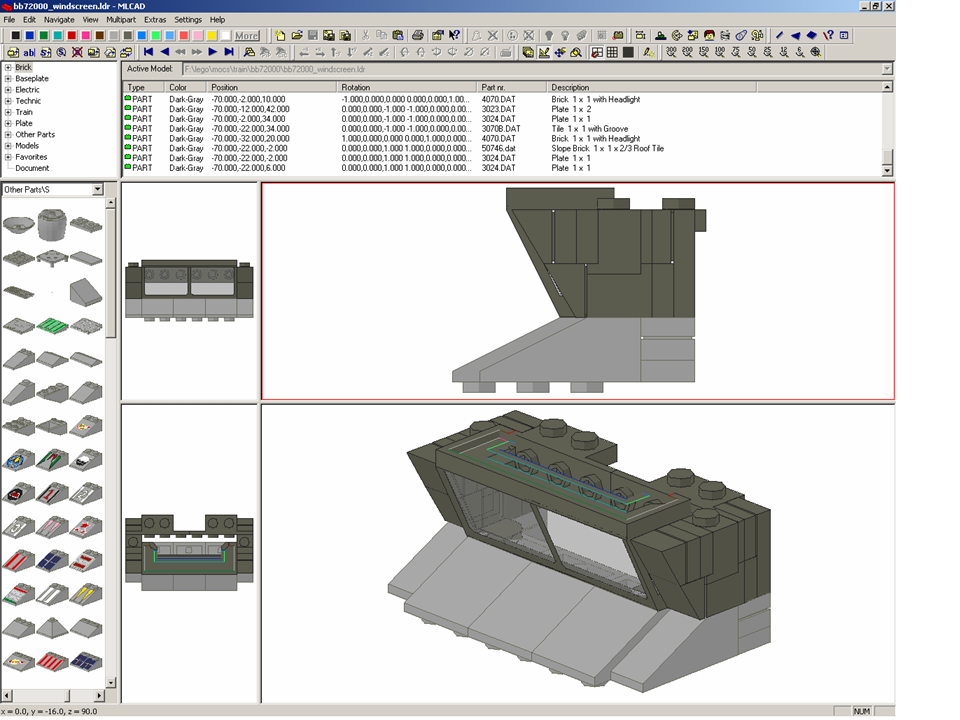
Notice the 1/2-plate offset between the two 1x1x2/3 slopes. This allows the two
slope surfaces to edge-match very cleanly.
The 1x4 by 1x2 bracket is not attractive viewed through the windscreen, but I
have not found an alternate solution in the few minutes I thought of this.
I have not tried this in real-brick, and I do not know if these parts exist in
the color required. I hope it is a worthwhile solution to eliminate the forward
facing stud on the 1x2 45-deg slope.
Another exploded-view is
available upon folder moderation.
later,
James Mathis
|
|
| |
In lugnet.trains, James Mathis wrote:
| |
Alban,
I was inspired by your SNOT work on the windscreen to try to use the new
1x1x2/3 slope in replacement of the 1x2 45-deg slope that is either-side of
the front windscreen. In CAD, it looks like this:
Notice the 1/2-plate offset between the two 1x1x2/3 slopes. This allows the
two slope surfaces to edge-match very cleanly.
The 1x4 by 1x2 bracket is not attractive viewed through the windscreen, but I
have not found an alternate solution in the few minutes I thought of this.
I have not tried this in real-brick, and I do not know if these parts exist
in the color required. I hope it is a worthwhile solution to eliminate the
forward facing stud on the 1x2 45-deg slope.
Another exploded-view
is available upon folder moderation.
later,
James Mathis
|
Very good work, Alban, with one of my favourite electric locos (it was the loco
in my first Lima toy train...)
I have a slightly better solution to James’ modification:
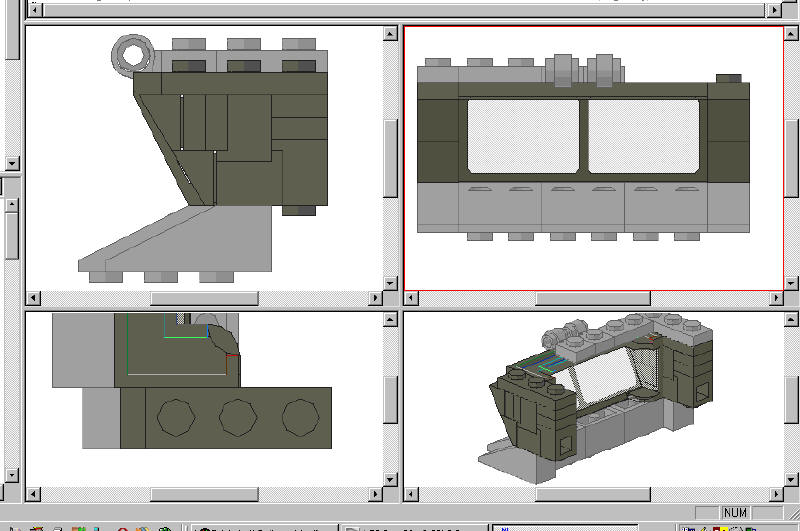
and the exploded view:
And yes, James, that slope also exists in dark bley :-)
Ciao,
Gianluca.
BTW, an hint for a “cleaner” side:

that is, use 1 row of snotted tiles instead of 2 plates and a bracket :-P
|
|
| |
In lugnet.trains, Gianluca Morelli wrote:
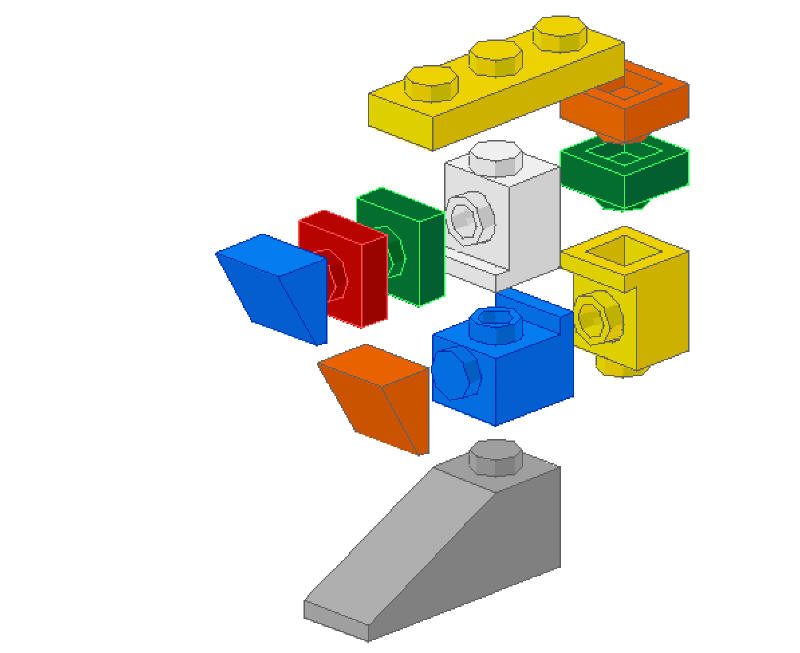
| |
I have a slightly better solution to James’ modification:
|
Very nice! And works for less than 8-wide.
later,
James Mathis
|
|
| |
In lugnet.trains, James Mathis wrote:
| |
In lugnet.trains, Gianluca Morelli wrote:
| |
I have a slightly better solution to James’ modification:
|
Very nice! And works for less than 8-wide.
later,
James Mathis
|
Wow! I’m very honored to have a comment from the brilliant Lego train Designer,
aka James Mathis...
Thanks a lot James and Gianluca for your help about the front of my loco. Like
you, I didn’t like the stud of the 1x2 SNOT slope brick, and I worked a long
time to find a solution to replace this 1x2 slope brick by something else. But I
didn’t find anything, so many thank for your great solution.
Sorry for not having reply to your messages sooner, but we had a power supply
shut down here (I don’t know if it was linked with the riots that we have in
France at the moment... maybe not, I shouldn’t be too paranoiac :-)). Anyway I
had to try your solution with the light of a candle, and beleive me, it’s not
easy to distinguish a dark gray from dark bluish gray when the only light you
have is a candle! :-)
So, the Gianluca’s solution works perfectly, but I had to SNOT 180° the light
gray plate 1x1 with clip (that holds the handle), and then add two light gray
tiles 1x1 facing each other.
Moreover this modification leads me to modifiy a bit the top light gray line,
and that’s a good modification because now the doors are more solid. Also
there’s no more gap at the top corners of the roof (but on the other hand,
there’s a half-stud hole in the dark gray, but I think it’s acceptable). See the
following MLCAD image :

I add the SNOT 180° 1x6 dark gray plate for solidity reason (and because it
supports a removable roof).
Gianluca, I think your second proposition won’t help me because I need the
brackets for a half-stud height shift (and not for a decorative purpose).
Now I have to order some new parts on Bricklinks, and I will make new pictures
in few weeks when I’ll get the parts.
One more time, thank you so much you two for your precious help!
Yours.
|
|
| |
In lugnet.trains, Alban NANTY wrote:
| |
Gianluca, I think your second proposition won’t help me because I need the
brackets for a half-stud height shift (and not for a decorative purpose).
Now I have to order some new parts on Bricklinks, and I will make new
pictures in few weeks when I’ll get the parts.
One more time, thank you so much you two for your precious help!
Yours.
|
Alban,
I’m MlCADding your loco with some modifications and with that row of side
snotted tiles you don’t like. It’s a huge work (700+ parts) and I’ll show
building instructions within 12 hours. I’m pretty sure you’ll find them
interesting :-PPPPP
Au revoir,
Gianluca
|
|
| |
In lugnet.trains, Gianluca Morelli wrote:
| |
Alban,
I’m MlCADding your loco with some modifications and with that row of side
snotted tiles you don’t like. It’s a huge work (700+ parts) and I’ll show
building instructions within 12 hours. I’m pretty sure you’ll find them
interesting :-PPPPP
Au revoir,
Gianluca
|
Oh! I think it will be difficult to reverse-ingeeniering my loco, since there
are a lots of parts assembled in many ways. But congratulation if you succeed!
If you are enough patient, I promiss to make the MLCAD soon.
Bye.
|
|
| |
In lugnet.trains, Alban NANTY wrote:
| |
Oh! I think it will be difficult to reverse-ingeeniering my loco, since there
are a lots of parts assembled in many ways. But congratulation if you
succeed! If you are enough patient, I promiss to make the MLCAD soon.
Bye.
|
Reverse engineering is fun! :-PPP
here is the link:
http://brickshelf.com/cgi-bin/gallery.cgi?f=153192
alternatively you can download the .ldr file and let mlcad generate the images
on your computer, offline...
I redesigned your loco eliminating all the tiles’ grooves and making it
smoother. I also designed the underframe (side tanks) so that it shows less gaps
between parts.
Hope it helps you and, by the way, you built a great MOC.
Gianluca
PS the only thing I’d really change is the orange line: I don’t like much the
zig-zag gaps (tiles put at 45 degrees don’t fill completely the angled space)
and I’d redesign the nose, which seems too high to me. In particular, the orange
line should become narrower, moving from the center to the nose. I’ll probably
make it 2 plates high in the center and one plate high in the nose, with a 1.5
plates high transition. But this means TOTALLY redesigning the loco. Which is as
complicated as the reverse engineering, so it MUST be done, hehehehe...
|
|
| |
In lugnet.trains, Gianluca Morelli wrote:
Oh, nice work. I understand now your second proposition. You seems to be a
fanatic of smooth surfaces without any hole! :-)
For the vents I notice you used tiles grid. I thought about using these parts,
but I wanted to use the plates 1x8 with door rail to make some relief. Moreover
I already use this technic for my FL9 Loco, so I wanted to change a bit :-)
Finally I spend my afternoon to finish the MLCAD of my loco, you can find it
here:
http://www.brickshelf.com/gallery/Banban/BB7200-Loco/bb7200.mpd
Now I think I’m totaly satisfied with this version.
| |
Hope it helps you and, by the way, you built a great MOC.
|
Yes of course, and thanks again for your help.
| |
PS the only thing I’d really change is the orange line: I don’t like much the
zig-zag gaps (tiles put at 45 degrees don’t fill completely the angled space)
and I’d redesign the nose, which seems too high to me. In particular, the
orange line should become narrower, moving from the center to the nose. I’ll
probably make it 2 plates high in the center and one plate high in the nose,
with a 1.5 plates high transition. But this means TOTALLY redesigning the
loco. Which is as complicated as the reverse engineering, so it MUST be done,
hehehehe...
|
OK, sure! You’re welcome to try your own version of this loco!
Yours.
PS: I made a mistake in my first post, I think this loco is a BB7200, not 72000,
but it’s not really important :-)
|
|
| |
In lugnet.trains, Alban NANTY wrote:
| |
For the vents I notice you used tiles grid. I thought about using these
parts, but I wanted to use the plates 1x8 with door rail to make some relief.
Moreover I already use this technic for my FL9 Loco, so I wanted to change a
bit :-)
|
Yes. I left them 1/5 stud out as the real one. Plus, they’re 1 plate shorter (10
instead of 11), so the lower edge is at the same height of the orange line.
| |
PS: I made a mistake in my first post, I think this loco is a BB7200, not
72000, but it’s not really important :-)
|
I noticed it, since they all end with 72xx and not 72xxx... ;-)))
But I agree, it’s not that important :-))
Ciao,
Gianluca
|
|
| |
In lugnet.trains, Gianluca Morelli wrote:
| |
In lugnet.trains, Alban NANTY wrote:
| |
Oh! I think it will be difficult to reverse-ingeeniering my loco, since
there are a lots of parts assembled in many ways. But congratulation if you
succeed! If you are enough patient, I promiss to make the MLCAD soon.
Bye.
|
Reverse engineering is fun! :-PPP
here is the link:
http://brickshelf.com/cgi-bin/gallery.cgi?f=153192
alternatively you can download the .ldr file and let mlcad generate the
images on your computer, offline...
I redesigned your loco eliminating all the tiles’ grooves and making it
smoother. I also designed the underframe (side tanks) so that it shows less
gaps between parts.
Hope it helps you and, by the way, you built a great MOC.
Gianluca
PS the only thing I’d really change is the orange line: I don’t like much the
zig-zag gaps (tiles put at 45 degrees don’t fill completely the angled space)
and I’d redesign the nose, which seems too high to me. In particular, the
orange line should become narrower, moving from the center to the nose. I’ll
probably make it 2 plates high in the center and one plate high in the nose,
with a 1.5 plates high transition. But this means TOTALLY redesigning the
loco. Which is as complicated as the reverse engineering, so it MUST be done,
hehehehe...
|
Dude, you are a SNOT psycho... and that’s saying a lot coming from
me ;-). I had a look at
those BI and I’m still shocked! Good job with those teeeeny offsets! I’m
impressed.
Legoswami
|
|
| |
In lugnet.trains, Samarth Moray wrote:
| |
In lugnet.trains, Gianluca Morelli wrote:
|
snip
| |
Dude, you are a SNOT psycho... and that’s saying a lot coming from
me ;-). I had a look
at those BI and I’m still shocked! Good job with those teeeeny offsets! I’m
impressed.
|
Wow! Awesome work!
later,
James Mathis
|
|
| |
In lugnet.trains, Alban NANTY wrote:
| |
In lugnet.trains, James Mathis wrote:
| |
In lugnet.trains, Gianluca Morelli wrote:
| |
I have a slightly better solution to James’ modification:
|
Very nice! And works for less than 8-wide.
later,
James Mathis
|
Now I have to order some new parts on Bricklinks, and I will make new
pictures in few weeks when I’ll get the parts.
|
Hi,
I’ve finally finished the modification on my BB7200 loco, and took the time to
make some pictures. So I updated my BS galery
(http://www.brickshelf.com/cgi-bin/gallery.cgi?f=152867) , here is an exemple
of the new version :
One more time, thanks James Mathis and Gianluca Morelli for your precious help.
|
|
|