| |
Hi All,
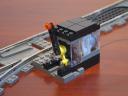
Here’s an update of one of my
earlier motorized switch
designs. This design utilizes the new-style monkey(1) motor instead of the
traditional Technic mini motor:
Building diagrams can be found at my BrickShelf folder:
Cheers,
Mark
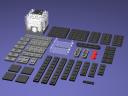
(1) “Monkey” motor because it first came in this set:
The actual part number for the motor is 47154.
|
|
| |
In lugnet.trains, Mark Riley wrote:
| |
Hi All,
Here’s an update of one of my
earlier motorized
switch designs. This design utilizes the new-style monkey(1) motor instead
of the traditional Technic mini motor:
|
(snip)
Thanks for the update! Nice job on the renders for the instructions, by the
way...
Question: does this require switch modification to de-stiffenize the mechanism?
Also I assume that this motor is DCC-able using the technique you demonstrated
here: smart motor ? That would be
tres cool, remote controlled DCC switch with no receiver RCX required and in
fact, no external connectors of any sort.
|
|
| |
In lugnet.trains, Larry Pieniazek wrote:
| |
In lugnet.trains, Mark Riley wrote:
| |
Hi All,
Here’s an update of one of my
earlier motorized
switch designs. This design utilizes the new-style monkey(1) motor
instead of the traditional Technic mini motor:
|
(snip)
Thanks for the update! Nice job on the renders for the instructions, by the
way...
|
Glad you like them!
| |
Question: does this require switch modification to de-stiffenize the
mechanism?
|
No, all that is required is a standard unmodified switch. The motor has
more than enough torque to throw the switch. In fact, I recommend that
you feed a lower voltage to the motor as the motorized switch may(1) loosen up
over time if run with the full 9 volts. Here’s an excerpt from the notes.txt
file in my Brickshelf folder:
“When operating this switch, use a low power setting
on your power source. You can accomplish this by
using a train controller set to speed step 3 or 4.
You can then connect a polarity switch between the
train controller and the motorized switch for use as
your control lever. Or, to use an RCX as controller,
just use a ~50% power setting when activating the motor.”
| |
Also I assume that this motor is DCC-able using the technique you
demonstrated here: smart motor ?
|
Yes, all that remains is to modify the LDCC firmware to be configured to use a
locomotive decoder (vs. a stationary decoder) when throwing a switch.
| |
That would be tres cool, remote controlled DCC switch with no receiver RCX
required and in fact, no external connectors of any sort.
|
No more unsightly wires running all over the layout! All you need is a track
connector going to the switch motor. In fact, since I’ve already modified some
of my switches for DCC operation (i.e. both routes always powered), I plan on
adding a short wire to each switch for connection straight to the smart motor.
Mark
(1) I say “may” because the grip strength of Lego pieces vary. Sometimes the
switch will work indefinitely at full voltage, while another one might only
operate a few dozen times before self destructing. However, when using a lower
voltage, it holds together just fine. Supplying the lower voltage is easy since
we all tend to have lots of extra train controllers sitting around! :-)
|
|
| |
In lugnet.trains, Mark Riley wrote:
| |
In lugnet.trains, Larry Pieniazek wrote:
| |
In lugnet.trains, Mark Riley wrote:
|
|
| |
| |
Question: does this require switch modification to de-stiffenize the
mechanism?
|
No, all that is required is a standard unmodified switch. The motor has
more than enough torque to throw the switch. In fact, I recommend that
you feed a lower voltage to the motor as the motorized switch may(1) loosen
up over time if run with the full 9 volts.
|
OK, thanks for the reminder! It sounds like maybe if you DCC-ise it, you would
want the control program to issue non full power commands then?
| |
No more unsightly wires running all over the layout! All you need is a track
connector going to the switch motor. In fact, since I’ve already modified
some of my switches for DCC operation (i.e. both routes always powered), I
plan on adding a short wire to each switch for connection straight to the
smart motor.
|
I wish we could get track connectors and wires in bulk at good prices.
|
|
| |
In lugnet.trains, Larry Pieniazek wrote:
| |
In lugnet.trains, Mark Riley wrote:
| |
In lugnet.trains, Larry Pieniazek wrote:
| |
In lugnet.trains, Mark Riley wrote:
|
|
| |
| |
Question: does this require switch modification to de-stiffenize the
mechanism?
|
No, all that is required is a standard unmodified switch. The motor has
more than enough torque to throw the switch. In fact, I recommend that
you feed a lower voltage to the motor as the motorized switch may(1) loosen
up over time if run with the full 9 volts.
|
OK, thanks for the reminder! It sounds like maybe if you DCC-ise it, you
would want the control program to issue non full power commands then?
|
Yep, that’s correct. With LDCC you will be able to configure the power as well
as the stroke duration (somewhere around 0.1 to 0.2 seconds). Right now, LACC
can control stroke duration, but not power, so I’ll be modifying LACC for
non-smart motor applications.
Since Lego train layouts tend to be more temporary in nature (vs. traditional
model railroading layouts), I think using smart motors (and/or DCC bricks) for
the switches is an ideal solution. It makes creating the layout more freeform
since you don’t have to consider how you’ll hide all the wires, RCXes, etc...
Mark
|
|
| |
In lugnet.trains, Mark Riley wrote:
<snip>
>
> No more unsightly wires running all over the layout! All you need is a track
> connector going to the switch motor. In fact, since I've already modified
> some of my switches for DCC operation (i.e. both routes always powered), I
> plan on adding a short wire to each switch for connection straight to the
> smart motor.
>
> Mark
<snip>
Oh My Goodness! I didn't even think of that! I've modified all my switches to
have both sides powered, but gettting a 9v wire out to a DCC enabled switch
motor--that's extraordinarily brilliant!
Time for me to either modify the actual motors, or build more
DCC-Chip-In-A-Brick adapters. Too bad I can't get the electrical plates from
S@H anymore. Dacta, expect a phone call in the near future.
Very nicely done, Mark!
Dave K
|
|
| |
In lugnet.trains, Mark Riley wrote:
| |
Hi All,
Here’s an update of one of my
earlier motorized
switch designs. This design utilizes the new-style monkey(1) motor instead
of the traditional Technic mini motor:
Building diagrams can be found at my BrickShelf folder:
Cheers,
Mark
(1) “Monkey” motor because it first came in this set:
The actual part number for the motor is 47154.
|
Hi Mark -
Great design, and the DCC stuff pointed out later in this thread is exciting.
I’m curious - your switch designs seem to be updated from time to time to get a
better base connection between the switch track itself and the motor, so does
the monkey motor allow for a more rigid design? I’m guessing that since the
base of the monkey motor has more inverted studs than the other new style
Technic motors, you’re able to get more grip from it in your design. Also, you
point out that the stiffness of the thin-walls helps out to maintain integrity
of the design. Can you comment on those two items please?
Also, what happens (dare I ask...) if you use full power from a 9v controller on
the device?
Thanks!
Ed
|
|
| |
In lugnet.trains, Mark Riley wrote:
| |
Hi All,
Here’s an update of one of my
earlier motorized
switch designs. This design utilizes the new-style monkey(1) motor instead
of the traditional Technic mini motor:
|
...
| |
Building diagrams can be found at my BrickShelf folder:
|
Hello Mark,
All I want to say right now is THANK YOU Mark. Again a very good shot.
Now I am lurking around for useless “monkey” motors in the stock :-)
The other point is to find Digitrax decoders around here.
Can we still use a motor in the regular way even with a decoder mounted inside?
Cheers,
Philippe.
|
|
| |
In lugnet.trains, Ed McGlynn wrote:
| |
Hi Mark -
Great design, and the DCC stuff pointed out later in this thread is exciting.
I’m curious - your switch designs seem to be updated from time to time to get
a better base connection between the switch track itself and the motor, so
does the monkey motor allow for a more rigid design? I’m guessing that since
the base of the monkey motor has more inverted studs than the other new style
Technic motors, you’re able to get more grip from it in your design. Also,
you point out that the stiffness of the thin-walls helps out to maintain
integrity of the design. Can you comment on those two items please?
Also, what happens (dare I ask...) if you use full power from a 9v controller
on the device?
|
Hi Ed,
Thanks, glad you like the design. If you count the number of posts I’ve made
about DCC in the forums, you’ll see I’m pretty excited, too! :-)
It’s hit-or-miss when using the full 9V when operating the switches. Sometimes
it holds together just fine, no matter how many times you throw the switch.
Other times, you’ll build one and after a few dozen throws, it just self
destructs. Usually the roof pops off, one or more of the side panels go flying,
the yellow switch lever sometimes gets disconnected or sometimes the base
disconnects and the whole unit flys up and back and just lays there pathetically
where it happened to land. So far, no breakage of anything, though.
But, that’s with the full 9V. Chris Masi, in this
post, originally had the idea to reduce
the voltage going to the motor. Ever since using the lower voltage, I haven’t
encountered any problems.
As to the side panels, I found using the transparent panels worked better since
they flexed less when absorbing the impact. When using the opaque panels, the
flex would tend to work the roof loose. Since using lower voltage, I really
haven’t tested the units with opaque panels, so it may turn out that it’s OK to
use them in that case.
Also, it’s true I have changed the base attachment a bit. The
TSwitch2 just didn’t
have enough grip. TSwitch4 and TSwitch5
introduce an extra row of studs that grips the switch better - probably because
the switch base plate is straddled on both sides, unlike the earlier design.
Cheers,
Mark
|
|
| |
In lugnet.trains, Mark Riley wrote:
| |
In lugnet.trains, Ed McGlynn wrote:
| |
Hi Mark -
Great design, and the DCC stuff pointed out later in this thread is
exciting.
I’m curious - your switch designs seem to be updated from time to time to
get a better base connection between the switch track itself and the motor,
so does the monkey motor allow for a more rigid design? I’m guessing that
since the base of the monkey motor has more inverted studs than the other
new style Technic motors, you’re able to get more grip from it in your
design. Also, you point out that the stiffness of the thin-walls helps out
to maintain integrity of the design. Can you comment on those two items
please?
Also, what happens (dare I ask...) if you use full power from a 9v
controller on the device?
|
Hi Ed,
Thanks, glad you like the design. If you count the number of posts I’ve made
about DCC in the forums, you’ll see I’m pretty excited, too! :-)
It’s hit-or-miss when using the full 9V when operating the switches.
Sometimes it holds together just fine, no matter how many times you throw the
switch. Other times, you’ll build one and after a few dozen throws, it just
self destructs. Usually the roof pops off, one or more of the side panels go
flying, the yellow switch lever sometimes gets disconnected or sometimes the
base disconnects and the whole unit flys up and back and just lays there
pathetically where it happened to land. So far, no breakage of anything,
though.
But, that’s with the full 9V. Chris Masi, in this
post, originally had the idea to
reduce the voltage going to the motor. Ever since using the lower voltage, I
haven’t encountered any problems.
As to the side panels, I found using the transparent panels worked better
since they flexed less when absorbing the impact. When using the opaque
panels, the flex would tend to work the roof loose. Since using lower
voltage, I really haven’t tested the units with opaque panels, so it may turn
out that it’s OK to use them in that case.
Also, it’s true I have changed the base attachment a bit. The
TSwitch2 just didn’t
have enough grip. TSwitch4 and TSwitch5 introduce an extra row of studs that grips the switch better -
probably because the switch base plate is straddled on both sides, unlike the
earlier design.
Cheers,
Mark
|
Excellent insights and explanations, Mark -thank you.
“...the whole unit flys up and back and just lays there pathetically where it
happened to land.” LOL Man, I’ve been there. It’s sad, but funny at the same
time. It’s like these contraptions play along with our wishes for just so long,
then say the heck with it and spaz out. “OK, pal, that last command from you
was the last straw...grawnk.” Gotta love it!
Thanks again,
Ed
|
|
| |
In lugnet.trains, Mark Riley wrote:
| |
Hi All,
Here’s an update of one of my
earlier motorized
switch designs. This design utilizes the new-style monkey(1) motor instead
of the traditional Technic mini motor:
Building diagrams can be found at my BrickShelf folder:
Cheers,
Mark
(1) “Monkey” motor because it first came in this set:
The actual part number for the motor is 47154.
|
Cool design, gets the job done. I also wanted to say thanks for saying Monkey
Motor. Its fun like that. Question, I haven’t checked yet; did you add this to
the Building Instructions Portal?
Great post, thanks!
e
|
|
| |
In lugnet.trains, Eric Sophie wrote:
| |
Cool design, gets the job done. I also wanted to say thanks for saying Monkey
Motor. Its fun like that.
|
Thanks, Eric! Not sure I can take credit for “monkey motor”, though. I
think I heard that phrase (or one very similar) used somewhere else. I’m not
sure. That would be cool if it caught on - it’s sorta fun, like you say! :-)
| |
Question, I haven’t checked yet; did you add this
to the Building Instructions Portal?
|
I’ll look into that. I don’t really frequent BIPortal all that often, and when
I do, I tend to get “lost”. It probably has something to do with how frames are
used by the site to link externally.
Cheers,
Mark
|
|
| |
In lugnet.trains, Philippe Label wrote:
| |
In lugnet.trains, Mark Riley wrote:
| |
Hi All,
Here’s an update of one of my
earlier motorized
switch designs. This design utilizes the new-style monkey(1) motor
instead of the traditional Technic mini motor:
|
...
| |
Building diagrams can be found at my BrickShelf folder:
|
Hello Mark,
All I want to say right now is THANK YOU Mark. Again a very good shot.
Now I am lurking around for useless “monkey” motors in the stock :-)
The other point is to find Digitrax decoders around here.
Can we still use a motor in the regular way even with a decoder mounted
inside?
|
Hi Philippe,
You’re welcome & thanks! Perhaps Lenz decoders are more readily available where
you live? They have some pretty small ones on their site here:
http://www.lenz.com/products/decoders/index.htm
The answer to your other question is “sort of”. Most decoders have a DC
compatibility mode where the decoder will pass power directly to the motor in
the absence of a DCC signal (i.e. rapid reversals in polarity). The problem is
that this doesn’t kick in til about 3 volts, so you loose some of your low
speeds. Also, you loose about a volt off the top because of diode drops in the
decoder. I have no idea what a DCC decoder will do with a PWM signal as
produced by an RCX operating at partial power, though - I’ll have to check into
that.
Hope that helps,
Mark
|
|
|
