 | | | | | | |
| |

|
With the proliferation of Znap on clearance, I have been wondering how Znap can
be interfaced to System. Here I present four possible methods:
<http://www.brickshelf.com/cgi-bin/gallery.cgi?f=7818>
Method 1 - uses <part:2476> Plate 2 x 2 with Pin. Multiple of these are stagered
along a znap beam. Then you can place a 2x or 4x plate across them. This seems
to be very structuraly sound. I can imagine this being used either flat or in a
vertical mode (as in skinning the side of a large building).
Method 2 - uses <part:4274> Techinic Pin 1/2. Each pin is a standard Techinc pin
coupled with a standard stud. This is slightly less sound than method 1, mostly
because you have 1/2 the number of pins, but it does give you 1:1 alignment
between the system studs and the znap holes.
Method 3 - uses <part:2458> Brick 1 x 2 with Pin. This would probably be used in
a building skinning application also. Seems to be quite sound.
Method 4 - uses <part:2460> Tile 2 x 2 with Pin. A good method of attaching Znap
to a baseplate or any other supporting System structure, where conventional
studs are on the top.
All of these parts appear to be readily available in the marketplace. One might
even describe them as being 'less desirable' parts. Another example of bricolage
:)
Ray
| | | | | | | | | | | | | | |
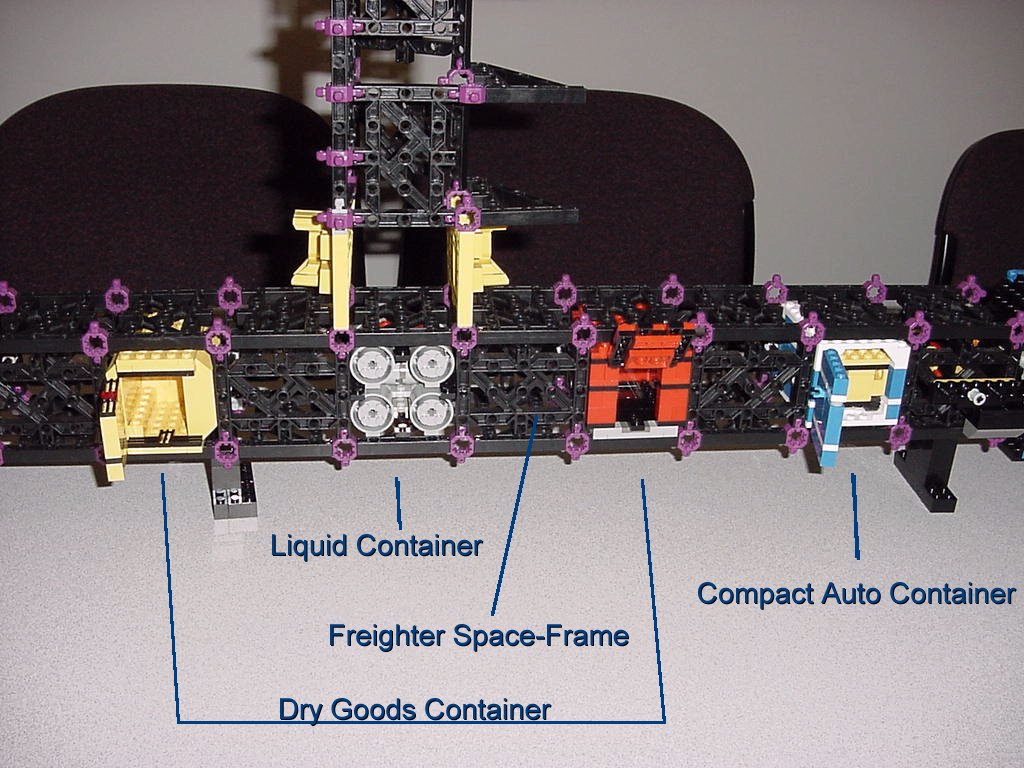
You may have already discovered this, but creations built of Znap are almost
always an odd number of System studs long. I built a Space Freighter frame and
the cargo containers all had to be 7 studs wide and seven studs long. I forget
how tall they are. Look here:
http://brickshelf.com/gallery/asneary/Space/Ships/space06label.jpg
It's also important to remember that Znap width is equal to LEGO brick width,
but not height, and they are square, unlike LEGO. I found that very frustrating
at first.
One more thing, if you build openings such as the ones the containers are in,
the purple connectors are angled and protrude into the 7 x 7 in the corners,
making a bit of the opening only 6 wide.
Let me know if you come up with any other cool ideas...
| | | | | | | | | | | | | | | | | |
| |
|
In lugnet.znap, Aaron Sneary writes:
> You may have already discovered this, but creations built of Znap are almost
> always an odd number of System studs long. I built a Space Freighter frame and
> the cargo containers all had to be 7 studs wide and seven studs long. I forget
> how tall they are. Look here:
> http://brickshelf.com/gallery/asneary/Space/Ships/space06label.jpg
Ever thought about using the "jumper" bricks (the 1 x 2 plates with the stud
in the center) to create an offset? This would let you make a 6 wide roof,
and 7 wide compartment for the ZNAP.
I'm working on a project with the ZNAP. As I come up with some skinning
techniques, I'll try to keep them posted here. Until then, you can look at
my latest ZANP project--a double wide train bridge at 110 studs long. Here
it is: http://www.brickshelf.com/cgi-bin/gallery.cgi?i=105239
Scott Lyttle
>
> It's also important to remember that Znap width is equal to LEGO brick width,
> but not height, and they are square, unlike LEGO. I found that very frustrating
> at first.
>
> One more thing, if you build openings such as the ones the containers are in,
> the purple connectors are angled and protrude into the 7 x 7 in the corners,
> making a bit of the opening only 6 wide.
>
> Let me know if you come up with any other cool ideas...
| | | | | | | | | | | | | | | | | | |
| |
|
In lugnet.znap, Scott Lyttle writes:
> Ever thought about using the "jumper" bricks (the 1 x 2 plates with the stud
> in the center) to create an offset? This would let you make a 6 wide roof,
> and 7 wide compartment for the ZNAP.
Actually, that's exactly how those containers were built. I was originally
inspired to start making 5 and 7 wide cars since the train heads were always
arguing 6 or 8. I said make 'em 7 and stop complaining. Then I went home and
tried it. This truck is actually a combination of 4, 5, and 6 wide:
http://brickshelf.com/cgi-bin/gallery.cgi?i=70939
When I discovered the 7 wide openings common on Znap, I knew I could build
containers with floors and roofs at 6 and walls at 7 wide.
I did some experimenting with alternating by half steps withOUT jumper tiles.
Using the tubes on the underside of bricks and plates you can widen a cornice
(my example) from 6 wide to 7 (keeping the 7 wide plate centered, and then to 8
wide. I don't have pictures yet, but hopefully will in the next weekend or so.
Have you guys found ANY system brick that connects or fits with the purple
connectors?
Aaron Sneary
http://brickshelf.com/cgi-bin/gallery.cgi?m=asneary
| | | | | | | | | | | | | | | | | | | | |
In lugnet.znap, Aaron Sneary writes:
>
> Have you guys found ANY system brick that connects or fits with the >purple
> connectors?
>
> Aaron Sneary
> http://brickshelf.com/cgi-bin/gallery.cgi?m=asneary
Try using the studless Technic beams. Alternately, I had some success using
plates and tiles stacked 3 high, but it's a very tight fit.
If you keep thinking of 1 stud wide, 1 studless brick high ways of
connecting, there may be some really cool uses for these connectors yet.
-Dave
| | | | | | | | | | | | | | | | | | |
In lugnet.znap, Scott Lyttle writes:
>
> I'm working on a project with the ZNAP. As I come up with some skinning
> techniques, I'll try to keep them posted here. Until then, you can look at
> my latest ZANP project--a double wide train bridge at 110 studs long. Here
> it is: http://www.brickshelf.com/cgi-bin/gallery.cgi?i=105239
>
> Scott Lyttle
Why are there star wars people all over that bridge ? Is that a Jar-Jar
signalman I see working for the railroad ? Inquiring minds want to know ;)
Ray
| | | | | | | | | | | | | | | | |
> Why are there star wars people all over that bridge ? Is that a Jar-Jar
> signalman I see working for the railroad ? Inquiring minds want to know ;)
>
> Ray
Well, truth be told, I just wanted a place to put all the Star Wars figures
together, and we were running out of space (no pun intended there) to put
figures. The bridge was empty, and I had a handful of Star Wars figures
closeby, so I just put them there. Jarjar is tempting fate by crossing over
two live tracks...I think Lewis Valentine's "General" steam engine knocked
him over at one point.
I'm continuing work on the bridge. I hope to have a monorail attached to
the bridge as well at some point.
-Scott
| | | | | | | | | | | | | | | | |
In lugnet.znap, Scott Lyttle writes:
> I'm continuing work on the bridge. I hope to have a monorail attached to
> the bridge as well at some point.
You should look around Brickshelf.com, someone was working on a monorail system
using Znap as the rail. Perhaps you could intergrate the track and the bridge's
topmost strut into one Znap thing-bob.
Aaron
| | | | | | | | | | | | | | | | |
Znap was designed by Lego to be fully integrateable with system elements. The
znap stud circumference is tangent to a brick stud circumference at the 4
cardinal points, meaning you can mount a system brick on a znap connector stud.
The height of a purple 4 ay connector is one plate above znap beam height, so
you can build bricks over a znap girder by mounting a brick along the znap studs
and clicking a plate beneath the brick between the studs. Results in a nearly
seamless flow from znap elements to brick elements. The socket at the end of a
znap brick will take a system stud side on, meaning you can mount say a double
arch to a vertical lego wall by incorporating two headlight bricks into the
wall. These are all mathematical characteristics Lego would have exploited in
3rd and 4th year sets, if the Znap line had been continued.
| | | | | | |