| |
Hello,
I purchased set 10124 and assembled it over the weekend. Like some of the other
comments I read here on lugnet, I found the model to be very flimsy and
difficult to assemble.
My main problem was with the wings. It was like the large tile-plates (this
piece) that made up the wings just did
not want to stick together. As I assembled the wings they also wanted to take
on a significant droop. If I tried to flatten the droop out, the wings would
basically disintegrate. When I tried to mate the lower wing section to the
“wooden” frame the wing just would not stick to the frame. What I found was
that the brown 2x16 plate on the rear portion of the frame did now want to stick
to the tan 6x16 tile-plate that made up the rear portion of the wing center
section.
After examining the parts more closely I found that the large tan “6x16 tiles
with studs on edges” are flawed. They are ~1 mm longer than the brown 2x16
plates! Further more the when you fix the one end of the 6x16 tile and the 2x16
plate together the studs are misaligned at the other end! I compared these
pieces against a 20yr-old 1x16 techic beam from my collection the 2x16 plate
matched the beam but the 6x16 tile was visibly longer.
When you try to mate the 2x16 plate on top/bottom of the 6x16 tile a significant
curvature is introduced. If the 2x16 plate (shorter) is on top of the 6x16 tile
(longer) the assembly takes on an upward curvature as the pieces flex to get the
studs/tubes to line up. If the plate is on the bottom, a downward curvature is
produced. This would seem to explain the droop observed in the wing assemblies.
Further more, it also explains why the 2x16 plate would not stick to the bottom
of the wing since other elements in the wing assembly would not allow the tile
to take on the necessary curvature to mate up with the 2x16 plate.
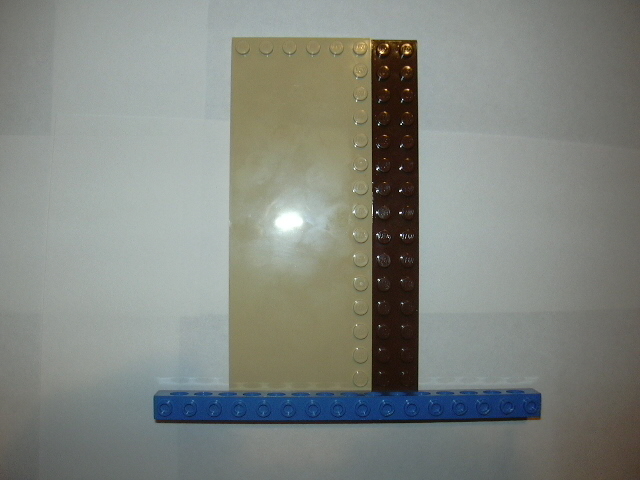
I took some pictures that hopefully demonstrate the problems with the 6x16 tile.
photo1 shows the setup I used. I used a technic 1x16 beam to align both the
6x16 tile and the 2x16 plate. Though the picture is a little dark, the
uneven-ness of the top edge is apparent as well as the miss alignment of the
studs.
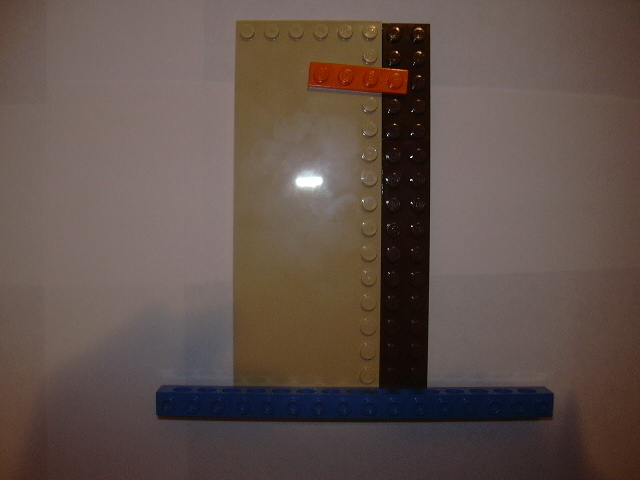
In photo2 I added an orange 1x4 plate on the 3rd stud from the top to the assembly
to emphasize the mis-alignment of the studs on both pieces.
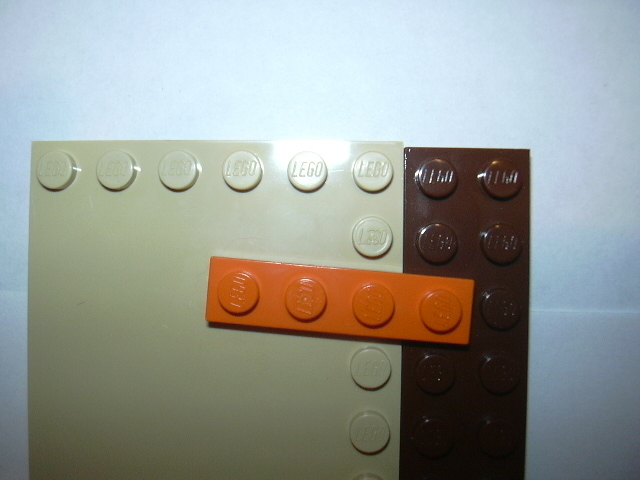
photo3 is a close up of the top edge. The difference in length and stud
alignment problems should be clearly visible.
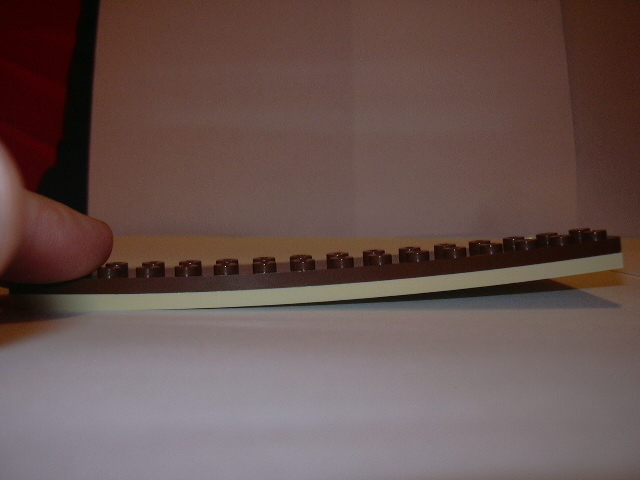
And finally,
photo4 shows the amount of curvature that is a result of the two pieces flexing
to line up the studs when the plate is attached to the top of the tile.
Since I’m not a plastics moulding expert, I have no idea what would cause such a
phenomenon. I checked every 6x16 tile in the set and they all exhibit the same
problem though. I should also note that all the 6x16 tiles seemed to be
slightly warped when I took them out of their plastic bags. I hope that this is
the result of some sort of process anomaly like where the pieces hadn’t fully
cooled/hardend when ejected from the mold and somehow stretched a bit and
weren’t caught by quality control.
I don’t remember having this problem with the 6x16 plates from my sopwith cammel
set or the red baron set but then again, their wing strutures are different so
may not be as sensitive to this problem. I would have to tear those models down
to check the parts though. I sincerly hope that this is not a problem with the
mold itself (or worse yet, the process used to design the molds). Any comment
from Lego on this would be appreciated. When they get this problem fixed it
would be nice if they would offer a new set of 6x16 tiles for the wright flyer
(I belive there are a total of 14 in the set).
Anyways, I replaced the rear 2x16 plate on the frame with 2 2x4 plates and the
wing was able to mate up much nicer (though with its inherent droop). I think
the error with the tile is that each stud is a tiny bit off (that adds up over
distance) so the 2x4 plates are able to mate up and the lower frame supports are
able to flex a little to make up the difference. I also found that mating the
lower wing to the frame first then buliding the “wooden” superstructure after
the wing was mated to the lower frame made for a much easier build. I was able
to assemble the rest of the model with this new understanding of the piece
geometry in mind. The model is actually quite solid once you get it together,
and the the wing-droop is probably more accurate to the original flyer. Another
option would be to use normal 6x16 tan plates in the center section of the wing
where it mates to the frame.
Other than the problems with the 6x16 tile, I am really impressed with this
model. I think that the Lego version honors the orginal quite well. The only
thing that I might add is a way for the control lever to acually actuate the
rudder and try to make the forward elevator move as well. Being an aviation
buff, I sincerly hope that Lego continues to produce large scale historical
aircraft. Hopefully, Lego might someday be willing to produce a Spitfire/BF109
combo or F4U/Zero combo on a similar scale as part of their historical aircraft
line.... even a Spirit of St. Louis model or Lockheed Vega of similar scale
would be really cool.
Enjoy,
drc
|
|
Message has 1 Reply:
5 Messages in This Thread:
  ")
- Entire Thread on One Page:
- Nested:
All | Brief | Compact | Dots
Linear:
All | Brief | Compact
|
|
|
|
