|
|
| |
In lugnet.znap, Steve Hassenplug <steve@teamhassenplug.org> wrote:
>
> At 01:49 PM 2/20/07, Jean-Marc Détraz wrote:
> > Here is finally a working GBC module ferris wheel made out of ZNAP.
>
> I forgot there is a ZNAP group on Lugnet... :)
Yeah, I forgot them too in my pile, but they happily resurfaced. ;~D
>
> > Enjoy the movie (poor quality)
> > http://www.brickshelf.com/gallery/Legomotive/NovaLUG-shows/PEI/gbc-movie1.avi
> >
> >
I uploaded the movie again, but without result... I dont know what is wrong the
2 other movies I uploaded were successful...
I might e-mail it to you so you can view it and maybe post it somewhere...
>
> I always find those loud ball-pumps very
> annoying. But, still, it's very cool. I like your stuff.
> Steve
Thanks! I'm working on a really cool module, but it's not completed yet and I go
back on the road for a couple of months, so it'll wait...
JM
|
|
| |
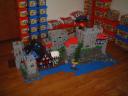
Hello gang!
Here is finally a working GBC module ferris wheel made out of ZNAP.
After many reflexions, I wanted to put at a good use some of my ZNAP pieces.
I was thinking for quite a while on how to use a ferris wheel for the GBC.
http://www.brickshelf.com/cgi-bin/gallery.cgi?i=2332259
The unloading part is easy, but the loading part gave me some work to do...
Then I got the idea of dropping the balls vertically onto the baskets. It works
at about 90% which is just good enough to have a good try.
I displayed it last weekend in the JFF in Charlottetown, PEI
<http://www.brickshelf.com/cgi-bin/gallery.cgi?f=235498>
It worked twice for 5 hours in a row. (WAY too long! but quite a test for the
modules). The balls missing the baskets went on the floor sometimes and the kids
were always enjoying collect them and put them back into the circuit...
The way I use the orange tower was the solution I chose in order to use the
Ferris wheel. I would prefer to build a different "feeding" method, but it takes
time!!!
Enjoy the movie (poor quality)
http://www.brickshelf.com/gallery/Legomotive/NovaLUG-shows/PEI/gbc-movie1.avi
The second module is a simple one, yet 100% reliable! A track on the bottom of
the entry basket,
http://www.brickshelf.com/cgi-bin/gallery.cgi?i=2332263
and a serie of rotating technic plate 1x5
<http://www.bricklink.com/catalogItem.asp?P=2711>
The sloping angle can vary, but it can't climb on a high angle. In the position
it is in, ther is never 2 balls climbing together, even if there is lots of them
coming in at the same time.
http://www.brickshelf.com/cgi-bin/gallery.cgi?i=2332261
Enjoy this movie:
http://www.brickshelf.com/gallery/Legomotive/NovaLUG-shows/PEI/gbc-movie2.avi
I realize that I will have to take more and better pictures...
LMKWYT, JM
|
|
| |
Very nice! Function all the way ; ) I must try something similar (though
perhaps with some unwanted bionicle parts from the new viking sets...) Thaks for
sharing and God Bless,
Nathan
Visit my brickshelf gallery:
 (pic=link)
|
|
| |
In lugnet.announce.moc, Ray Sanders wrote:
| |
A year back I got a new laptop. One of the first things I noticed was how
close it was to the table surface and how little air got to the bottom side
for cooling. A couple of design attempts yielded this platform, which yields
a vary cool running lappy ;)
with laptop in operation

without laptop to expose construction

All parts are ZNAP (other than a few Technic Pins). Mostly these parts...
18x 32206 Znap Beam 9, 5 Holes, 4 Bends (Half-Octagon)
(various colors)
20x 32213 Znap Grid 9 x 7, 15 Holes
(various colors)
20x 32203 Znap Beam 7, 3 Holes
(various colors)
5x Zbb014 Znap Connector 1 x 3 - 2 way A
(light Gray)
42x Zbb013 Znap Connector 3 x 3 - 4 way B (Beam)
(purple)
2x 32246 Znap Beam 8, 4 Holes, 3 Bends, Curved
(I used yellow)
4x 4459 Technic, Pin WITH Friction Ridges Lengthwise
(black, holds side arms)
The space below the bottom also provides handy space to store pens and
pencils.
|
Nice idea! :)
If I may, a suggestion: remove the front supports and replace with some internal
triangular bracing if possible, then you can store notes and other things
underneath the lappy - good on you for using znap as well, the ugly stepchild of
Lego.
Cheers,
Matt
.:Brickology Level: 225 - Where’s the artisan trainer?:.
|
|
| |
I like the way you haven’t wasted any useful parts on it :-).
|
|
| |
A year back I got a new laptop. One of the first things I noticed was how close
it was to the table surface and how little air got to the bottom side for
cooling. A couple of design attempts yielded this platform, which yields a vary
cool running lappy ;)
with laptop in operation
without laptop to expose construction
All parts are ZNAP (other than a few Technic Pins). Mostly these parts...
18x 32206 Znap Beam 9, 5 Holes, 4 Bends (Half-Octagon)
(various colors)
20x 32213 Znap Grid 9 x 7, 15 Holes
(various colors)
20x 32203 Znap Beam 7, 3 Holes
(various colors)
5x Zbb014 Znap Connector 1 x 3 - 2 way A
(light Gray)
42x Zbb013 Znap Connector 3 x 3 - 4 way B (Beam)
(purple)
2x 32246 Znap Beam 8, 4 Holes, 3 Bends, Curved
(I used yellow)
4x 4459 Technic, Pin WITH Friction Ridges Lengthwise
(black, holds side arms)
The space below the bottom also provides handy space to store pens and pencils.
|
|
| |
In lugnet.build, Ray Sanders wrote:
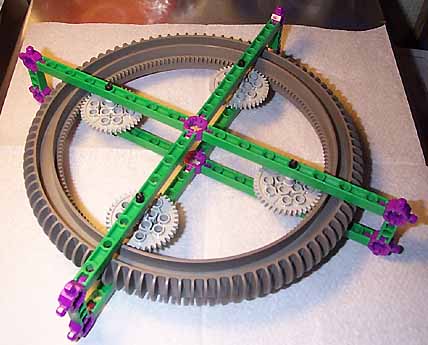
Version 2: now I have hard points on one side to attach it to something... and I
have complete clearance on the edge on the wheel...
The two halves are held together with eight p/n 32207 ( apparently a ZNAP
connector ) and four regular technic pins with friction ( which are hidden
within the ZNAP connectors ).
If I wanted to use up 16 of the 40-tooth gears and four of the big hailfire
wheels, I could have the beginnings of a vehicle here (mega-scale of course).
brickshelf folder after
moderation
Ray
|
|
| |
In lugnet.build, Geoffrey Hyde wrote:
> I've been thinking, there's gotta be some way one could adapt one or two of
> those hailfire droid wheels for a turntable assembly, like for a crane
> project or to build a rotating restaurant on top of. Anyone got any ideas
> or photos that might help?
Several people have already done it, here's just one example:
http://www.brickshelf.com/cgi-bin/gallery.cgi?i=709148
ROSCO
|
|
| |
I've been thinking, there's gotta be some way one could adapt one or two of
those hailfire droid wheels for a turntable assembly, like for a crane
project or to build a rotating restaurant on top of. Anyone got any ideas
or photos that might help?
Cheers ...
Geoffrey Hyde
"Ray Sanders" <rsanders@svic.net> wrote in message
news:I8BpxF.yCG@lugnet.com...
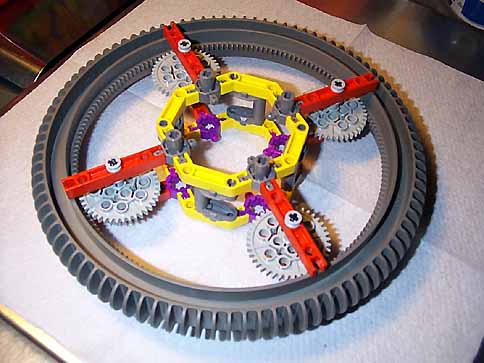
> The other night, I started exploring what uses can be made of the big gear
> wheel
> from the Hailfire Droid. Having plenty of ZNAP beams handy, I used a few
> of them
> as a gear box to hold the wheel.
>
> <<http://www.brickshelf.com/gallery/cosmicray/hailfire-wheel/dcp04851sm.jpg>>
>
> The first attempt was to use four 8-tooth gears, in the next pin hole out
> from
> the center. That worked, but there appears to be an issue with the
> inside-curvature of the big droid wheel (an inverted gear as I think of
> it) and
> the tight turning radius of the 8-tooth gears. Much chattering of the gear
> teeth
> was heard. So I switched up to 40-tooth gears (as shown above). Very
> smooth
> action now... and quiet ! Someone in another thread remarked that the
> droid
> wheel could have used some pin-holes (for securing to an object).. I
> concur on
> that.
>
> Onward to practical uses ! (like using it to drive my ferris wheel)
>
> Ray
|
|
|