| |
Hello Nate,
Just for your information, are you familiar with this ingeneous remote
switch solution designed by Rick Clark:
http://news.lugnet.com/trains/?n=16648 ?
With friendly greetings, M. Moolhuysen.
|
|
| |
Nate Jacobs wrote:
> The journey down the long and winding road of trains....
Welcome!
<snip>
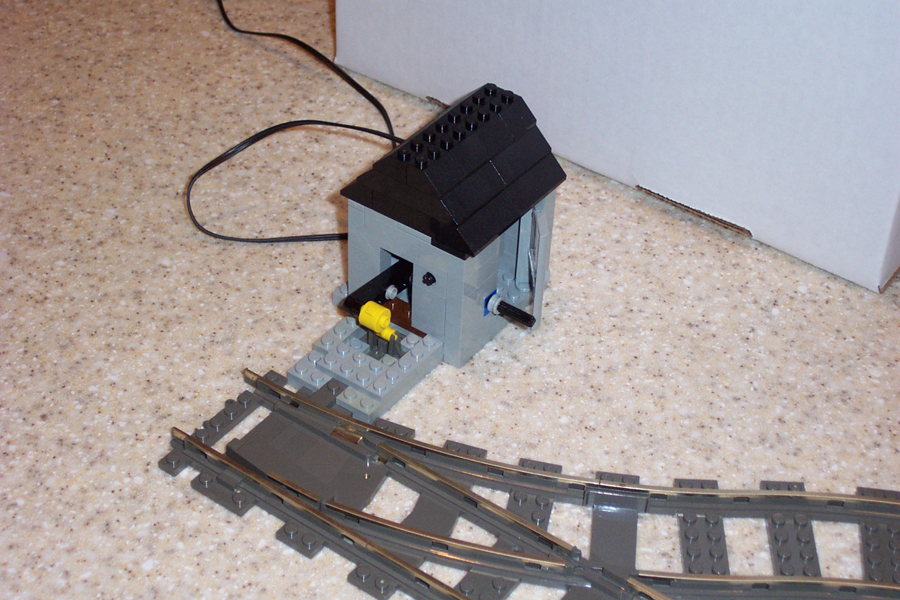
> Automatic Switch House
> http://www.brickshelf.com/cgi-bin/gallery.cgi?f=32202
> (After Moderation)
Nice design! Haven't built it yet, but it looks rather elegant. The only
thing is that you may find that if you're using MindStorms to control
the point, it is difficult to keep the motor on long enough to throw the
switch, and short enough to keep from tearing the housing apart. Or have
you tested it for this already?
A great stress test was proposed to me by fellow PNLTC member Steve
Barille: Cycle the switch 100 times, leaving the motor on for one full
second in each direction. If the housing is still intact at the end, you
have a winner! (Of course, if you're operating the remote switch
manually, this is less of an issue.)
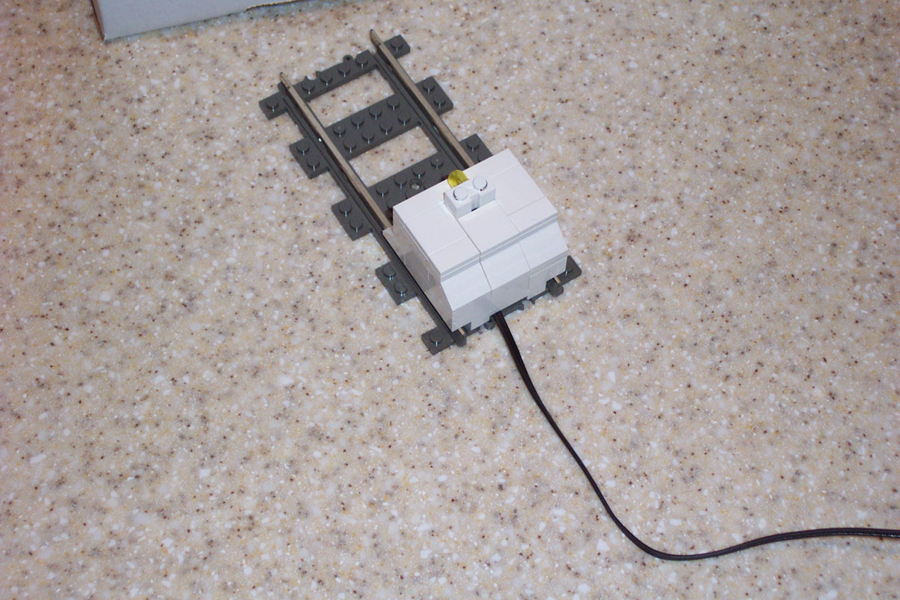
> End of the Line Bumper with Flashing Light
> About a week ago Rob Hendrix posted a set of instructions for his end of
> the line bumper (http://news.lugnet.com/inst/?n=242). I took his version
> and added a flashing light to the top.
>
> http://www.brickshelf.com/cgi-bin/gallery.cgi?f=32201
> (After Moderation)
The only problem with this design is that it is not functional. Well, it
is, but crashing into it puts a good deal of stress on the train's
magnet housing (which is a bit delicate), instead of on the train's
bumpers (which are quite sturdy). Add a pokey-out thing [1] on each side
of the bumper and you will eliminate any potential magnet damage.
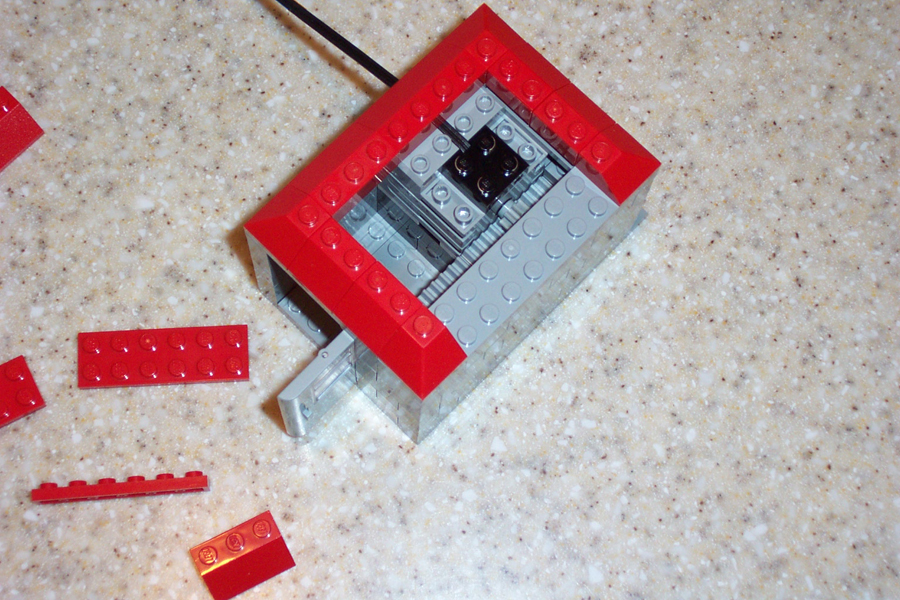
> Automatic Decoupler
> I did some digging looking for any designs people had done of an automatic
> decoupler. I found Martin Legault's design
> (http://news.lugnet.com/trains/?n=16347) and
> Rick Clark's design (http://www.brickshelf.com/cgi-bin/gallery.cgi?f=18638).
> I then set out to build my own. It works quite well. It is fantastic not
> to have to take the train apart by hand.
Thanks for the cite, but don't underestimate the benefits of manual
uncoupling, either. I use a manual uncoupling tool for most (all) of my
switching. It is much more prototypical in that you can uncouple
wherever you want, instead of being locked into set locations. I waxed
poetic about it here:
http://news.lugnet.com/trains/?n=16315
Again, welcome to Trains! It looks like you're well on your way. We'll
expect more great things from you in the near future!
Rick C.
[1] It's a technical term.
|
|
| |
M. Moolhuysen wrote:
> Just for your information, are you familiar with this ingeneous remote
> switch solution designed by Rick Clark:
> http://news.lugnet.com/trains/?n=16648 ?
Many thanks for the props. I made a slight change in the original design
so that it incorporates a LEGO rubber band rather than getting power
directly from the motor shaft. It didn't increase the size at all, and
eliminated an intermittent motor-stalling problem I was having. I'll try
to post an update in the next few weeks.
Rick C.
PS. Just to be clear, this is referring to a remote SWITCH solution.
When I read MM's post (too quickly, in hindsight), I thought he was
referring to my remote DECOUPLING solution, which Nate had already
posted about. This is because I'm a dunderhead.
|
|
| |
In lugnet.trains, Nate Jacobs writes:
> The journey down the long and winding road of trains....
>
> Earlier this month I had the opportunity to participate in the GATS show in
> Syracuse, NY with LUCNY. This event really kicked my entrance into the
> Train aspect of LEGO into high gear. I had bought some track and had the
> Santa Fe and Metroliner before the event, but the thrill of showing off a
> layout and interacting with the crowd was the coup-de-gras.
Glad to hear you caught the bug. I should have never given you the remote
control that day... :-)
*snip-o-matic*
>
> Automatic Switch House
> I took the designs of Jeff Elliot
> (http://www.brickshelf.com/cgi-bin/gallery.cgi?f=10867) and
> Ed McGlynn (http://news.lugnet.com/trains/?n=15934) and added my own little
> twist.
>
> http://www.brickshelf.com/cgi-bin/gallery.cgi?f=32202
> (After Moderation)
>
> http://www.brickshelf.com/gallery/njelmo98/Train/Switch/switch1.jpg
> (More pictures available)
Jeff's design is great, and it looks like you have compacted the footprint a
bit. What's the cycle time on the swithching mechanism? Shorter is better,
I'd say. Nice roof lift-off feature.
*snip-o-matic*
> Automatic Decoupler
> I did some digging looking for any designs people had done of an automatic
> decoupler. I found Martin Legault's design
> (http://news.lugnet.com/trains/?n=16347) and
> Rick Clark's design (http://www.brickshelf.com/cgi-bin/gallery.cgi?f=18638).
> I then set out to build my own. It works quite well. It is fantastic not
> to have to take the train apart by hand.
>
> http://www.brickshelf.com/cgi-bin/gallery.cgi?f=32203
> (After Moderation)
>
> http://www.brickshelf.com/gallery/njelmo98/Train/Decoupler/dec3.jpg
> (More pictures available)
I fiddled with Rick's design as well, but preferred the newer motor as
you've used it (since I only have one older-style motor). I ran into
problems balancing with the speed and torque of the motor and stopping the
throw of the pushrod used to force between the magnets. Do you use and RCX
to control your version? What happens at the far end of the pushrod throw -
fully extended? Does the small gear attached to the output shaft of the
motor hit a brick or grind away at the rack? I had those problems. Lemme
sort that out:
Old motor style: Used pulleys, not very effective at the extent of the
pushrod throw.
New motor style: Used small gear directly in contact with a rack. Got
gummed up and started stripping rack teeth at the end of the throw if I
wasn't watching.
How do you line up the trains for decoupling?
This type of automated decoupling is fantastic for an automated layout. I
can't wait to use your design in our next show. Nice work!
Ed
|
|
| |
In lugnet.trains, Rick Clark writes:
> > Automatic Switch House
> > http://www.brickshelf.com/cgi-bin/gallery.cgi?f=32202
> > (After Moderation)
>
>
> Nice design! Haven't built it yet, but it looks rather elegant. The only
> thing is that you may find that if you're using MindStorms to control
> the point, it is difficult to keep the motor on long enough to throw the
> switch, and short enough to keep from tearing the housing apart. Or have
> you tested it for this already?
>
> A great stress test was proposed to me by fellow PNLTC member Steve
> Barille: Cycle the switch 100 times, leaving the motor on for one full
> second in each direction. If the housing is still intact at the end, you
> have a winner! (Of course, if you're operating the remote switch
> manually, this is less of an issue.)
I am controlling it it with the RCX. So far I have let it run about 100 or
more times in a row. The housing stays intact and the switch cycles. I
have it set so when it receives Message 1 from the remote it operates for
2.75 seconds. It is just enough time to switch completly. The only issue
is about every 27 times or so the message has to be sent twice to get it to
cycle properly. Still tweeking the setup.
> > End of the Line Bumper with Flashing Light
> > About a week ago Rob Hendrix posted a set of instructions for his end of
> > the line bumper (http://news.lugnet.com/inst/?n=242). I took his version
> > and added a flashing light to the top.
> >
> > http://www.brickshelf.com/cgi-bin/gallery.cgi?f=32201
> > (After Moderation)
>
>
> The only problem with this design is that it is not functional. Well, it
> is, but crashing into it puts a good deal of stress on the train's
> magnet housing (which is a bit delicate), instead of on the train's
> bumpers (which are quite sturdy). Add a pokey-out thing [1] on each side
> of the bumper and you will eliminate any potential magnet damage.
I had noticed some strain when the magnet housing hit the block. I hadn't
thought about having two "pokey-out" things from the front. I will have to
give some thought to that. Thanks for the suggestion.
>
> > Automatic Decoupler
> > I did some digging looking for any designs people had done of an automatic
> > decoupler. I found Martin Legault's design
> > (http://news.lugnet.com/trains/?n=16347) and
> > Rick Clark's design (http://www.brickshelf.com/cgi-bin/gallery.cgi?f=18638).
> > I then set out to build my own. It works quite well. It is fantastic not
> > to have to take the train apart by hand.
>
>
> Thanks for the cite, but don't underestimate the benefits of manual
> uncoupling, either. I use a manual uncoupling tool for most (all) of my
> switching. It is much more prototypical in that you can uncouple
> wherever you want, instead of being locked into set locations. I waxed
> poetic about it here:
> http://news.lugnet.com/trains/?n=16315
I did read your eloquently stated post about manual uncoupling. I agree the
manual method is adventagous for a normal layout. My thinking behind this
automatic method was for use in a totally automatic layout. That could just
continuously run.
> Again, welcome to Trains! It looks like you're well on your way. We'll
> expect more great things from you in the near future!
Thanks for the welcome!
Nate
|
|
| |
In lugnet.trains, Ed McGlynn writes:
> In lugnet.trains, Nate Jacobs writes:
> > The journey down the long and winding road of trains....
> Glad to hear you caught the bug. I should have never given you the remote
> control that day... :-)
I agree, it was a monumental event!
> > Automatic Switch House
> > I took the designs of Jeff Elliot
> > (http://www.brickshelf.com/cgi-bin/gallery.cgi?f=10867) and
> > Ed McGlynn (http://news.lugnet.com/trains/?n=15934) and added my own little
> > twist.
> >
> > http://www.brickshelf.com/cgi-bin/gallery.cgi?f=32202
> > (After Moderation)
>
> Jeff's design is great, and it looks like you have compacted the footprint a
> bit. What's the cycle time on the swithching mechanism? Shorter is better,
> I'd say. Nice roof lift-off feature.
The cyle time is 2.75 seconds. Only issue is about every 27 or so times it
has to be run twice to complete a cycle.
> *snip-o-matic*
>
> > Automatic Decoupler
> > I did some digging looking for any designs people had done of an automatic
> > decoupler. I found Martin Legault's design
> > (http://news.lugnet.com/trains/?n=16347) and
> > Rick Clark's design (http://www.brickshelf.com/cgi-bin/gallery.cgi?f=18638).
> > I then set out to build my own. It works quite well. It is fantastic not
> > to have to take the train apart by hand.
> >
> > http://www.brickshelf.com/cgi-bin/gallery.cgi?f=32203
> > (After Moderation)
>
> I fiddled with Rick's design as well, but preferred the newer motor as
> you've used it (since I only have one older-style motor). I ran into
> problems balancing with the speed and torque of the motor and stopping the
> throw of the pushrod used to force between the magnets. Do you use and RCX
> to control your version? What happens at the far end of the pushrod throw -
> fully extended? Does the small gear attached to the output shaft of the
> motor hit a brick or grind away at the rack? I had those problems. Lemme
> sort that out:
> Old motor style: Used pulleys, not very effective at the extent of the
> pushrod throw.
> New motor style: Used small gear directly in contact with a rack. Got
> gummed up and started stripping rack teeth at the end of the throw if I
> wasn't watching.
I am controlling it by the RCX. I have it set now so that when it receives
message 3 from the remote, motor turns on for 0.4 seconds (just enough to
extend the pushrod, but not enough to cause the gear to come off the rack),
then wait 5 seconds (plenty of time for engine to pull away), followed by a
change of direction of the motor and then motor on again for 0.4 seconds.
It works great. I have no slipping of gears or any harm to anything.
> How do you line up the trains for decoupling?
Pretty hapzardly...For a trial run I pulled an engine and three cars onto a
siding with one of my end of the line bumpers on it and then attached the
decoupler to the track by where the engine and first car ended up. Kinda
confusing, but I will take some pictures to show what I mean. The placement
would all depend on the size of the train.
> This type of automated decoupling is fantastic for an automated layout. I
> can't wait to use your design in our next show. Nice work!
That is what I was thinking!
Nate
|
|
|