 | | | | | | |
| |

|
In lugnet.cad.ray, John O'Keefe wrote:
> I have corrected my links so that now people should see the images
> regardless if they have been moderated yet or not.
>
> I need some help making better LEGO renderings and getting around some
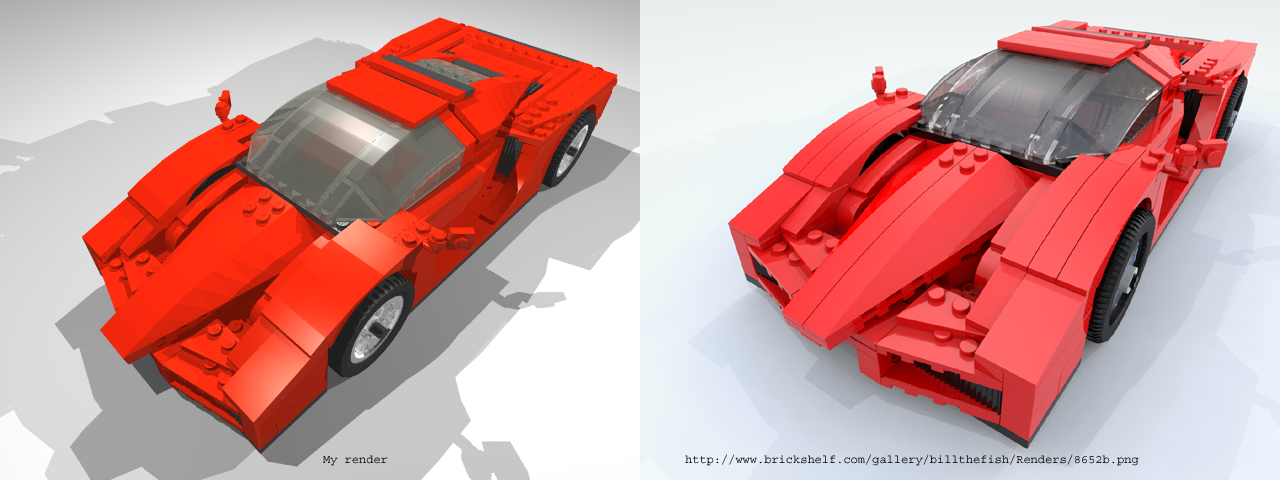
> errors that I am encountering. Here is an example of my render on the left
> and someone else's cool render on the right:
>
> http://www.brickshelf.com/gallery/JoJa15/Renders/8652.png
>
> As you can see I have a lot to improve in my renders. My color, floor, and
> lighting looks fake. The other persons looks realistic and natural. My LEGO
> parts are faceted and flat, the other persons look smooth and glossy. My
> transparent parts look fake, the other persons look realistic.
>
> To create this render I first downloaded the dat file for the Ferrari set
> here:
>
> http://www.pobursky.com/files/8652.mpd
>
> I am using the tools that come with the "LDRAW all in one installer" found
> here:
>
> http://www.ldraw.org/modules.php?op=modload&name=News&file=article&sid=104
>
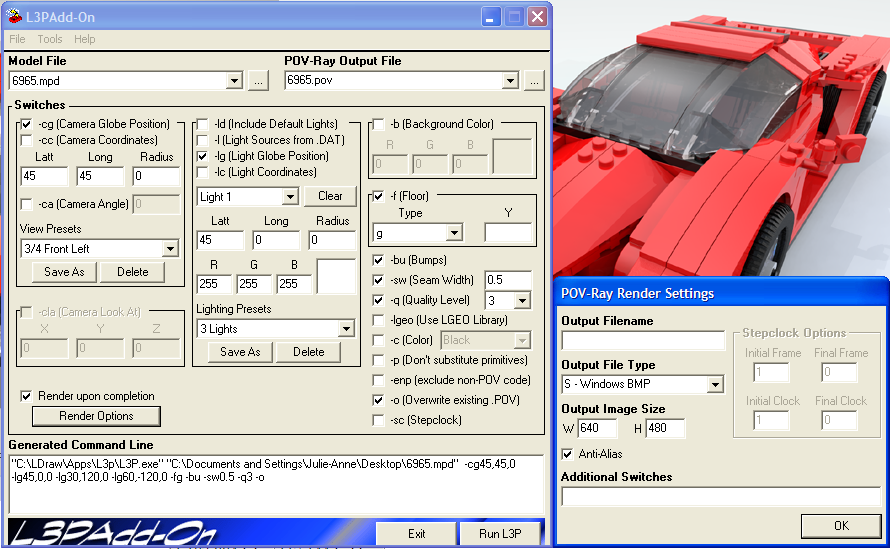
> I launch L3PAO and use the following settings:
>
> http://www.brickshelf.com/gallery/JoJa15/Renders/l3pao_settings.png
>
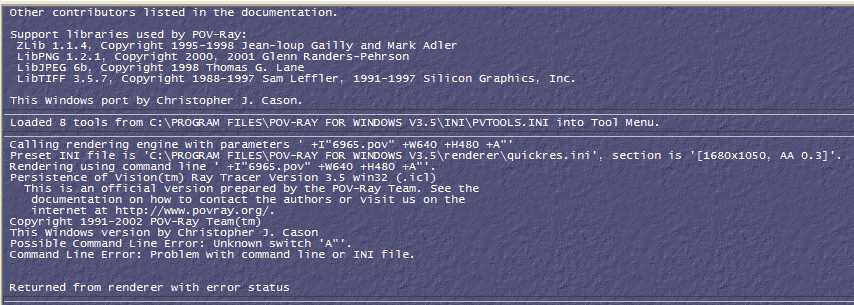
> I then select "Run L3P". That launches a command line window and then it
> launches POV-Ray for Windows. POV-Ray displays an error in the error window
> which can be seen here:
>
> http://www.brickshelf.com/gallery/JoJa15/Renders/pov-ray_error1.png
>
> I select "Run L3P" again and now get an error message dialogue box titled
> "Commandline processing error" with a message in the dialogue saying "Only
> /EDIT and /RENDER may be passed to previous instance". The only option is to
> press the "OK" button for the message box.
>
> I assumed the "unknown switch A error" was due to anti-aliasing so I turned
> that option off in the L3PAO dialogue. I then closed down POV-Ray to get
> around the "Only /EDIT and /RENDER may be passed to previous instance"
> error. I clock "Run L3P" again and now it renders the image seen at the top
> of this message.
>
> Here is where I need help:
>
> (1) Why do I get the first error in POV-Ray with the "Unknown switch A"? Is
> it due to the anit-aliasing setting in L3PAO? If it is due to that is there
> a way to have that option set but not have POV-Ray error out?
> (2) Why do I get the second error "Only /EDIT and /RENDER may be passed to
> previous instance" when I modify settings in L3PAO and then try to run
> another render?
> (3) Lastly and most important how can I get my renders to look like the
> Ferrari on the right in the first image at the top of this posting?
>
> Hopefully the listing of the steps I take above is detailed enough. If they
> are not please let me know what information I need to provide.
>
> Thank you in advance for any help provided!
>
> Best Regards,
> John
Hi John,
That render your using is mine and I'm 'billthefish' (at least outside of the UK
Football scene). It was produced using a number of different tools:
L3P
Mesh-Enhancer - http://members.aol.com/elferwette/LDraw/
The FastRad POV includes - http://www.brickshelf.com/cgi-bin/gallery.cgi?f=94173
The LUGNET color definitions include - http://www.pobursky.com/article/4
Basically the steps are:
- Generate a POV file with L3P (make sure LGEO option is selected)
- Run the POV file through Mesh-Enhancer. I had to experiment to find a good
crea angle that smoothed the edge that needed smoothing but left sharp edges
where they were supposed to be.
- Add in the includes for FasrRad and LUGNET Colors
- Render and wait.
If you have any question please don't hesitate to ask.
-Orion
| | | | | | | | | | | | | | | |
| |
|
> Hi John,
>
> That render your using is mine and I'm 'billthefish' (at least outside of
> the UK
> Football scene). It was produced using a number of different tools:
Thank you for the quick response Orion! I hope you didn't mind me using your
render as an example. It just looked so good and since you had the model
available for download it helped me quickly compare my rendering skills to
yours. :-)
> L3P
> Mesh-Enhancer - http://members.aol.com/elferwette/LDraw/
This was a big help! On my second guess for the angle I got something that
looked pretty good on the Ferrari. I ended up with an angle of 170 degrees.
Fortunately I am familiar with what the mesh enhancer does since we do
something similar in my line of work. I am surprised I have not seen this
tool mentioned anywhere on the LEGO community web sites. I have been
scouring lugnet, ldraw.org, brickshelf, and several other sites trying to
find info on LEGO rendering. After I am done figuring out all this stuff I
will probably create a step by step tutorial for people wanting to create
high quality renderings of their LDRAW files.
> The FastRad POV includes -
> http://www.brickshelf.com/cgi-bin/gallery.cgi?f=94173
The instructions were pretty easy to follow and I got it set up quickly. The
one thing that confused me about FastRad was the lights setting. In the
instructions it says it is designed for one bright light. In the
instructions it has you comment out one of the three default lights. In your
render (http://www.brickshelf.com/gallery/billthefish/Renders/8652b.png) it
looks like you have a couple lights. Did you leave the three default lights,
use only one light, or have your own custom lights?
For the "#declare ldraw_sky = 2; // Sky- 0-None; 1-White; 2-Blue; 3-Black."
setting at the top of the file what setting do you use? I am assuming you
used 2 Blue because there is a blue hue on your floor.
I am still having a problem getting my colors to look like yours. I am using
the #include "lg_color.inc" as you mentioned in your instructions. I am
unsure if the color difference between my render and your render is due to
the #include "lg_color.inc" not working, the camera angle difference between
my render and your render, or if you have different lights/sky colors that
effect the final color look of the render. Also my smoke windows look a lot
different then yours. Your smoke windows look very close to what they look
like in real life.
Here is the best I could come up with in terms of my renders:
http://www.brickshelf.com/gallery/JoJa15/Renders/8652_enhanced_170b.png
I found a different site on Brickshelf that has a modified colors and a
different radiosity file.
http://www.brickshelf.com/cgi-bin/gallery.cgi?f=92270
Have you used those before?
Here is an example render:
http://www.brickshelf.com/gallery/nicokaiser/cad/modelteam/2556-side.jpg
Very similar look and quality to yours. Looks like he uses more than one
light. Do you know how to do the reflective floor that he did in that
render?
- John
| | | | | | | | | | | | | | | | | |
| |
|
In lugnet.cad.ray, John O'Keefe wrote:
> > Hi John,
> >
> > That render your using is mine and I'm 'billthefish' (at least outside of
> > the UK
> > Football scene). It was produced using a number of different tools:
>
> Thank you for the quick response Orion! I hope you didn't mind me using your
> render as an example. It just looked so good and since you had the model
> available for download it helped me quickly compare my rendering skills to
> yours. :-)
No problem, that's what it's out there for.
> > L3P
> > Mesh-Enhancer - http://members.aol.com/elferwette/LDraw/
>
> This was a big help! On my second guess for the angle I got something that
> looked pretty good on the Ferrari. I ended up with an angle of 170 degrees.
> Fortunately I am familiar with what the mesh enhancer does since we do
> something similar in my line of work. I am surprised I have not seen this
> tool mentioned anywhere on the LEGO community web sites. I have been
> scouring lugnet, ldraw.org, brickshelf, and several other sites trying to
> find info on LEGO rendering. After I am done figuring out all this stuff I
> will probably create a step by step tutorial for people wanting to create
> high quality renderings of their LDRAW files.
The author of the program was also kind enogh to provide me with the source code
so I could learn from it.
> > The FastRad POV includes -
> > http://www.brickshelf.com/cgi-bin/gallery.cgi?f=94173
>
> The instructions were pretty easy to follow and I got it set up quickly. The
> one thing that confused me about FastRad was the lights setting. In the
> instructions it says it is designed for one bright light. In the
> instructions it has you comment out one of the three default lights. In your
> render (http://www.brickshelf.com/gallery/billthefish/Renders/8652b.png) it
> looks like you have a couple lights. Did you leave the three default lights,
> use only one light, or have your own custom lights?
I leave the 3 default lights but I lower their intensity by reduceing their
color from <1,1,1> to <0.1,0.1,0.1>. This provides low level lighting for the
scene and doesn't wash out the details.
> For the "#declare ldraw_sky = 2; // Sky- 0-None; 1-White; 2-Blue; 3-Black."
> setting at the top of the file what setting do you use? I am assuming you
> used 2 Blue because there is a blue hue on your floor.
Nope, I use setting 1
> I am still having a problem getting my colors to look like yours. I am using
> the #include "lg_color.inc" as you mentioned in your instructions. I am
> unsure if the color difference between my render and your render is due to
> the #include "lg_color.inc" not working, the camera angle difference between
> my render and your render, or if you have different lights/sky colors that
> effect the final color look of the render. Also my smoke windows look a lot
> different then yours. Your smoke windows look very close to what they look
> like in real life.
You need my lugnetcolors.inc (found at my website
http://www.pobursky.com/article/4). Include that instead of lg_colors.inc.
You probably will also need to tell POV-RAY where all these extra files are.
You can do that by adding the path into the master POV ini file. Just go to
Tool -> Edit master POVRAY.INI, scoll down to the bottom and new LIBRARY_PATH
statements as neccessary.
As to the Trans-Smoke color, I used a custom definition that is now in the
lugnetcolors.inc file. I just now uploaded to my website so make sure you
redownload it.
> Here is the best I could come up with in terms of my renders:
>
> http://www.brickshelf.com/gallery/JoJa15/Renders/8652_enhanced_170b.png
>
> I found a different site on Brickshelf that has a modified colors and a
> different radiosity file.
>
> http://www.brickshelf.com/cgi-bin/gallery.cgi?f=92270
>
> Have you used those before?
>
> Here is an example render:
>
> http://www.brickshelf.com/gallery/nicokaiser/cad/modelteam/2556-side.jpg
>
> Very similar look and quality to yours. Looks like he uses more than one
> light. Do you know how to do the reflective floor that he did in that
> render?
I not sure but here's the definition for the floor I use:
#declare Y_HIEGHT = XXX
object {
plane { y, Y_HEIGHT hollow }
texture {
pigment { color rgb <0.8,0.8,0.8> }
finish { ambient 0 diffuse 1 }
}
}
Replace XXX with the y position of the floor auto generated by L3P and then
delete L3P's default floor.
-Orion
| | | | | | | | | | | | | | | | | |
| |
|
> > > L3P
> > > Mesh-Enhancer - http://members.aol.com/elferwette/LDraw/
> >
> > This was a big help! On my second guess for the angle I got something
> > that
> > looked pretty good on the Ferrari. I ended up with an angle of 170
> > degrees.
> > Fortunately I am familiar with what the mesh enhancer does since we do
> > something similar in my line of work. I am surprised I have not seen this
> > tool mentioned anywhere on the LEGO community web sites. I have been
> > scouring lugnet, ldraw.org, brickshelf, and several other sites trying to
> > find info on LEGO rendering. After I am done figuring out all this stuff
> > I
> > will probably create a step by step tutorial for people wanting to create
> > high quality renderings of their LDRAW files.
>
> The author of the program was also kind enogh to provide me with the
> source code
> so I could learn from it.
Thank you for taking the time to reply on Christmas! I hope your Christmas
was a good one.
That is funny you mention that you have the source code. I was going to ask
the author if he could add a per part angle tolerance. Different parts
require different angles to get the proper result. When you enter an angle
for the entire model you are trying to choose an angle that improves the
majority of the parts while not ruining parts that should not have their
angle smoothed. In reality you should not have to enter any angle at all. If
the program can tell what part# it is working with it should be able to look
up a table of part number to smoothing angle. That way someone will only
need to go through the LEGO parts database once, determine the appropriate
angle, and then people would be able to run it through the mesh enhancer
without supplying an angle. The program would know the appropriate angle for
each part. Then everyone would be able to achieve very realistic renders
geometry wise. Unfortunately I am not that great of a programmer but I would
be willing to try and determine an appropriate angle for each part. Are you
good at programming or know someone that might want to modify the mesh
enhancer for that functionality?
> > > The FastRad POV includes -
> > > http://www.brickshelf.com/cgi-bin/gallery.cgi?f=94173
> >
> > The instructions were pretty easy to follow and I got it set up quickly.
> > The
> > one thing that confused me about FastRad was the lights setting. In the
> > instructions it says it is designed for one bright light. In the
> > instructions it has you comment out one of the three default lights. In
> > your
> > render (http://www.brickshelf.com/gallery/billthefish/Renders/8652b.png)
> > it
> > looks like you have a couple lights. Did you leave the three default
> > lights,
> > use only one light, or have your own custom lights?
>
> I leave the 3 default lights but I lower their intensity by reduceing
> their
> color from <1,1,1> to <0.1,0.1,0.1>. This provides low level lighting for
> the
> scene and doesn't wash out the details.
OK, I used <0.1,0.1,0.1> for all three lights, 1 for the sky declare, and I
made sure I am using lugnetcolors.inc instead of lg_color.inc.
Here is my render compared to yours now:
http://www.brickshelf.com/gallery/JoJa15/Renders/radiosity.png
It looks like I am getting closer. I matched your camera angle which helps
with making the comparison. It still looks like I am off on the lighting.
Your lighting still looks brighter and also gives the sense of a blue tint.
You can see the blue tint in the floor compared to mine. Your lighting looks
great. It looks like the car is in a big white room with bright flourescnet
lights. Mine is looking better but still not quite to the quality of yours.
Do you have any ideas what I may be missing?
Are my part colors still messed up too? It is hard to tell if it is the
lighting causing the color difference or if it is lighting and part colors.
My red is still darker then yours.
I also noticed that in my render the fender parts and the center nose parts
are not showing the black line seperation between the parts. I thought the
LGEO parts or the mesh enhancer were causing it. I tried renders without
those items and I still get the missing seperation between he fender and
nose pieces. All my other part seperations look similar to yours so I am
baffled what is causing it. Do you have any idea?
> > light. Do you know how to do the reflective floor that he did in that
> > render?
>
> I not sure but here's the definition for the floor I use:
>
> #declare Y_HIEGHT = XXX
> object {
> plane { y, Y_HEIGHT hollow }
> texture {
> pigment { color rgb <0.8,0.8,0.8> }
> finish { ambient 0 diffuse 1 }
> }
> }
>
> Replace XXX with the y position of the floor auto generated by L3P and
> then
> delete L3P's default floor.
I figured out how to do a reflective floor by looking at some POV sites. In
the finish statement of your floor you add the keyword "reflection". For
example in my render above my finish statement for the floor looked like the
following:
finish {reflection 0.4 ambient 0 diffuse 1}
I plan on exploring other effects like camera effects (blurring far and
near) as well as fog effects but I want to get my lighting tweaked first. I
really hope I am able to figure out how to get my renders like yours. Thank
you for all your help so far!
- John
-
| | | | | | | | | | | | | | | | | |
John wrote:
> OK, I used <0.1,0.1,0.1> for all three lights,
I usually write that as: 0.1*<1.0,1.0,1.0> which makes it much easier to
adjust the brightness, especially if you're using coloured lights (or many
lights).
Remember that the sum of all lights used should be in the vicinity of 1.0,
too much and you get a 'washed out' effect, too little and you get darkness.
An old example of many lights can be seen at
http://web.telia.com/~u16122508/merry.htm (my 1998 'Christmas Card'), scroll
down to the raytraced pictures.
--
Anders Isaksson, Sweden
BlockCAD: http://web.telia.com/~u16122508/proglego.htm
Gallery: http://web.telia.com/~u16122508/gallery/index.htm
| | | | | | | | | | | | | | | | | | | | |
"Anders Isaksson" <isaksson.etuna@REMOVEtelia.com> wrote in message
news:Is3u6q.1KpJ@lugnet.com...
> John wrote:
>
> > OK, I used <0.1,0.1,0.1> for all three lights,
>
> I usually write that as: 0.1*<1.0,1.0,1.0> which makes it much easier to
> adjust the brightness, especially if you're using coloured lights (or many
> lights).
That is a great tip Anders! That will save me a lot of time when tweaking
lights.
> Remember that the sum of all lights used should be in the vicinity of 1.0,
> too much and you get a 'washed out' effect, too little and you get
> darkness.
Ahh, so if I am using four lights each light should have an intensity of
<0.25,0.25,0.25> so that all four combined would be the equivalent of
<1,1,1>?
- John
| | | | | | | | | | | | | | | | | | | |
| |
|
In lugnet.cad.ray, John O'Keefe wrote:
> <snip>
>
> Thank you for taking the time to reply on Christmas! I hope your Christmas
> was a good one.
It's nothing. I'm visiting my Dad (in San Diego) for the holiday. And I did
have a good Christmas but I have to go home today so I'l post this reply before
embarking on my plane ride home (Hawaii).
> That is funny you mention that you have the source code. I was going to ask
> the author if he could add a per part angle tolerance. Different parts
> require different angles to get the proper result. When you enter an angle
> for the entire model you are trying to choose an angle that improves the
> majority of the parts while not ruining parts that should not have their
> angle smoothed. In reality you should not have to enter any angle at all. If
> the program can tell what part# it is working with it should be able to look
> up a table of part number to smoothing angle. That way someone will only
> need to go through the LEGO parts database once, determine the appropriate
> angle, and then people would be able to run it through the mesh enhancer
> without supplying an angle. The program would know the appropriate angle for
> each part. Then everyone would be able to achieve very realistic renders
> geometry wise. Unfortunately I am not that great of a programmer but I would
> be willing to try and determine an appropriate angle for each part. Are you
> good at programming or know someone that might want to modify the mesh
> enhancer for that functionality?
The reason why I asked for it is that I have a L3PAO style program in the works
(waiting for L3P 1.4 nudge,nudge Lars ;-) ) and I wanted to build in some post
L3P processing elements like the mesh enhancer functionality.
> > > > The FastRad POV includes -
> > > > http://www.brickshelf.com/cgi-bin/gallery.cgi?f=94173
> > >
> > > The instructions were pretty easy to follow and I got it set up quickly.
> > > The
> > > one thing that confused me about FastRad was the lights setting. In the
> > > instructions it says it is designed for one bright light. In the
> > > instructions it has you comment out one of the three default lights. In
> > > your
> > > render (http://www.brickshelf.com/gallery/billthefish/Renders/8652b.png)
> > > it
> > > looks like you have a couple lights. Did you leave the three default
> > > lights,
> > > use only one light, or have your own custom lights?
After further review of my file I noticed that I was mistaken and I'm not using
the setings above but the ones you noted earlier in the thread:
http://www.brickshelf.com/cgi-bin/gallery.cgi?f=92270
If you'll notice that the built in sky sphere has blue which is where the blue
tinge is coming from.
> <snip>
> I also noticed that in my render the fender parts and the center nose parts
> are not showing the black line seperation between the parts. I thought the
> LGEO parts or the mesh enhancer were causing it. I tried renders without
> those items and I still get the missing seperation between he fender and
> nose pieces. All my other part seperations look similar to yours so I am
> baffled what is causing it. Do you have any idea?
L3P only shrinks parts it find in the LDRAW/PART directory and not custom or
unofficial part embedded in the MPD or otherwise.
Since it's not recommended that you add unofficial parts to the LDRAW/PARTS
directory, there 2 possible reasons why mine are shrunk:
- I manually added the part shrinking code to those parts that weren't shrunk by
L3P (most likely)
- I used a private beta of L3P 1.4 which may have corrected this problem (not
very likely)
> <snip>
>
> I plan on exploring other effects like camera effects (blurring far and
> near) as well as fog effects but I want to get my lighting tweaked first. I
> really hope I am able to figure out how to get my renders like yours. Thank
> you for all your help so far!
No problem. I like this thread and my interest in HDRI has been sparked by
Koyan's reply.
-Orion
| | | | | | | | | | | | | | | | | |
| |
|
> > Thank you for taking the time to reply on Christmas! I hope your
> > Christmas
> > was a good one.
>
> It's nothing. I'm visiting my Dad (in San Diego) for the holiday. And I
> did
> have a good Christmas but I have to go home today so I'l post this reply
> before
> embarking on my plane ride home (Hawaii).
That is cool. I have family in San Diego also. I used to go to Hawaii a lot
when I lived in California. Now that I am in Texas it is a little harder to
travel out that way.
[SNIP
> > be willing to try and determine an appropriate angle for each part. Are
> > you
> > good at programming or know someone that might want to modify the mesh
> > enhancer for that functionality?
>
> The reason why I asked for it is that I have a L3PAO style program in the
> works
> (waiting for L3P 1.4 nudge,nudge Lars ;-) ) and I wanted to build in some
> post
> L3P processing elements like the mesh enhancer functionality.
Do you plan on adding per part angle tolerance for the mesh enhancer? If you
do I would be willing to help by going through all the parts and determining
an appropriate angle tolerance.
> > > > looks like you have a couple lights. Did you leave the three default
> > > > lights,
> > > > use only one light, or have your own custom lights?
>
> After further review of my file I noticed that I was mistaken and I'm not
> using
> the setings above but the ones you noted earlier in the thread:
> http://www.brickshelf.com/cgi-bin/gallery.cgi?f=92270
>
> If you'll notice that the built in sky sphere has blue which is where the
> blue
> tinge is coming from.
OK, I will try those radiosity settings. How do I use those? Do I just add
an #include radiosity.inc below the Dif statement like I do for the FastRad?
> > <snip>
> > I also noticed that in my render the fender parts and the center nose
> > parts
> > are not showing the black line seperation between the parts. I thought
> > the
> > LGEO parts or the mesh enhancer were causing it. I tried renders without
> > those items and I still get the missing seperation between he fender and
> > nose pieces. All my other part seperations look similar to yours so I am
> > baffled what is causing it. Do you have any idea?
>
> L3P only shrinks parts it find in the LDRAW/PART directory and not custom
> or
> unofficial part embedded in the MPD or otherwise.
>
> Since it's not recommended that you add unofficial parts to the
> LDRAW/PARTS
> directory, there 2 possible reasons why mine are shrunk:
> - I manually added the part shrinking code to those parts that weren't
> shrunk by
> L3P (most likely)
> - I used a private beta of L3P 1.4 which may have corrected this problem
> (not
> very likely)
OK, that explains it. So I guess I will have to wait for your L3PAO style
program and L3p 1.4 to be able to have that functionality or is that
something I have to hand tweak?
> > <snip>
> >
> > I plan on exploring other effects like camera effects (blurring far and
> > near) as well as fog effects but I want to get my lighting tweaked first.
> > I
> > really hope I am able to figure out how to get my renders like yours.
> > Thank
> > you for all your help so far!
>
> No problem. I like this thread and my interest in HDRI has been sparked by
> Koyan's reply.
I am glad you guys are so open to sharing your techniques. I find LEGO
rendering very interesting. I am very new to this but trying to learn very
quickly. I am looking forward to learning HDRI techniques.
- John
| | | | | | |