 | | | | | |
Hi all!
Is there a way to make the red tail-lights shine a little less brightly?
I use the following code,
1 36 -50 -55 108 -1 0 0 0 0 -1 0 -1 0 4073.DAT
1 36 50 -55 108 -1 0 0 0 0 -1 0 -1 0 4073.DAT
1 15 -50 -53 108 1 0 0 0 1 0 0 0 1 light.dat
1 15 50 -53 108 1 0 0 0 1 0 0 0 1 light.dat
, and get this result:
http://web.telia.com/~u66203131/LDA/spiff05.avi
(Spiffcraft by Dan Jassim)
TIA
/Tore
| | | | | | | | | | | | | | | |
In lugnet.cad.ray, Tore Eriksson wrote:
> Hi all!
>
>
> Is there a way to make the red tail-lights shine a little less brightly?
> I use the following code,
> 1 36 -50 -55 108 -1 0 0 0 0 -1 0 -1 0 4073.DAT
> 1 36 50 -55 108 -1 0 0 0 0 -1 0 -1 0 4073.DAT
> 1 15 -50 -53 108 1 0 0 0 1 0 0 0 1 light.dat
> 1 15 50 -53 108 1 0 0 0 1 0 0 0 1 light.dat
> , and get this result:
> http://web.telia.com/~u66203131/LDA/spiff05.avi
> (Spiffcraft by Dan Jassim)
>
>
> TIA
> /Tore
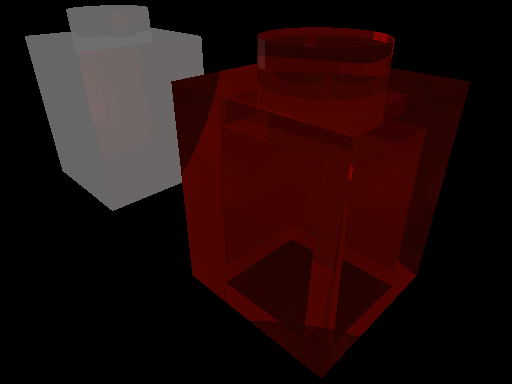
Maybe it shows better how dominating the red light is in this frame:
http://web.telia.com/~u66203131/LDA/@spf5050.jpg
/Tore
| | | | | | | | | | | | | | | | | | | | |
Tore Eriksson wrote:
> >
> > Is there a way to make the red tail-lights shine a little less
> > brightly?
> http://web.telia.com/~u66203131/LDA/@spf5050.jpg
The easiest way to fix that is to modify the light sources in the .pov code.
They should probably be less bright, you can multiply the whole RGB triple
by a constant less than 1:
... 0.4 * <r, g, b>
It would also help changing the 'fade_distance' and 'fade_power' to make
them not shine so far.
Or you could change them to 'spotlight' and adjust the 'falloff' value
instead. I think that's what I would do.
--
Anders Isaksson, Sweden
BlockCAD: http://web.telia.com/~u16122508/proglego.htm
Gallery: http://web.telia.com/~u16122508/gallery/index.htm
| | | | | | | | | | | | | | | | | | | | | | | |
| |

|
In lugnet.cad.ray, Anders Isaksson wrote:
> Tore Eriksson wrote:
> > >
> > > Is there a way to make the red tail-lights shine a little less
> > > brightly?
> > http://web.telia.com/~u66203131/LDA/@spf5050.jpg
>
> The easiest way to fix that is to modify the light sources in the .pov code.
> They should probably be less bright, you can multiply the whole RGB triple
> by a constant less than 1:
>
> ... 0.4 * <r, g, b>
>
> It would also help changing the 'fade_distance' and 'fade_power' to make
> them not shine so far.
>
> Or you could change them to 'spotlight' and adjust the 'falloff' value
> instead. I think that's what I would do.
Thank you, Anders, I think that should do it. But the thing is, in LDA I try to
do everything before running it all trough L3P. Adding post-processing to the
steps already involved in LDA is not very appealing to me. And after the most
unfortunate ban of inline POV code in official LDraw parts, I almost haven't
touched any POV code by hand. Let's see if I can create a number of light
objects with inline POV code - or maybe let LDA create them inside the LDraw
frame files! At least I have some options to experiment with (instead of
sleeping tonight...).
Thanks, Anders
/Tore
| | | | | | | | | | | | | | | | | | | | | | | |
| |
|
In lugnet.cad.ray, Tore Eriksson wrote:
> In lugnet.cad.ray, Anders Isaksson wrote:
> > Tore Eriksson wrote:
> > > >
> > > > Is there a way to make the red tail-lights shine a little less
> > > > brightly?
> > > http://web.telia.com/~u66203131/LDA/@spf5050.jpg
> >
> > The easiest way to fix that is to modify the light sources in the .pov code.
> > They should probably be less bright, you can multiply the whole RGB triple
> > by a constant less than 1:
> >
> > ... 0.4 * <r, g, b>
> >
> > It would also help changing the 'fade_distance' and 'fade_power' to make
> > them not shine so far.
> >
> > Or you could change them to 'spotlight' and adjust the 'falloff' value
> > instead. I think that's what I would do.
>
> Thank you, Anders, I think that should do it. But the thing is, in LDA I try to
> do everything before running it all trough L3P. Adding post-processing to the
> steps already involved in LDA is not very appealing to me. And after the most
> unfortunate ban of inline POV code in official LDraw parts, I almost haven't
> touched any POV code by hand. Let's see if I can create a number of light
> objects with inline POV code - or maybe let LDA create them inside the LDraw
> frame files! At least I have some options to experiment with (instead of
> sleeping tonight...).
>
> Thanks, Anders
> /Tore
Hi Tore,
Try something like the following
Tim
------- SOFLIGHT.DAT -------
0 Soft Pov-RAY Light Source
0 Name: SOFLIGHT.DAT
0 Author: Tim Gould based on work by James Jessiman
0 Unofficial part
0 L3P IFPOV
0 light_source { <0,0,0> color rgb <1,1,1>*0.4 }
0 L3P ELSEPOV
2 24 0 4 0 0 1 0
2 24 4 0 0 1 0 0
2 24 0 0 4 0 0 1
2 24 0 -4 0 0 -1 0
2 24 -4 0 0 -1 0 0
2 24 0 0 -4 0 0 -1
0 L3P ENDPOV
0
| | | | | | | | | | | | | | | | | | | | | | | |
| |
|
In lugnet.cad.ray, Timothy Gould wrote:
> In lugnet.cad.ray, Tore Eriksson wrote:
> > In lugnet.cad.ray, Anders Isaksson wrote:
> > > Tore Eriksson wrote:
> > > > >
> > > > > Is there a way to make the red tail-lights shine a little less
> > > > > brightly?
> > > > http://web.telia.com/~u66203131/LDA/@spf5050.jpg
> > >
> > > The easiest way to fix that is to modify the light sources in the .pov code.
> > > They should probably be less bright, you can multiply the whole RGB triple
> > > by a constant less than 1:
> > >
> > > ... 0.4 * <r, g, b>
> > >
> > > It would also help changing the 'fade_distance' and 'fade_power' to make
> > > them not shine so far.
> > >
> > > Or you could change them to 'spotlight' and adjust the 'falloff' value
> > > instead. I think that's what I would do.
> >
> > Thank you, Anders, I think that should do it. But the thing is, in LDA I try to
> > do everything before running it all trough L3P. Adding post-processing to the
> > steps already involved in LDA is not very appealing to me. And after the most
> > unfortunate ban of inline POV code in official LDraw parts, I almost haven't
> > touched any POV code by hand. Let's see if I can create a number of light
> > objects with inline POV code - or maybe let LDA create them inside the LDraw
> > frame files! At least I have some options to experiment with (instead of
> > sleeping tonight...).
> >
> > Thanks, Anders
> > /Tore
>
> Hi Tore,
>
> Try something like the following
>
> Tim
>
> ------- SOFLIGHT.DAT -------
>
> 0 Soft Pov-RAY Light Source
> 0 Name: SOFLIGHT.DAT
> 0 Author: Tim Gould based on work by James Jessiman
> 0 Unofficial part
>
> 0 L3P IFPOV
> 0 light_source { <0,0,0> color rgb <1,1,1>*0.4 }
> 0 L3P ELSEPOV
> 2 24 0 4 0 0 1 0
> 2 24 4 0 0 1 0 0
> 2 24 0 0 4 0 0 1
> 2 24 0 -4 0 0 -1 0
> 2 24 -4 0 0 -1 0 0
> 2 24 0 0 -4 0 0 -1
> 0 L3P ENDPOV
> 0
I just did before I read your post! (Just called it test.dat instead...) And it
really works, the problem is POV will not inline the light into the position of
SOFLIGHT.DAT but rather <0,0,0> of the POV world. This makes it more
complicated, but I don't think it's impossible.
Thanks!
/Tore
| | | | | | | | | | | | | | | | | |
In lugnet.cad.ray, Tore Eriksson wrote:
| |
Hi all!
Is there a way to make the red tail-lights shine a little less brightly?
I use the following code,
1 36 -50 -55 108 -1 0 0 0 0 -1 0 -1 0 4073.DAT
1 36 50 -55 108 -1 0 0 0 0 -1 0 -1 0 4073.DAT
1 15 -50 -53 108 1 0 0 0 1 0 0 0 1 light.dat
1 15 50 -53 108 1 0 0 0 1 0 0 0 1 light.dat
, and get this result:
http://web.telia.com/~u66203131/LDA/spiff05.avi
(Spiffcraft by Dan Jassim)
|
I notice you’re using white as the color for light.dat. Since L3P pays
attention to the color of the light, you can use a much darker shade of gray.
The following was done with a light inside the trans red brick with a color of
0x02141414 (very dark gray, with 20,20,20 as the RGB):
The following is the same scene, except that white (color 15) was used for the
light:
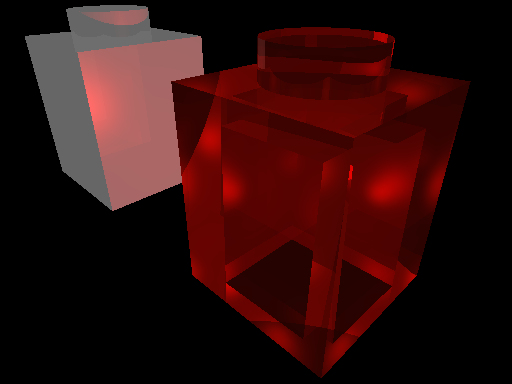
This doesn’t completely solve the problem, since the brick in the first example
doesn’t look all that lit up. But it’s something to keep in mind.
--Travis
| | | | | | | | | | | | | | | | | |
In lugnet.cad.ray, Travis Cobbs wrote:
| |
In lugnet.cad.ray, Tore Eriksson wrote:
| |
Hi all!
Is there a way to make the red tail-lights shine a little less brightly?
I use the following code,
1 36 -50 -55 108 -1 0 0 0 0 -1 0 -1 0 4073.DAT
1 36 50 -55 108 -1 0 0 0 0 -1 0 -1 0 4073.DAT
1 15 -50 -53 108 1 0 0 0 1 0 0 0 1 light.dat
1 15 50 -53 108 1 0 0 0 1 0 0 0 1 light.dat
, and get this result:
http://web.telia.com/~u66203131/LDA/spiff05.avi
(Spiffcraft by Dan Jassim)
|
I notice you’re using white as the color for light.dat. Since L3P pays
attention to the color of the light, you can use a much darker shade of gray.
The following was done with a light inside the trans red brick with a color
of 0x02141414 (very dark gray, with 20,20,20 as the RGB):
This doesn’t completely solve the problem, since the brick in the first
example doesn’t look all that lit up. But it’s something to keep in mind.
--Travis
|
Wow! Thank you! I didn’t know that. I tried some different options, and found
that the “black” light (color 0, which isn’t really black) surpringly produced
the best balance between taillights noticably on and not spreading too much red
light on the surrounding environment.
/Tore
| | | | | | | | | | | | | | | | | | |
| |
|
Travis Cobbs wrote:
>
> This doesn't completely solve the problem, since the brick in the
> first example doesn't look all that lit up. But it's something to
> keep in mind.
In my 1998 Christmas picture http://web.telia.com/~u16122508/merry.htm (go
to the end of the page) I hand adjusted the lights (one inside each candle)
quite a bit. One important part was the material settings (Color46_t), as
the clear L3P parts are much *too* clear. Most of the light escapes the part
without making it shine. The following is the result of much experimenting,
but not necessarily the 'best' way to do it. Note also the use of
'looks_like' to combine the light with the part it's supposed to light up.
#declare Color46_t = texture {
pigment { rgbf <1,0.905882,0.211765,0.90> }
finish { ambient 0.6 diffuse 0 phong 0.5 phong_size 40 reflection 0.9
refraction 1 ior 1.25 }
}
#declare light_point = light_source {
<0, -8, 0>
color rgb 0.5*<1,0.905882,0.211765>
fade_distance 60.0
fade_power 1.6
looks_like {_3062_dot_dat texture { Color46_t } }
}
--
Anders Isaksson, Sweden
BlockCAD: http://web.telia.com/~u16122508/proglego.htm
Gallery: http://web.telia.com/~u16122508/gallery/index.htm
| | | | | | | | | | | | | | | | | |
| |
|
In lugnet.cad.ray, Anders Isaksson wrote:
> Travis Cobbs wrote:
> >
> > This doesn't completely solve the problem, since the brick in the
> > first example doesn't look all that lit up. But it's something to
> > keep in mind.
>
>
> In my 1998 Christmas picture http://web.telia.com/~u16122508/merry.htm (go
> to the end of the page) I hand adjusted the lights (one inside each candle)
> quite a bit. One important part was the material settings (Color46_t), as
> the clear L3P parts are much *too* clear. Most of the light escapes the part
> without making it shine. The following is the result of much experimenting,
> but not necessarily the 'best' way to do it. Note also the use of
> 'looks_like' to combine the light with the part it's supposed to light up.
>
> #declare Color46_t = texture {
> pigment { rgbf <1,0.905882,0.211765,0.90> }
> finish { ambient 0.6 diffuse 0 phong 0.5 phong_size 40 reflection 0.9
> refraction 1 ior 1.25 }
> }
>
> #declare light_point = light_source {
> <0, -8, 0>
> color rgb 0.5*<1,0.905882,0.211765>
> fade_distance 60.0
> fade_power 1.6
> looks_like {_3062_dot_dat texture { Color46_t } }
> }
Thanks Anders!
Only took half a year from idea to completion on this part ...
/Tore
0 Brick 1 x 1 Round with Hollow Stud Yellow with POV Light
0 Name: 3062bL46.dat
0 Author: Tore Eriksson
0 Unofficial part
0 // based on work by James Jessiman
0 // Credits to Anders Isaksson and Tim Gould
0 // http://news.lugnet.com/cad/ray/?n=2764
0 L3P IFPOV
0 light_source {
0 <0, 0, 0>
0 color rgb 0.5*<1,0.905882,0.211765>
0 fade_distance 60.0
0 fade_power 1.6
0 looks_like {_3062b_dot_dat texture {
0 pigment { rgbf <1,0.905882,0.211765,0.90> }
0 finish { ambient 0.6 diffuse 0 phong 0.5 phong_size 40
0 reflection 0.9
0 refraction 1 ior 1.25
0 }
0 }
0 } }
0 L3P ELSEPOV
1 46 0 0 0 1 0 0 0 1 0 0 0 1 3062b.dat
0 L3P ENDPOV
0
| | | | | | | | | | | | | | | | |
Tore Eriksson wrote:
> Only took half a year from idea to completion on this part ...
Pictures, we want pictures :-)
--
Anders Isaksson, Sweden
BlockCAD: http://web.telia.com/~u16122508/proglego.htm
Gallery: http://web.telia.com/~u16122508/gallery/index.htm
| | | | | | | | | | | | | | | | |
In lugnet.cad.ray, Anders Isaksson wrote:
> Tore Eriksson wrote:
> > Only took half a year from idea to completion on this part ...
>
> Pictures, we want pictures :-)
Sorry, don't have the time to make models right now. I am currently writing a
program to automatically create dat files of "shining" parts. I call it
datshine.exe and I am very excited over it.
Well, here's one quite strange model I rushed together as a demo:
http://web.telia.com/~u66203131/LDraw/datshine/demo.jpg
(The car is Jonathan Wilson's Datsville car "Suzuki Swift Hatchback", modified
by me. That is, I changed the headlights into 3062's. Not very kind of me;
driver will be blinded by his own car's headlights.)
The cool thing is that the file, 3062bL46.dat, is totally self-containing (is
that the correct term?). You just use it in ML-Cad or program you use, than run
the model file in L3P, and POV will render those L46 parts shining with yellow
light. No include files to look for, no hassle!
/Tore
| | | | | | | | | | | | | | | | | |
| |
|
In lugnet.cad.ray, Tore Eriksson wrote:
> In lugnet.cad.ray, Anders Isaksson wrote:
> > Tore Eriksson wrote:
> > > Only took half a year from idea to completion on this part ...
> >
> > Pictures, we want pictures :-)
>
> Sorry, don't have the time to make models right now. I am currently writing a
> program to automatically create dat files of "shining" parts. I call it
> datshine.exe and I am very excited over it.
>
> Well, here's one quite strange model I rushed together as a demo:
> http://web.telia.com/~u66203131/LDraw/datshine/demo.jpg
> (The car is Jonathan Wilson's Datsville car "Suzuki Swift Hatchback", modified
> by me. That is, I changed the headlights into 3062's. Not very kind of me;
> driver will be blinded by his own car's headlights.)
>
> The cool thing is that the file, 3062bL46.dat, is totally self-containing (is
> that the correct term?). You just use it in ML-Cad or program you use, than run
> the model file in L3P, and POV will render those L46 parts shining with yellow
> light. No include files to look for, no hassle!
>
>
> /Tore
At least, Jonathan's car now has gotten its original headlights back now - yet
yellow instead of white.
http://web.telia.com/~u66203131/LDraw/datshine/demo2.jpg
/Tore
| | | | | | | | | | | | | | | | |
Tore Eriksson wrote:
> At least, Jonathan's car now has gotten its original headlights back
> now - yet yellow instead of white.
> http://web.telia.com/~u66203131/LDraw/datshine/demo2.jpg
Maybe you should add the choice to use POV spotlights? It looks a bit
strange when the headlights cast shadows backwards :-)
--
Anders Isaksson, Sweden
BlockCAD: http://web.telia.com/~u16122508/proglego.htm
Gallery: http://web.telia.com/~u16122508/gallery/index.htm
| | | | | | | | | | | | | | | | |
In lugnet.cad.ray, Anders Isaksson wrote:
> Tore Eriksson wrote:
>
> > At least, Jonathan's car now has gotten its original headlights back
> > now - yet yellow instead of white.
> > http://web.telia.com/~u66203131/LDraw/datshine/demo2.jpg
>
> Maybe you should add the choice to use POV spotlights? It looks a bit
> strange when the headlights cast shadows backwards :-)
It depends. Do you want the light to act more like it would through LEGO parts
or do you want it to imitate a real car's headlights...?
Anyway, the choice the user's. All you have to do is write the spotlight
definitions ans run it through DatShine
Two more DatShine light definition files are uploaded at
http://web.telia.com/~u66203131/LDraw/datshine/L36.ldr
and
http://web.telia.com/~u66203131/LDraw/datshine/L47.ldr
And a little preview at
http://web.telia.com/~u66203131/LDraw/datshine/test_L36_L47.jpg
/Tore
| | | | | | | | | | | | | | | | |
> Two more DatShine light definition files are uploaded at
> http://web.telia.com/~u66203131/LDraw/datshine/L36.ldr
> and
> http://web.telia.com/~u66203131/LDraw/datshine/L47.ldr
> And a little preview at
> http://web.telia.com/~u66203131/LDraw/datshine/test_L36_L47.jpg
>
> /Tore
Exactly the kind of thing I'm looking for to "lighten up" my space crafts.
Question: How do I develop my own files? I can't seem to get the datshine102.exe
to work. Even if I have to hand code them into the .ldr files, I'll be happy.
| | | | | | | | | | | | | | | | | |
| |
|
Available at http://dl.dropbox.com/u/15954981/DatShine201.zip
- - -
Please note that this application will only work properly if...
* Installed (ie just unpacked) in <LDrawBaseDir>\Apps\DatShine directory
* The Attribute Files (L*.ldr) are in <LDrawBaseDir>\Apps\DatShine\Attr
directory
* The BaseDirectory key in LDraw.ini is properly set to point to your
LDrawBaseDir
- - -
About DatShine:
DatShine is an LDraw utility program that creates .dat files
for parts with clear colors, like Trans-yellow, Trans-red and so
on. In POV, they will become illuminated, but not in an LDraw viewer (like
LDView) or editor (like MLCad).
DatShine is written to produce dat parts illuminted in POV, but
any attributes like material, texture, pigment, finish and so on
can be manipulated at will by creating an attribute file containing
desired POV code.
DatShine never alters any of your "source" files, ie the original part or the
attribute file it reads to create the new, unofficial part with inlined POV code
and a new, unique file name.
/Tore
| | | | | | |