| |
Dear James
Please forgive me for not replying to your posting before this. Somehow, I
missed seeing it when you made it (some months ago... :( ).
> Great post. I'm going to need to read through it several
> times.
Thank you. I hope, after digesting things, you've found the information useful.
> Any way you can post bigger pics, or post links to where
> they can be found?
Yes, certainly. I had intended to set up all of those thumbnails to be
hyperlinks to the relevant full-sized images in my Brickshelf gallery, but I
seem to have used the wrong syntax. Drat!
Here are the image-related snippets of the original post, along with
(hopefully...) correct hyperlinks:
> 2. Basic materials • [...]
> For custom hair, I most often start with a "ponytail" hair
> element. They're common and, once the ponytail bit at the
> back is cut off, they fit quite close to the figure's
> head. This makes it easy to create a variety of different
> hairstyles without the thickness of the original plastic
> getting in the way. If necessary, a bit of work with a
> file or knife can further reduce and reshape the plastic.
> This is useful when shaping a custom hair piece to suggest
> ears showing below the hair, for instance.
<<http://www.brickshelf.com/gallery/nhblack/anime/el-hazar/nanami_s.jpg>>
<http://www.brickshelf.org/cgi-bin/gallery.cgi?i=1074955>
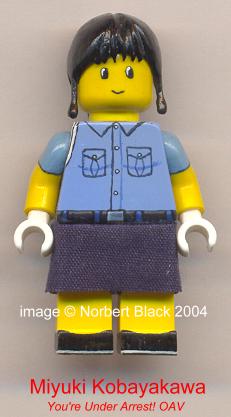
> To build up the shape of a piece, I use a type of epoxy
> plumbers' putty that goes by the brandname A+B. When
> cured, it is rigid, quite strong, and can be drilled,
> sanded, sawn and carved as necessary. Used carefully,
> quite thin cross-sections of cured putty are safe from
> breaking. For instance, I've built up bangs of hair over
> a character's forehead out of putty, projecting below the
> plastic of the original hair piece's hairline.
<<http://www.brickshelf.com/gallery/nhblack/anime/Yuarrest/miyuki_f.jpg>>
<http://www.brickshelf.org/cgi-bin/gallery.cgi?i=1075009>
[...]
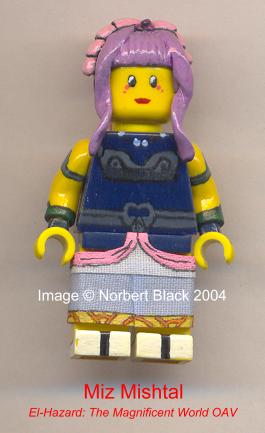
> 3. Reinforcing pieces made of epoxy putty
>
> Despite what I've said about the epoxy putty's strength,
> there are some situations where some sort of internal
> skeleton to reinforce the structure makes sense. This is
> especially so for a thin cross-section in a piece that
> will be handled. For an example, look at the tendrils of
> hair framing the face of this figure:
<http://www.brickshelf.com/gallery/nhblack/anime/el-hazar/miz_f.jpg>>
<http://www.brickshelf.org/cgi-bin/gallery.cgi?i=1074949>
> 4. Using Paper as a skeleton
>
> I've used a variety of different materials to reinforce
> elements.
>
> For some applications, bits of carefully cut paper are
> enough. The brims on the hats worn by this Edwardian-
> period mother and daughter are an example of this
> technique.
<<http://www.brickshelf.com/gallery/tstrutt/Train-Shows/Oct-04/Scenes/stevermer_2.jpg>>
<http://www.brickshelf.org/cgi-bin/gallery.cgi?i=953831>
> 6. Composite paper/wire skeletons from twist ties
>
> Recently, I've discovered that by using a twist tie with
> the paper strip left on, I can easily combine paper and
> wire into a skeleton. [...]
> cuticle scissors
> can be used to trim back the paper strip of the twist tie
> to whatever width is appropriate. For instance, a
> skeleton for a long pointed curlunder in a custom
> hairpiece could have the paper cut away until only the
> wire itself remained at the tip. From this point, epoxy
> putty can be added to the skeleton as usual to give added
> thickness. The result is a strong custom element that
> comes to an extremely fine point, as seen on the right-
> most figure here:
<<http://www.brickshelf.com/gallery/tstrutt/Train-Shows/Oct-04/Scenes/custom-figs-9nf.jpg>>
<http://www.brickshelf.org/cgi-bin/gallery.cgi?i=953444>
I have also created a few new images of the figure used in the final example,
which should be up in my nhblack gallery on Brickshelf in the not too distant
future. I'll try to post a mention in this thread when I get things online.
Thanks once again for your patience, James, and my apologies to all of those
Lugnet readers who waded through my pages and pages of descriptions and were
unable to get at the full-sized images.
Regards,
Norbert Black
|
|
Message is in Reply To:
7 Messages in This Thread:
")  
 

- Entire Thread on One Page:
- Nested:
All | Brief | Compact | Dots
Linear:
All | Brief | Compact
|
|
|
|
