| |
A primer on making custom elements for use with Lego(tm) pieces.
N.H. Black, February 2005
1. Introduction
What follows is a discussion of some techniques I’ve developed
over the past 10 years for modifying and customizing pieces for
use with Lego minifigures. I use a variety of materials,
including cut down and otherwise altered Lego elements. Needless
to say, what follows is not suitable reading for Lego purists.
I’ve tried to explain basic techniques without going into too
much detail about how one actually sculpts things into a
particular shape. For that, consult a variety of books in any
library or craft store. I’ve generally stuck to the things that
are specific to the creation of custom elements for use in Lego
creations.
I hope those who read these words will find something useful in
them. I find customizing a very liberating creative experience.
It’s also a lot of fun, once you get the hang of things.
Hopefully some of you will be moved to find out just how much.
2. Basic materials
My custom elements are largely created with epoxy putty. Some
items are built up over a base provided by a butchered Lego
element. For instance, starting with a cut-down Lego hair piece
gives a reliable joint between the custom hair element and the
Lego head. Another trick is to start with a cut-down spear or
lightsabre blade for a custom sword or anything else that has to
fit in a minifig’s hand.
For custom hair, I most often start with a “ponytail” hair
element. They’re common and, once the ponytail bit at the back
is cut off, they fit quite close to the figure’s head. This
makes it easy to create a variety of different hairstyles without
the thickness of the original plastic getting in the way. If
necessary, a bit of work with a file or knife can further reduce
and reshape the plastic. This is useful when shaping a custom
hair piece to suggest ears showing below the hair, for instance.

To build up the shape of a piece, I use a type of epoxy plumbers’
putty that goes by the brandname A+B. When cured, it is rigid,
quite strong, and can be drilled, sanded, sawn and carved as
necessary. Used carefully, quite thin cross-sections of cured
putty are safe from breaking. For instance, I’ve built up bangs
of hair over a character’s forehead out of putty, projecting
below the plastic of the original hair piece’s hairline.
One of the nice things about A+B putty is that it does not shrink
as it cures. This means I don’t have to guess about what size
something is going to be when finished - I just sculpt it to the
desired volume and cross-section.
The other big advantage about A+B is that it cures without
needing to be heated. Curing takes place over a period of about
12-20 hours (depending on ambient temperature). This means that
you can use A+B putty in conjunction with Lego elements without
having the Lego plastic melt or deform.
My supply of A+B came from a plumbing supply store almost 15
years ago. Yes, a little does go a long way... I’m reasonably
certain the same brand is still available in Canada and the
United States, but there are alternatives. You may find
something called Milliput epoxy putty in some well-stocked hobby
shops in Europe and North America. Milliput comes in several
grades - try to get the Superfine sort, which doesn’t have the
slightly grainy texture of some of the coarser grades.
Extremely important safety warning: like any type of epoxy,
epoxy putty is not good stuff to touch. Once your skin exceeds
its tolerance level, you’re likely to get a nasty rash. DON’T
shape epoxy putty using your bare fingers, and wash your hands
promptly when finished. If you must use your fingers to shape
your work, wear thin latex gloves to avoid skin contact.
I know of some sculptors who use saliva as a lubricant for their
sculpting tools when working with epoxy putty. I find that water
does the job just fine for A+B, and there’s no dangerous
temptation to lick a tool...
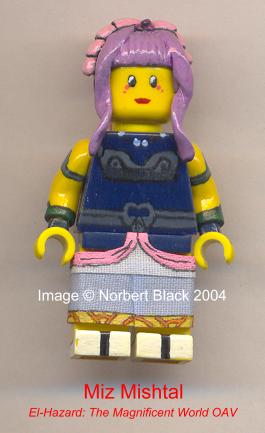
3. Reinforcing pieces made of epoxy putty
Despite what I’ve said about the epoxy putty’s strength, there
are some situations where some sort of internal skeleton to
reinforce the structure makes sense. This is especially so for a
thin cross-section in a piece that will be handled. For an
example, look at the tendrils of hair framing the face of this
figures:
A skeleton, when covered with epoxy putty, stops movement
from side to side. This movement is what is known as “shearing.”
The putty on its own resists compression and expansion very well
- you cannot squeeze a piece smaller or stretch it out once the
putty has cured - but it only has a moderate shear strength.
That’s why, if you strike an un-reinforced putty shape hard
enough from the side, it will crack or break off. If the same
putty shape has an internal skeleton to reinforce its shear
strength, it will be far less likely to break. Oddly enough, the
material used for the skeleton can be something that’s easily
bent on its own - surrounding it with putty on all sides keeps
the skeleton from bending.
4. Using Paper as a skeleton
I’ve used a variety of different materials to reinforce elements.
For some applications, bits of carefully cut paper are enough.
The brims on the hats worn by this Edwardian-period mother and
daughter are an example of this technique.
I use a small smear of epoxy glue (not putty) to secure the paper
in place to the rest of the element, and then once that first
application is cured, I go back and add a thin coat of glue glue
over all the visible surfaces of the paper. Since I use thin,
cheap paper (cash register receipts are good), the glue soaks in
to the paper and gives it some rigidity. Once the glue has
cured, the skeleton can be covered in epoxy putty as necessary
to increase its thickness or alter its surface texture. The
epoxy putty will stick more reliably to paper that has been
soaked in epoxy glue. The glue also prevents the paper from
delaminating like cheap plywood left out in the rain.
5. Wire skeletons
More often than not, paper alone is not enough to give the
support needed. In these cases, I’ll add reinforcements out of
fine wire. Paperclips in various sizes, and the wire core of
twist-ties are both useful sources of fine wire. Note that the
wire itself doesn’t have to be very stiff. It’s there inside the
final shape of epoxy putty to add shear strength, not rigidity.
The wires are secured with epoxy glue in holes drilled into the
body of the custom element. For a custom hair element, this
might be a Lego hair piece. Drilling and securing wire skeletons
in this way makes it less likely that the wires will part company
with the remainder of the work. If a wire was just glued to a
plastic or epoxy putty surface, there’s a risk that the glue bond
will fail at some point, leaving the custom piece to split.
When building up epoxy putty around any sort of wire skeleton,
make sure that there are no gaps or air pockets left in the
putty. This can take some care, because it’s easy to have a bit
of wire end up inside a sort of irregular tunnel as the putty
over top of it is shoved back and forth into shape.
To avoid this tunnel effect, I’ve used two different techniques.
One is to apply a thin sausage of putty to encapsulate the wire
and fix it into position, and let that cure. Then I add more
putty, bringing the part up to its final volume and cross-
section.
The second technique uses a composite wire/paper
skeleton.
6. Composite paper/wire skeletons from twist ties
Recently, I’ve discovered that by using a twist tie with the
paper strip left on, I can easily combine paper and wire into a
skeleton. The twist tie has a small section of its paper
stripped away to provide a bit of bare wire to glue into a hole
in the Lego hair piece (or whatever else is appropriate). The
tie is then cut to the appropriate length, and glued in place.
Once the epoxy glue attaching the twist tie in place has cured,
the tie can be bent into whatever curve is needed for thin-
sectioned part of the custom element. A second application of
glue is used to soak the paper of the twist tie. This will help
to hold the skeleton in the shape chosen.
Once that second application of glue has set, cuticle scissors
can be used to trim back the paper strip of the twist tie to
whatever width is appropriate. For instance, a skeleton for a
long pointed curlunder in a custom hairpiece could have the paper
cut away until only the wire itself remained at the tip. From
this point, epoxy putty can be added to the skeleton as usual to
give added thickness. The result is a strong custom element
that comes to an extremely fine point, as seen on the right-
most figure here:

Because there is a broad paper strip firmly attached to the wire
skeleton, the epoxy putty doesn’t have a chance to develop
internal gaps or tunnels as it’s being worked into shape.
Composite skeletons take a bit of time to create, but are still
faster than using a simple wire skeleton and using two separate
layers of epoxy putty.
7. Creating the final shape of a piece
Once you have any necessary reinforcements in place, creating a
custom piece is mostly a matter of adding and shaping epoxy
putty. You can do this in stages, or all at once, depending on
your skills, the size of the piece, and (most of all) on the
design of the piece.
It’s often a good idea to work on complicated pieces in stages.
When you’ve finished work on a stage, let the putty cure, and
come back to the piece another day. Working this way stops slips
made while working on one section from ruining the carefully
shaped (but not yet cured) putty somewhere else.
In some cases, it’s even appropriate to create a single piece in
more than one part, and join them together late in the process.
For instance, when creating a set of custom wings for one
character,
http://www.katiebair.com/fanart_lego_lokki.html
I worked on each wing separately, joining them together only once
all work on the intricately feathered wings was complete. A bit
of wire skeleton was left exposed at each wing’s root to allow
them to be glued into place on a collar that was made to fit
around a minifig’s neck.
8. Getting things smooth
After the basic shape of a custom piece has been created, there’s
usually some work needed to create an appropriate surface finish.
I try to make all my pieces look like genuine Lego elements, and
this means that the surface must be smooth and free of small
irregularities (or fingerprints!). A little work with fine wet &
dry sandpaper will give a good result. You may find that there
are small holes or other depressions that remain. Fill these
with a bit of fresh putty, and sand again once it has cured.
If you happen to sand away enough putty to expose part of a paper
skeleton, don’t worry. If you coated the paper with epoxy glue
as I suggested above, the result will sand in almost the same way
as the epoxy putty. There should be no change in surface
texture.
Extremely important safety warning: never sand epoxy putty of
any sort without using lots of water. Epoxy dust is extremely
toxic to the lungs, and it builds up over a lifetime until an
allergic reaction is suffered. Always sand your work while it’s
wet, and make sure the sludge of epoxy dust and water that
results is washed down the drain.
9. Adding surface texture
Sometimes, your custom piece will need some sort of pattern or
texture, such as strands of hair, or feathers. This is best
added once the basic shape of the piece has been created and a
smooth surface achieved.
If there is any sort of overlapping texture, it is best added in
stages, like tiles or shingles on a roof. Look at your element,
and decide which area is the equivalent of the bottom edge of the
roof. Apply a thin layer of epoxy putty here, and let it
partially cure until it is stiff but not solid in consistency.
When the putty is in this state, one easily sculpt sharply
defined details and establish a regular surface finish with a
knife or other tool. The putty is then allowed to cure solid,
and then the surface slightly smoothed as necessary as necessary
with fine wet & dry sandpaper.
Once the first layer is complete, another layer of putty is
added, partially overlapping the first. Layers are added as
necessary until the surface is completely textured. Keep in mind
that you may need to texture more than one surface on a given
piece, so plan to do this kind of texturing work in stages over a
period of days.
A practical application of this technique is the set of wings
seen here:
http://www.katiebair.com/fanart_lego_lokki.html
I started from the inside bottom edge of each wing, adding a thin
layer of putty over the area where the outermost layer of
feathers would be seen. Individual feathers were shaped with a
knife once the putty had partially cured. A bit of sanding was
needed to smooth the feathers’ faces once everything had set, and
then the process was repeated three times. And then I started
work on the wings’ outer sides...
Because one has to wait for each layer of putty to partially cure
before work can proceed, this texturing process can take a long
time. I’ve found that two layers per day per custom piece is a
good rate to aim for. Beginners should be stick to one per day,
until they gain some experience.
It is possible to speed up the curing of the epoxy putty by
heating it gently, but that is risky. First, it’s very easy to
have the putty cure too much, and be too stiff to sculpt. This
means you have to sand a layer off and start over. There is
another risk. If you have a plastic Lego piece somewhere inside
your custom element, the heat may distort its shape. My advice
is to learn patience. Work on more than one custom element at a
time, if possible, to cut down on time wasted waiting for things
to cure.
10. Adding colour
Once you’ve finished creating the shape of a custom piece, you’ll
want to make it an appropriate colour. I use acrylic paints from
a variety of sources. Feel free to use enamel paints if you
choose, but they’re toxic and require special thinners and
solvents for cleaning.
If you do use acrylics, the kind of “craft” paints one buys in 60
mL (2 oz.) squeeze bottles is usually just fine. Buy a more
expensive brand if possible - you will get a better density of
pigment, and the paints last long enough to make it a good value.
I am still using bottles I bought 20 years ago, and always expect
to get all but the last bit out of a bottle.
For some applications, I buy the acrylic paints made by Games
Workshop, a British wargames company. These are very good
quality, but are quite expensive and tend to dry out very
rapidly. This brand is good value in one circumstance - when you
need to match a specific Lego colour that’s unavailable in other
ranges, or hard to create by mixing other colours.
One example is Lego blue, which is very tricky to match. It’s
both slightly reddish in tone, and quite bright in hue. Most
blue paints are either slightly yellow in tone, or less bright.
Games Workshop Enchanted Blue is a pretty close match, especially
with just a touch of white added.
Whatever brand of paint you use, make sure you use it in as thin
a coat as possible. If necessary, dilute the paint until you
don’t see brush marks left when you apply it. Some colours will
need several coats to build up a useful density of pigment. This
is particularly so for reds and yellows. Expect to use three or
more very thin coats.
11. Protecting the piece
To protect my work, I always add a couple of thin coats of gloss
acrylic polyurethane floor varnish. Acrylic paint is fairly
soft, even when dry, and custom pieces should be able to take
some handling. Remember, use only thin coats of varnish (thinned
slightly with water if necessary) and let them dry thoroughly (at
least 24 hours) before handling.
For some surfaces, there’s no point in adding paint (or varnish).
These include any surface that must mate with a Lego stud, or be
gripped by a Lego minifigure’s hand. I’ve found no acrylic paint
or varnish that will stand up to such wear over the long run.
The Lego Company does manage to successfully paint stud surfaces.
The company uses enamels, I’m sure, but they have the
factory equipment to do so safely...
This need to avoid some surfaces means that some of my custom
elements will have parts that cannot by painted. In these cases,
I try to build Lego elements of the correct colour into the
relevant area. For instance, I’ll use a slice of a Lego lance in
dark grey for the hilt of a custom sword. A gun can be built
around the butt or grip of a Lego gun or pistol. There are a
number of similar solutions for most shape/colour combinations if
you do a bit of careful investigation and thinking.
12. Some final words of encouragement
By way of conclusion, I cannot offer any better advice than to
tell you to have a try. Unless you are unusually gifted, your
first attempt will not look as you intended, but don’t give up.
Start with something simple, and work up gradually to pieces with
complicated shapes that require internal skeletons or textured
finishes.
Keep in mind that there is often more than one way to solve a
problem. The techniques I’ve described all work well for me, but
you may have a way of doing things that works better for you.
It’s worth mentioning, though, that I’ve given you what I find to
be the easy, fast and reliable methods. Give them a try before
dismissing them - you may be surprised!
Above all, have fun doing the work, and don’t be afraid of
sharing the results with the rest of us.
|
|
| |
In lugnet.build.minifigs, Norbert Black wrote:
| |
A primer on making custom elements for use with Lego(tm) pieces.
|
Brilliant!
What a fantastic write up and what a nice glimpse of your true skill.
Originating entirely new sculpted parts and then working them to a “Lego like”
finish is great. And important as far as I’m concerned. If people really need to
have a good knowledge of what Lego elements are or were actually available to be
able to detect your work, then you’ve done it well :)
I make a few parts, but they aren’t even in the same league. I avoid having to
restore the surface condition by cutting pieces from normal parts which can then
be glued together into a new shape.
I love your idea of making reinforced internal structure. Curiously enough, that
substance has an official name - Paxolin, which is an SRBP or synthetic resin
bonded paper. I have also discovered that “super glue” will soak into paper and
make a tough but thin structural element. ABS is slightly soluble in superglue
and although it slows the curing process, can attach quite strongly. (I have had
problems getting epoxy to bond well with ABS.) You can get gel super glue which
will retain its bulk after it cures, and can then be machined. I’ve used this
occasionally, although with most of my work which just involves re-attaching
pieces of ABS to each other, I use MEK with filler. And to repeat your caution,
a lot of these materials are bad for you. Keep dust out of your lungs especially
epoxy and fiber glass, and keep solvent fumes under control. A fan or an
extraction system are important but necessary accessories to a work area.
JB
|
|
| |
Hi John
Thanks for your kind words.
In lugnet.parts.custom, John Barnes wrote:
| |
In lugnet.build.minifigs, Norbert Black wrote:
| |
A primer on making custom elements for use with Lego(tm) pieces.
|
Brilliant!
|
Thanks. :) What you read is iteration 8 (or something of that order) of the
document - I hoped people would find it clear, and encouraging.
| |
Originating entirely new sculpted parts and then working them to a “Lego
like” finish is great. And important as far as I’m concerned.
|
Yeah, me too. I always want to keep things in the range of “Lego could do
this” (even though most of my customs would be insanely expensive to produce,
with all the decorated surfaces involved...).
I find that getting that “Lego” feel can often be the hardest and most subtle
part of a customizing project.
| |
If people
really need to have a good knowledge of what Lego elements are or were
actually available to be able to detect your work, then you’ve done it well
:)
|
Well, I’ve had a few double takes and “when did they produce that?!?” comments
over the years, so I’m getting there. ;)
| |
I love your idea of making reinforced internal structure. Curiously enough,
that substance has an official name - Paxolin, which is an SRBP or synthetic
resin bonded paper.
|
Oh, so that’s what Paxolin is. Huh. I’ve known the name for years, what with
dabbling in British-style model railways. Custom-built track with paxolin ties
used to be quite common in that field.
| |
I have also discovered that “super glue” will soak into
paper and make a tough but thin structural element.
|
Interesting... I’ve always had rotten luck with superglue - won’t stick, and
doesn’t keep, at least for me. Still, whatever folks can get to work, right?
| |
ABS is slightly soluble
in superglue and although it slows the curing process, can attach quite
strongly. (I have had problems getting epoxy to bond well with ABS.)
|
I always make sure I have some sort of mechanical bond, even if it’s only a
thorough scuffing of the relevant surfaces with wet & dry sandpaper. More
often, though, I’ve got a pin running through any epoxied joint (shear strength
and all that...) too.
| |
You can
get gel super glue which will retain its bulk after it cures, and can then be
machined. I’ve used this occasionally, although with most of my work which
just involves re-attaching pieces of ABS to each other, I use MEK with
filler. And to repeat your caution, a lot of these materials are bad for
you.
|
Oh, yes indeed! I personally wouldn’t use MEK (methyl ethyl ketone, if memory
serves) with anything less than a full environmental suit with appropriate
respirator in a room with industrial quality venting and scrubbing equipment.
That stuff is insanely toxic and the fumes will stick to surfaces and off-gas
for a surprising period of time.
| |
Keep dust out of your lungs especially epoxy and fiber glass, and keep
solvent fumes under control. A fan or an extraction system are important but
necessary accessories to a work area.
|
Yep. You only get one set of lungs, folks! Don’t get scared off, but do treat
these materials with great care. Read those safety warnings on the packages,
and FOLLOW THEM!
Anyway, to end on a more positive note - thanks again John for sharing some
interesting new information. Right - who’s next? :)
Norbert Black
|
|
| |
Great post. I'm going to need to read through it several times. Any way you
can post bigger pics, or post links to where they can be found?
Thanks,
James Wilson,
Dallas, TX
|
|
| |
Hey, thanks for posting this, Norbert! It's very informative and
well-written. I'm going to try the epoxy. I've tried a couple of hair pieces
using a cut down motorcycle helmet as a base, but because I get a one-track
mind about my hobby techniques and stubbornly always used Sculpey, they
results were never satisfactory (yes, I tried the boiling thing, but the
Sculpey never seems fully cured when boiling it). I think I'll also try
Milliput, my hobby store carries it and I was always curious about it.
With your permission, I'd like to link to your post on my website.
About said website, I have a couple of pictorial how-to's that have a few
LEGO applications (it's more directed toward my other toy hobby, customizing
12" action figures). I am still rebuilding the site, though, and the
pictorial with the most applicability to LEGO, decal making, is not complete
yet. Here is a link anyway:
Mimetic Gloss (customizing 1:6 & larger):
http://home.att.net/~binky2k/index.htm
and my LEGO proper site:
binkyplastica: http://home.att.net/~lilia2k/index.htm
Thanks again for the post.
Bianca
"Norbert Black" <norbert_howard_black@hotmail.com> wrote in message
news:ICL85v.DJu@lugnet.com...
> A primer on making custom elements for use with Lego(tm) pieces.
>
> N.H. Black, February 2005
|
|
| |
Hi Bianca
In lugnet.build.minifigs, Bianca Nebab wrote:
| |
Hey, thanks for posting this, Norbert! It’s very informative and
well-written. I’m going to try the epoxy.
|
Ah, then the work has been worthwhile. :)
| |
With your permission, I’d like to link to your post on my website.
|
Granted. I’ve also had an offer from Redbean (Isaac Yue) to host an HTML
version on his minifig customizing network website. I’ve given him permission
to go ahead as his time permits. I’ll likely add a few more images, and tinker
with the type style and so forth a bit to increase readability. You’re welcome
to link to the thread (assuming the Lugnet admins are OK with such?) in the mean
time, but I’d advise keeping an eye out for the debut of the HTML version. At
that point, I expect Isaac would be willing to let you link, if you ask. :)
| |
About said website, I have a couple of pictorial how-to’s that have a few
LEGO applications (it’s more directed toward my other toy hobby, customizing
12” action figures).
|
You too? *sigh* I earned a lot of my grocery money last year thanks to one
guy’s childhood obsession with Masters Of The Universe... :)
| |
I am still rebuilding the site, though, and the
pictorial with the most applicability to LEGO, decal making, is not complete
yet. Here is a link anyway:
Mimetic Gloss (customizing 1:6 & larger):
http://home.att.net/~binky2k/index.htm
|
I’m going to spend some time looking at this when I get a chance (just landed a
new freelance contract with Library and Archives Canada yesterday, so no free
time for Norbert for a few weeks...). Thanks for posting the link.
| |
and my LEGO proper site:
binkyplastica: http://home.att.net/~lilia2k/index.htm
|
Here too, I must rummage.
All the best,
Norbert Black
|
|
| |
Dear James
Please forgive me for not replying to your posting before this. Somehow, I
missed seeing it when you made it (some months ago... :( ).
> Great post. I'm going to need to read through it several
> times.
Thank you. I hope, after digesting things, you've found the information useful.
> Any way you can post bigger pics, or post links to where
> they can be found?
Yes, certainly. I had intended to set up all of those thumbnails to be
hyperlinks to the relevant full-sized images in my Brickshelf gallery, but I
seem to have used the wrong syntax. Drat!
Here are the image-related snippets of the original post, along with
(hopefully...) correct hyperlinks:
> 2. Basic materials • [...]
> For custom hair, I most often start with a "ponytail" hair
> element. They're common and, once the ponytail bit at the
> back is cut off, they fit quite close to the figure's
> head. This makes it easy to create a variety of different
> hairstyles without the thickness of the original plastic
> getting in the way. If necessary, a bit of work with a
> file or knife can further reduce and reshape the plastic.
> This is useful when shaping a custom hair piece to suggest
> ears showing below the hair, for instance.
<<http://www.brickshelf.com/gallery/nhblack/anime/el-hazar/nanami_s.jpg>>
<http://www.brickshelf.org/cgi-bin/gallery.cgi?i=1074955>
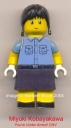
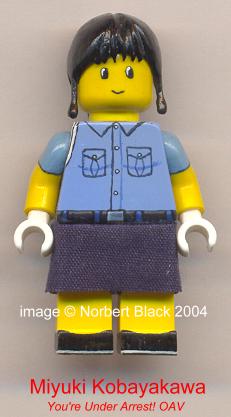
> To build up the shape of a piece, I use a type of epoxy
> plumbers' putty that goes by the brandname A+B. When
> cured, it is rigid, quite strong, and can be drilled,
> sanded, sawn and carved as necessary. Used carefully,
> quite thin cross-sections of cured putty are safe from
> breaking. For instance, I've built up bangs of hair over
> a character's forehead out of putty, projecting below the
> plastic of the original hair piece's hairline.
<<http://www.brickshelf.com/gallery/nhblack/anime/Yuarrest/miyuki_f.jpg>>
<http://www.brickshelf.org/cgi-bin/gallery.cgi?i=1075009>
[...]
> 3. Reinforcing pieces made of epoxy putty
>
> Despite what I've said about the epoxy putty's strength,
> there are some situations where some sort of internal
> skeleton to reinforce the structure makes sense. This is
> especially so for a thin cross-section in a piece that
> will be handled. For an example, look at the tendrils of
> hair framing the face of this figure:
<http://www.brickshelf.com/gallery/nhblack/anime/el-hazar/miz_f.jpg>>
<http://www.brickshelf.org/cgi-bin/gallery.cgi?i=1074949>
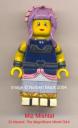
> 4. Using Paper as a skeleton
>
> I've used a variety of different materials to reinforce
> elements.
>
> For some applications, bits of carefully cut paper are
> enough. The brims on the hats worn by this Edwardian-
> period mother and daughter are an example of this
> technique.
<<http://www.brickshelf.com/gallery/tstrutt/Train-Shows/Oct-04/Scenes/stevermer_2.jpg>>
<http://www.brickshelf.org/cgi-bin/gallery.cgi?i=953831>
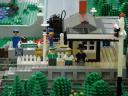
> 6. Composite paper/wire skeletons from twist ties
>
> Recently, I've discovered that by using a twist tie with
> the paper strip left on, I can easily combine paper and
> wire into a skeleton. [...]
> cuticle scissors
> can be used to trim back the paper strip of the twist tie
> to whatever width is appropriate. For instance, a
> skeleton for a long pointed curlunder in a custom
> hairpiece could have the paper cut away until only the
> wire itself remained at the tip. From this point, epoxy
> putty can be added to the skeleton as usual to give added
> thickness. The result is a strong custom element that
> comes to an extremely fine point, as seen on the right-
> most figure here:
<<http://www.brickshelf.com/gallery/tstrutt/Train-Shows/Oct-04/Scenes/custom-figs-9nf.jpg>>
<http://www.brickshelf.org/cgi-bin/gallery.cgi?i=953444>
I have also created a few new images of the figure used in the final example,
which should be up in my nhblack gallery on Brickshelf in the not too distant
future. I'll try to post a mention in this thread when I get things online.
Thanks once again for your patience, James, and my apologies to all of those
Lugnet readers who waded through my pages and pages of descriptions and were
unable to get at the full-sized images.
Regards,
Norbert Black
|
|
|