Subject:
|
Motorizing the pneumatics of set 8455 (Technic Back-hoe Loader)
|
Newsgroups:
|
lugnet.technic, lugnet.build
|
Date:
|
Fri, 12 Sep 2003 02:11:51 GMT
|
Viewed:
|
2244 times
|
| |

|
|
About 2 weeks ago, I purchased the excellent Technic Back-hoe Loader.
This is a wonderful set, but it was distracting to have to keep pumping
whenever trying to run one of the controls.
Therefore, I decided to install a motorized pump so that I could actually
play with the controls without having to pump each time.
After several iterations and some expensive BrickLink parts purchases, I've
finally met with success:
http://www.brickshelf.com/gallery/bhamilto1/BackHoe/aa_overall.jpg
The resulting model is a joy with which to play. You just switch it on and
can enjoy all the controls without any pumping! As an unexpected side
benefit, the engine introduces slight vibrations and a sound that is very
similar to a compressor on a real truck!
After moderation, see all the pictures here:
http://www.brickshelf.com/cgi-bin/gallery.cgi?f=56489
There are 4 key components used:
- Standard Technic 9v motor (newer variety)
- Small compressor - Replaces the two large manual compressors. This one
has no spring and is easily driven by the motor.
- Air Tank (optional) - Gives greater power as long as you wait about 1-2
seconds in between actions
- 9V battery box (optional) - For maximum mobility, I used a 9V monorail
battery box since it is quite small. If not available, one could run a
cable from a larger battery box or from a train transformer.
Here are the steps taken:
1) Remove the 2 manual pumps and associated beams.
This leaves a rather large cavity that is needed to hold the engine and
compressor.
2) Place a "T" intersection on the two empty pneumatic hoses and attach some
extra hose to the end of the third connection.
This leaves a single air input hose. An extra "T" hose intersection comes
with 8455 and is otherwise easily available in several other current sets.
Also, there is enough hose available for this modification as left-over from
building 8455. Such hose is also not too expensive on BrickLink.
3) Mount the 9V motor in the central cavity.
I bolted it to some extra beams installed against the front portion of the
engine cover:
http://www.brickshelf.com/gallery/bhamilto1/BackHoe/right.jpg
http://www.brickshelf.com/gallery/bhamilto1/BackHoe/left.jpg
The 9V motor can be found in several current sets, such as the mindstorms
sets.
4) Mount a fly-wheel to the motor (directly)
I found that I did not need to gear-down the motor. It seems plenty
powerful to drive the fly-wheel directly. See the previous picture.
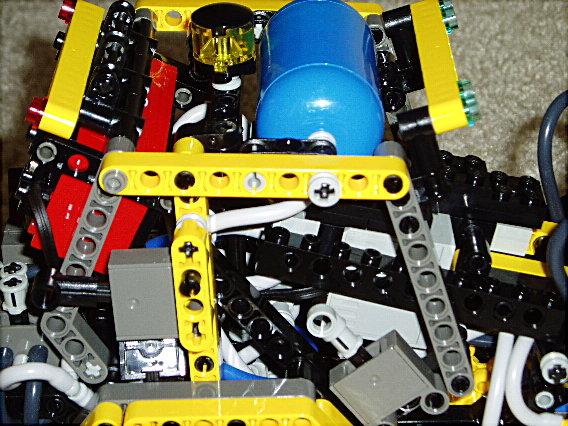
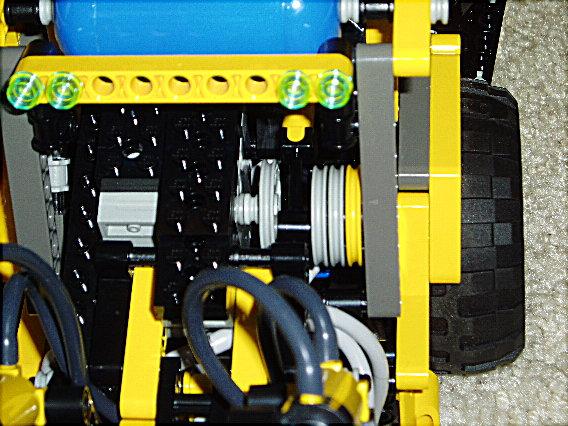
5) Mount a small compressor to the fly-wheel
Small compressors are hard to come by. They were at least available in set
8868 from many years ago. I had to buy mine for about $9 on BrickLink.
In this picture, you can see the flywheel hooked up to the compressor. Note
the extra fly-wheels on the right of this picture. Those wheels don't move,
but act as shields to keep the compressor from coming off the fly-wheel
(which happened before I installed these extra pieces):
http://www.brickshelf.com/gallery/bhamilto1/BackHoe/front.jpg
6) Attach the compressor to the frame
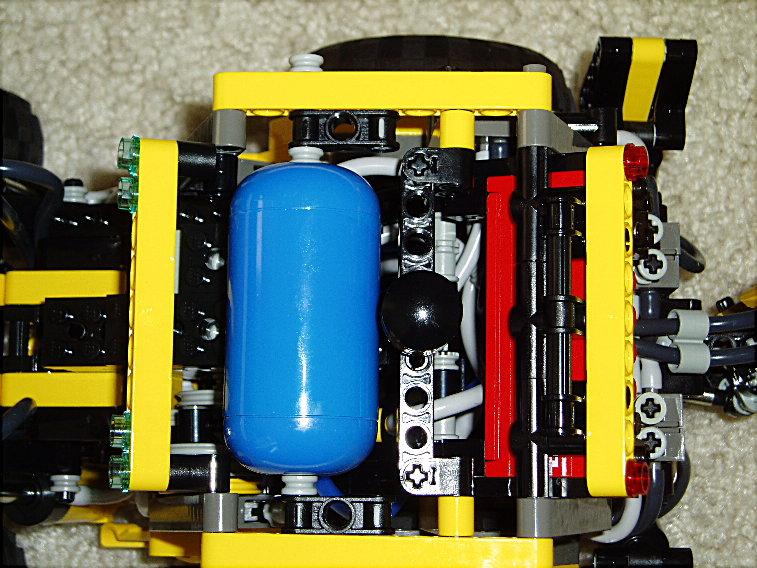
7) (Optional) Attach an air tank to the top of the frame.
The issue here is that the compressor that works well with the motor has
about 1/8 the power of the double hand-pumps. Some of this is made up by
the greater speed that the small compressor works, but not all of it. If
you don't use an air tank, then the motions are quite slow. By adding the
air tank, you can get a lot more force and speed, provided you wait about
1-2 seconds between each action (so that the air tank pressure can build).
Air tanks are very difficult to come by and have not been available in sets
for a while. They are about $8 on BrickLink.
Here is a shot showing the air tank. It is attached with axels to both
sides of the frame. Additionally, it is attached with studs to the
framework around the motor. This prevents otherwise significant vibration
of the motor assembly.
http://www.brickshelf.com/gallery/bhamilto1/BackHoe/top.jpg
Note also that I have had to slightly increase the volume of the upper part
of the frame to better accommodate the air tank and battery box.
8) Attach one end of the air tank to the input hose and the other end to the
compressor (requires an additional, short hose).
7) Relocate the pneumatic switch from the top of the frame (the only one
mounted horizontally) to the side. This is necessary to make room for the
battery box. You will need to use a bit of strength to get it over there
(or if not so lazy, you can recut and refit longer hoses attached to it).
See the lower-left of this picture:
http://www.brickshelf.com/gallery/bhamilto1/BackHoe/left.jpg
8) Install the battery box.
I used a monorail battery box with a 9V battery inside from an Airport
Shuttle set. This part is extremely rare, although it also comes in white
(slightly less rare). I don't know how much these cost on BrickLink, but
they are probably expensive. As compared with a train transformer (which I
used for prototypes), I did not notice any loss of speed or power when using
the 9V battery.
In this picture, you can see the thin beam that I attached to the battery
box (using 1x1 bricks with holes inside). Then, the side beams can be
easily attached to the beams of the frame.
http://www.brickshelf.com/gallery/bhamilto1/BackHoe/left.jpg
In this picture, you can see the top of the battery box. The gray 1x2 plate
is depressed and pushed slightly to the right to engage power (in which case
it stays depressed until you push it back to the left).
http://www.brickshelf.com/gallery/bhamilto1/BackHoe/back.jpg
Note that there is less clearance for the pneumatic switches in the back, so
I had to reduce the height of the switch handles.
All in all, I'm quite happy with this design. It is completely
self-contained and provides all the functionality I wanted.
On the down side, all of the interior space is taken, which some may
consider spoiling the aesthetics of the model.
An alternative design would be to move the compressor, motor, and air tank
to a separate "remote control" unit (fed by a larger battery box or even a
train transformer). This "remote control" could then feed the rest of the
model through a long pneumatic tube. This would provide a functionally
identical model, but without taking up so much interior space. Of course,
this would introduce the need to keep the model on a tether, which is the
down side of this alternative.
I'm happy to answer any questions and comments are appreciated.
|
|
Message has 1 Reply:
2 Messages in This Thread:
   -Kevin L. Clague (12-Sep-03 to lugnet.technic, lugnet.build)")
- Entire Thread on One Page:
- Nested:
All | Brief | Compact | Dots
Linear:
All | Brief | Compact
|
|
|
|
