Subject:
|
Re: Post for David Winkler... The Stanford Bunny!!
|
Newsgroups:
|
lugnet.build.sculpture
|
Date:
|
Fri, 23 Nov 2007 04:17:35 GMT
|
Viewed:
|
13055 times
|
| |

|
|
In lugnet.org.us.sealug, David Winkler wrote:
> In lugnet.build.sculpture, David Winkler wrote:
> > In lugnet.announce.moc, Todd Kubo wrote:
> > > Hello All!
> > > Hey Check this out!! I'm posting for David V. Winkler, a quiet but very talented
> > > builder in SEALUG.
> > > Be sure to check out all the other stuff he's got in the brickshelf folder if
> > > you haven't already seen it!
> > > Cheers!
> > >
> > > http://www.brickshelf.com/gallery/happyfrosh/StanfordBunny/abunny.png
> > >
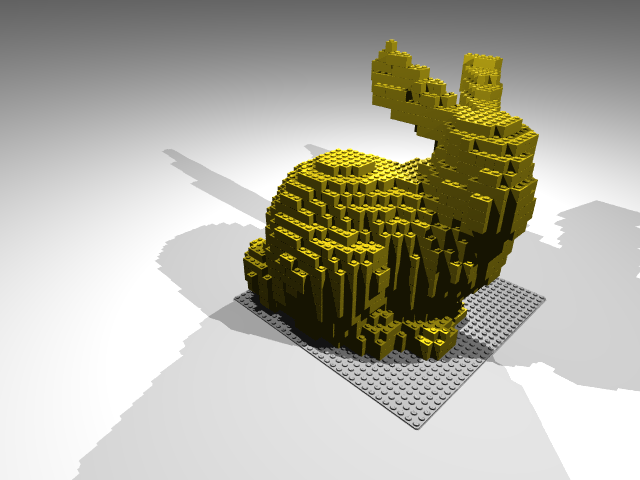
> > > The classic 3d test object, the Stanford Bunny!
> > > Using the mesh distributed by the Stanford Computer Graphics Lab (
> > > http://www-graphics.stanford.edu/ ) I produced this Lego sculpture that
> > > just fits within a 32x32 baseplate using 991 pieces.
> > >
> > > I have posted the LDRaw data, a PDF of instructions that I find simpler
> > > to follow, and a PNG image of the finished bunny at
> > > http://www.brickshelf.com/gallery/happyfrosh/StanfordBunny/
> > >
> > > -dw
> >
> > I was asked the following question:
> >
> > Wow! How did you digitize the mesh into Lego units? Did you do a "hit
> > test"
> > on each vertext/face within lego units, or perhaps do a boolean subtract
> > out of a composite lego 'block'? Inquiring minds want to know! ;)
> >
> > ---Will
> >
> > In response:
> >
> >
> > I used povray and rendered slices through the bunny.
> >
> > For this to work the section
> > vertex_vectors {
> > 35947,
> > <0.0378297, 0.12794, 0.00447467>,
> > ...
> > <0.0400442, 0.15362, -0.00816685>
> > }
> > face_indices {
> > 69451,
> > <21216, 21215, 20399>,
> > ...
> > <17277, 17346, 17345>
> > }
> > Needs to be replaced with the actual vertex_vectors and face_indices of the
> > bunny. It's a fairly simple transformation from the ply file format available
> > on the Stanford web site to this format. Note that this technique will work
> > with any POV CSG object.
> >
> > Render this as an animation for clock=frame=1 to clock=frame=25
> >
> > Then shrink the images of the animation to 32x32 pixels. (matching up with the
> > LegoWidth declaration below) (LegoHeight could be replaced with 0.4 for plates).
> >
> > Each frame of the animation is a Lego layer.
> >
> > Place a lego block there if each pixel of each layer frame is more white than
> > black. (An easy way to do this is to use a graphics program to transform the
> > file to a text pbm format, which uses "1" and "0" for the two allowed colors
> > (black and white))
I was asked the following question:
David,
I just caught your article on LUGNET about usingPov-Ray, I tried the code you
had posted with a .ply Ihad and it didn't work, gave me errors on the textureand
translate lines, is there any chance you couldsend me your .pov file version of
the Stanford Bunnyfor me to look over?
I, like you, would like to design lego "sculptures"using the abundant software
available and buildaccordingly.
Any help would be great!
Thanks
-Josh
In response I have posted the pov file generated from the ascii version
(bun_zipper.ply) of the bunny as posted from the The Stanford 3D Scanning
Repository. The coordinates and the triangle indicies should be unchanged from
that ascii file, so the mapping from the ply to the pov file should be pretty
clear.
http://www.brickshelf.com/gallery/happyfrosh/StanfordBunny/bunny.pov
To deal with the holes in the original ply mesh model I consider the mesh object
to be the intersection of several different mesh objects, each with a different
outside vector.
The command lines that I use to run povray are in a "#if 0" block at the bottom
of the file.
To get color I render the same model from six directions, then use a voting
scheme to decide what color a voxel is. I use the alpha channel of the png to
better determine whether a particular voxel is filled or not.
The attached model uses for the interior
color rgb <0,0,1>
and for the exterior
color rgb <1,0,0>
Note that the exterior will be visibile in only a small minority of the pixels,
but with voting and masking out the known interior color, this is enough. The
red color can be replaced with an actual pov texture or such. (I did one
leopard spotted bunny this way)
This pov file also includes some 2.5d work that I was doing. Terrain map like
stuff. Activated by setting the clock to 0 and declaring "DEPTHMAP".
The standard bottom-to-top rendering as described in the paper is the command
line with "Declare=CAMERAPOS=2".
David Winkler
posted to wrong group. oops. reposting. -dw
|
|
Message is in Reply To:
 | | Re: Post for David Winkler... The Stanford Bunny!!
|
| (...) I was asked the following question: David, I just caught your article on LUGNET about usingPov-Ray, I tried the code you had posted with a .ply Ihad and it didn't work, gave me errors on the textureand translate lines, is there any chance you (...) (18 years ago, 23-Nov-07, to lugnet.org.us.sealug)
|
5 Messages in This Thread:

  
- Entire Thread on One Page:
- Nested:
All | Brief | Compact | Dots
Linear:
All | Brief | Compact
|
|
|
|
