| |

Track cleaners
Full Gallery
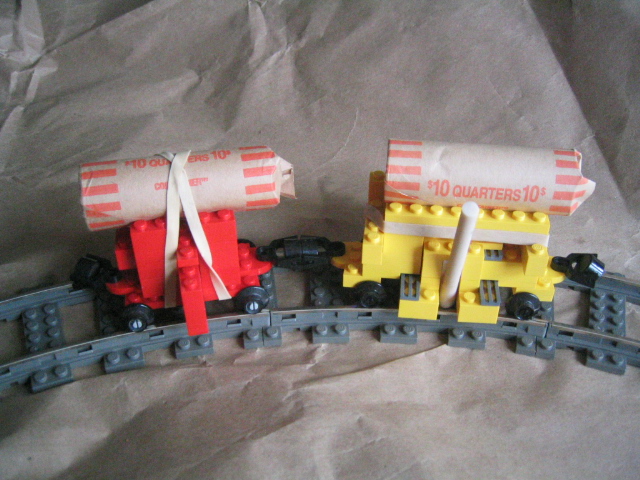
Out of a hatred of cleaning track, I’ve recently revised my track cleaner (the
red one), then built second version (the yellow one). As I’ll touch on in a
moment, both are good, but neither is perfect.
First, though, the problem. Lego track gets dirty after a while (faster if you
like heavy trains). Unfortunately, the 9v motors pick up power from the side of
the track, not the top, which makes it hard to clean. And my layout is tucked in
under the eves in the attic, which makes it that much harder to get to. And
matters are compounded by the fact that the cleaner has to deal with curves,
switches, etc..
So, my solution has been to come up with a means to apply pressure to the
insides of the rail with an eraser, and do so in a way that can handle the
varying track geometry.
Version 1.0 is shown in figures tc01-tc06. I spaced hand-carved erasers using a
1xN brick mounted on a simple slider, and used the shortest wheel base I could
make. To hold the car down, I use a roll of coins and run it between two
engines. This version had problems clearing crossovers, which I thought was due
to the erasers. I eventually figured out that the 2x8 plate on the bottom was
catching and redesigned the car to eliminate this problem. Version 1.1 is shown
in tc07-tc10. I’ve added a rubber band to keep the coins on and a shield to keep
the band from rubbing against the top of the slider. The old erasers were
getting rather dirty so I replaced them. The old ones are shown in some of the
pictures to give you an idea of the carving. Takes a bit of trial and error to
get them the right shape and you waste a lot of eraser in the process.
Now this car can go round and round without hitting any of the track. But one
thing that I took out in the revision were the small rubber bands pulling the
erasers outward. I think that was a mistake and they need to be added back in.

Still, I’d prefer to have something that doesn’t require the hand shaping of the
erasers. So that led to version 2.0, which is built in yellow. This car is
designed to clean only one rail at a time. It has the eraser taped to an
inverted slope to ensure that it contacts with the inside corner of the rail.
Again I employ a simple slider to allow it to handle curves. This time using a
rubberband to apply pressure since I can’t rely on the other rail. The good news
is that it works like gangbusters. So far it only takes two passes on each rail
to clean the track. The bad news is that although I had hoped that it would make
it over switches and crossovers, it doesn’t. So I still need to get in and do
some hand erasing (but it looks like only two passes works by hand as well).

A couple of other stupid cleaning tricks I’ve picked up. First, just letting a
motor or engine run around the track at the lowest setting on the transformer is
a great way to find the dirty spots. Second, the headlights on the engines also
give an indication when you hit dirty track. Even if the engine rolls through,
the light will flicker. Which is why I use a pair of engines (with working
headlights) back to back as in the photos.

Comments are welcome,
Enjoy,
Benn
Full Gallery
|
|
Message has 2 Replies:
 | | Re: Track cleaners
|
| (...) Neat cleaners! I've found that a single motor run around the track on full power for 10 mins or so is generally enough to get smooth running. But with worries about greenhouse gas emissions, I've been thinking about doing something that uses (...) (19 years ago, 8-Mar-07, to lugnet.trains, FTX)
|  | | Re: Track cleaners
|
| Erasers? Now I know what I should use to clean my tracks. Also, thanks for pointing out that the power comes from the sides and not the top; I would have been cleaning the wrong area. (19 years ago, 9-Mar-07, to lugnet.trains, FTX)
|
4 Messages in This Thread:
  
    
- Entire Thread on One Page:
- Nested:
All | Brief | Compact | Dots
Linear:
All | Brief | Compact
|
|
|
|