 | | | | | | |
| |

|
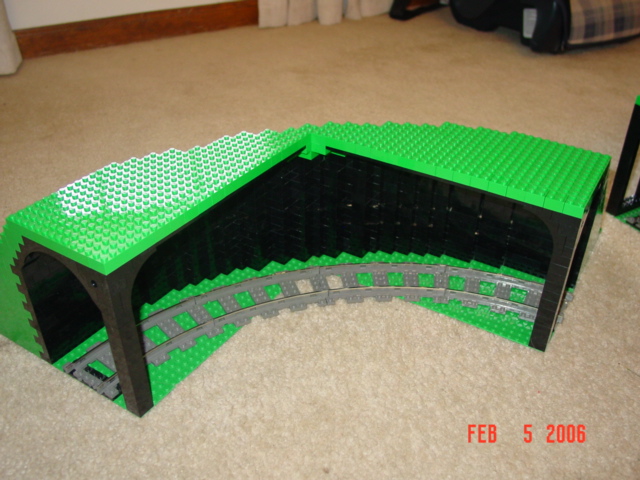
COLTC, the Central Ohio LEGO Train Club, has come up with a modular hill
standard. The goal of this standard was to provide more height-variations into
layouts, and increase the number of running trains.
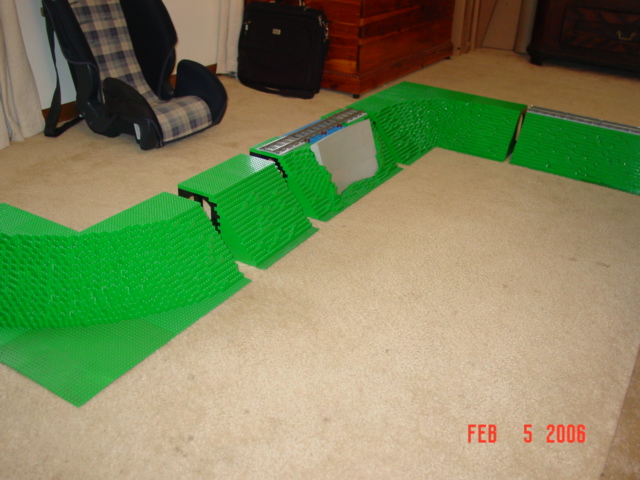
There are a variety of ways these modules can be used. On completely flat
layouts, they can be used at the inside of the layout, either as a section, or
as a full closed circuit. Trains can run on top, but also inside the hills. Make
an end-cap module, and the train comes out a tunnel, running on the layout for a
bit, and elsewhere dive back in. One could run the train in a flat section
outside, and hide it in another section.
On layouts that have different table levels, they can form transitions between
the levels. The standard (see below), is equal to the height difference of our
adjustable tables. The backsides of hte modules are uniform, so if visitors look
from the back-side, it will look nice as well.
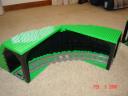
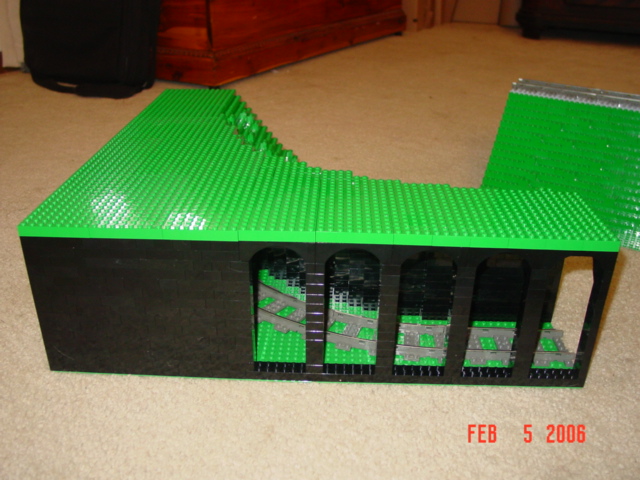
The standard:
Sections are build on 32x32 baseplates. Corners consist of 3 baseplates in an
L-shpe, forming either an inside or outside corner (see folder for examples).
Other modules are full multiples of a 32x32 baseplate.
Height: modules are 16 bricks tall, measured form top of baseplate to top green
level. If a track is on top, there is an additional plate between track and
green. Use a light bley plate, 10-wide, so it looks like gravel ballast. The
plate also stabilizes the top brick level.
http://www.brickshelf.com/gallery/brickbuy/COLTChill/coltchill04.jpg
Side view. On the right, 1 row of 2xX black bricks. On the left, keep 3 studs
free. For each level, decrease the hill by 1 brick (on average), so on top the
hill is 14 bricks wide. Train track is elevated by 1 plate, and starts 4 studs
from the side. The back-wall is solid black, 2 studs open between wall and
track. At level 14 there is a technik bricks w. hole, so modules can be
connected. The track inside will connect the modules on the bottom.
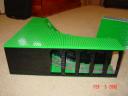
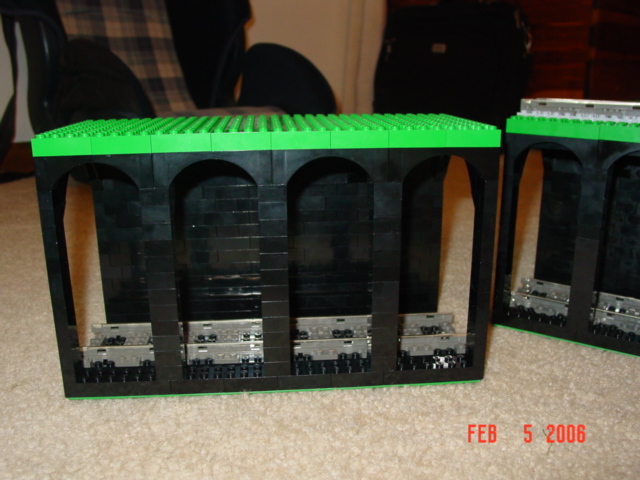
http://www.brickshelf.com/gallery/brickbuy/COLTChill/coltchill05.jpg
Back view. Black 2x2 pillars, with 1x8x2 arches. form each pillar, a 1x12x3 arch
connects to the back wall. top level is all green.
Modules can be placed back-to-back, as nothing sticks out, forming a solid hill.
Inside, it is best to make them pretty solid, so the can be transported in a
trailer, duplo and junk bricks work just fine.
Key parts needed for a single baseplate module:
5 1x12x3 arches black, 4 1x8x2 arch black, 1 baseplate, lots of green and black
2xX bricks. Top level is best to use some large green bricks (8x16) Some black
inverted 45 degree slopes: 4 x 1x2 and 6 x 2x2. Plates for under train track.
Modules can be plain (allowing for houses etc to be put in front of them, or can
be whatever. Also, only the sides need to adhere the the standard, the module
can go in and out in the middle, as long as it is back to the standard where it
connect to other modules. It can also be used for harbor scenes, so trans run
behing concrete walls, and/or on top. They can be build relatively fast as well,
a plain 1 baseplate module can be build in ~20 minutes when you have all the
parts at hand.
I’m sure I forgot to mention things, feel free to ask/add.
Have fun!
on behalf of COLTC,
Paul Janssen
| | | | | | | | | | | | | | | |
I love it! couldn’t have posted this at any better time! I have just recently
have been trying to figure out my train/town layout and I dont have much room to
work with and ive been thinking of a way to add multiple trains to my already
cramped town/train layout. I have about a (3 baseplate) by (16 base plate)
layout and needed to figure a way to get more trains running. I was thinking of
a way to have a train run over another one by means of a hill but Yours works so
much better than my idea. I’ll see if it will work out for my layout. :) very
nice work.
-FLIP-
| | | | | | | | | | | | | | | | | |
Rock on guys, this is awesome!
I’m definitely gonna try to build some for Michiana-LUG.
-Stefan-
| | | | | | | | | | | | | | | | | |
In lugnet.trains, Paul Janssen wrote:
| |
COLTC, the Central Ohio LEGO Train Club, has come up with a modular hill
standard. The goal of this standard was to provide more height-variations
into layouts, and increase the number of running trains.
There are a variety of ways these modules can be used. On completely flat
layouts, they can be used at the inside of the layout, either as a section,
or as a full closed circuit. Trains can run on top, but also inside the
hills. Make an end-cap module, and the train comes out a tunnel, running on
the layout for a bit, and elsewhere dive back in. One could run the train in
a flat section outside, and hide it in another section.
On layouts that have different table levels, they can form transitions
between the levels. The standard (see below), is equal to the height
difference of our adjustable tables. The backsides of hte modules are
uniform, so if visitors look from the back-side, it will look nice as well.
The standard:
Sections are build on 32x32 baseplates. Corners consist of 3 baseplates in an
L-shpe, forming either an inside or outside corner (see folder for examples).
Other modules are full multiples of a 32x32 baseplate.
Height: modules are 16 bricks tall, measured form top of baseplate to top
green level. If a track is on top, there is an additional plate between track
and green. Use a light bley plate, 10-wide, so it looks like gravel ballast.
The plate also stabilizes the top brick level.
|
Snipped
| |
http://www.brickshelf.com/gallery/brickbuy/COLTChill/coltchill05.jpg
Back view. Black 2x2 pillars, with 1x8x2 arches. form each pillar, a 1x12x3
arch connects to the back wall. top level is all green.
Modules can be placed back-to-back, as nothing sticks out, forming a solid
hill.
Inside, it is best to make them pretty solid, so the can be transported in a
trailer, duplo and junk bricks work just fine.
Key parts needed for a single baseplate module:
5 1x12x3 arches black, 4 1x8x2 arch black, 1 baseplate, lots of green and
black 2xX bricks. Top level is best to use some large green bricks (8x16)
Some black inverted 45 degree slopes: 4 x 1x2 and 6 x 2x2. Plates for under
train track.
Modules can be plain (allowing for houses etc to be put in front of them, or
can be whatever. Also, only the sides need to adhere the the standard, the
module can go in and out in the middle, as long as it is back to the standard
where it connect to other modules. It can also be used for harbor scenes, so
trans run behing concrete walls, and/or on top. They can be build relatively
fast as well, a plain 1 baseplate module can be build in ~20 minutes when you
have all the parts at hand.
|
Paul,
how thick are you tables? We use mudular tables that can be adusted in hieght
and stacked apone each other to acheive some vertical change. But our tables
are 6 brick thick. To allow a train to run under a stacked table we have to set
it at +20 bricks higher then surrounding tables to allow a 14 brick clearance
below. I consider this a bit tall for many situations.
I like what you’ve done, but it looks like any stacked structure adjacent to a
hill modual will need to be a maximum of 2 brick thick. ~3/4 inch thick. Any
thoughts?
Mat
| | | | | | | | | | | | | | | | | | | | |
In lugnet.trains, Mathew Clayson wrote:
| |
how thick are you tables? We use mudular tables that can be adusted in
hieght and stacked apone each other to acheive some vertical change. But
our tables
are 6 brick thick. To allow a train to run under a stacked table we have to
set it at +20 bricks higher then surrounding tables to allow a 14 brick
clearance below. I consider this a bit tall for many situations.
I like what you’ve done, but it looks like any stacked structure adjacent to
a hill modual will need to be a maximum of 2 brick thick. ~3/4 inch thick.
Any thoughts?
Mat
|
Our tables are just over 4, but well under 5 bricks thick. We do not necessarily
plan to run them under tables, it is mainly for on the tables, to give the
layout a more real feel. In populated areas, trains often run elevated, so city
streets can go under the track with rather simple tunnels. However, we also plan
to use them for ramping to lower levels. In fact, at our last show, after I made
and showed a test model at the show before that, someone else also had already
build modules, and on the spot we added them to the layout, see here:
http://www.brickshelf.com/cgi-bin/gallery.cgi?i=1578268
At our next show, GTE Cincinnati, we’ll have more modules, and will run them
mainly on our regular level tables.
Paul
| | | | | | | | | | | | | | | | | |
In lugnet.trains, Paul Janssen wrote:
| |
COLTC, the Central Ohio LEGO Train Club, has come up with a modular hill
standard. The goal of this standard was to provide more height-variations
into layouts, and increase the number of running trains.
I’m sure I forgot to mention things, feel free to ask/add.
Have fun!
on behalf of COLTC,
Paul Janssen
|
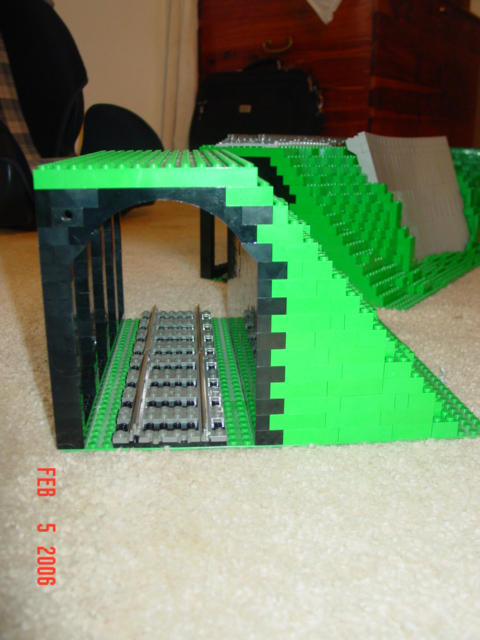
Awesome. I like the way this works, but I have one question. I am probably
just confused but...
when this:
connects to this:
as in this:
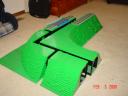
doesn’t the train in the concave tunnel (left side of picture) hit the wall of
the convex tunnel (right side of picture) ?
Just wondering how it all works in there!
-Alfred
| | | | | | | | | | | | | | | | |
In lugnet.trains, Alfred Speredelozzi wrote:
| |
doesn’t the train in the concave tunnel (left side of picture) hit the wall
of the convex tunnel (right side of picture) ?
Just wondering how it all works in there!
-Alfred
|
Yes, you are right. If we keep the black wall there, it would hit. Luckily, we
can take enough of a cormer out the black wall to make it work, but indeed the
two examples would conflict. In my second outer cruve, I have a block in the
corner that is removable, ~10 x 10 bricks in a triangular shape. It work OK
then. We are just starting with this, but with the ease at which you can build
there, we’re getting more modules quickly, and at one point may use them in the
back-to-back configuration. At the next show, we will mainly use them on top of
the tables, around the inner parameter.
Paul
| | | | | | |
